Showing posts with label Garden Enclosure. Show all posts

Tuesday, June 28, 2022

Garden Enclosure Repairs

 I finally got at the broken garden enclosure PVC/conduit pipe frame the other day.  It was harder than I expected.  The problem with re-attaching 10' pipes is that you really need to be at both ends at once, and my reach doesn't go that far.

So, I had to make supports at one end to attach the other.  2 ladders involved.  And the far end kept slipping off the support.  It was sort of maddening, and a few times the pipes just fell on me.  But when things fall, you just pick them up and try again.  

What do you do then?  Try again.

I didn't want to use PVC cement too often.  Friction holds them pretty well and allows pulling them apart again if required.  But many of the connections were broken enough to really require cementing.  That in itself was awkward.  The cement comes in a can with a built-in brush.  But using too much melts the PVC.  So you have to wipe the brush almost clean.

Standing on a stepladder, holding the PVC pipes generally in place, and then wiping the cement brush around the PVC pipes is not easy.  But all you have to do is succeed once for each one and I managed.  

It went from...


There are some more connections to replace at the sides, but the center one was the hardest and most important.  There is only so much you can do in one day.  

I have to mention that it took more than 2 hands.  Sometimes people don't think about other parts of their bodies.  I supported PVC tubes on my shoulders, lifted chicken wire with my head, and even stuck one PVC tube supported with my suspenders at one point.  Whatever works, LOL!

Next to do, the PVC sides and the chicken wire top...


Friday, June 24, 2022

A Day Of Small Tasks

Yesterday my lower back wasn't bothering me and  my right knee wasn't feeling stiff, so I spent the day doing constant but light work.  Well, I didn't want to stress my back of knee (give them another day of rest).  It was mostly clean-up stuff like collecting broken 6-packs of seedling planting pots, slow-speed kitchen and bathroom cleaning, watering houseplants, gathering up scattered cat toys, etc.  It is good for the body to just stay mildly active sometimes.  

But I did get a few more serious  things taken care of:

1.  One of the more important things was to straight the bent electrical conduit pipes that fit inside the PVC tubes for the frame of my garden enclosure.  That may seem like serious work, but it is more tedious than physically hard.  It is most just getting some leverage.

I stuck one end of the metal conduit (which is thin compared to real iron pipe though not exactly flexible) under the trail hitch of the riding lawn mower and set a cinder block a few feet out.  Mild body weight was enough to bend part of it straighter again.  Then turned the pipe around and did it again.  Repeated that for the 4 bent conduit pipes.  Then moved the cinder block a little further away and did the middle part.  

They aren't perfect, but they are "straight enough".  They are just there to keep the 10' lengths of PVC tube from sagging.  I had to use PVC for the framing because the connections were complex at spots.  PVC has more connection options than electrical metal conduit (like this)...

1" White 5-Way Furniture Grade PVC Fitting

The image is upside down to show all the connections.  The top one actually is used pointing down to attach a support pole to the ground.  The others hold ceiling poles to support the chicken wire covering the top of the enclosure.  

2.  Then I had to figure out what broken PVC and connecters I needed to replace.  To my relief, I only need 3 straight-line connectors and some new PVC cement and 3' of straight PVC tube.  The parts broke at angles that can be cemented back into place.  

Then I can roll the chicken wire back over the top and sides.  Actually, that will be harder than it sounds.  First, vines have grown up the sides and connected in fallen chicken wire and they all need to bu pruned away a few inches at a time.  I've done some of it, but it is slow work and I'll leave that for next week.

Second, part of the reason the top chicken wire collapsed was that the stuff is 4' wide, so there are 5 strips of it over the tops and sides.  I had clips holding them together, but they were weak.  They really need to be "sewn" together with aluminum wire.  I didn't do that when I built the enclosure and meant to every year after.  This time I will.

3.  I've been cutting apart old overgrown shrubs along the fence where I have a long 50' straight flowerbed of perennials and The Mews Memorial Garden.  I don't do too much at a time.  It takes a lot of twisting and bending, and too much of that causes muscle cramps and stiffness.  But I have the trailer stacked about as high as I can safely tie down, so I will be off to the County Recycling Center some Saturday soon.  

They pile up yard debris to make mulch/compost.  If I go on a Saturday, I can get the trailer loaded with it for free, and I have plenty of places to use it.  I could go there any Saturday, but I feel slightly guilty if I'm not providing fresh material.  LOL!

4.  Planted 2 cherry tomatoes in a large pot on the deck.  Well, 2 grew in one small pot, so rather than damage their roots separating them, I just planted them as one.  They are draped over the lower rails.  To ease the bending, I stuck foam tubing on the rail boards. The stuff is actually insulation for putting around hot water pipes to reduce heat loss, but I have a talent for "repurposing" leftover stuff.  I try to help my plants as much as possible!

5.  My meadow bed has wild grass growing in it, which competes with the flowers.  Since I went to a lot of effort to plan 40 seedling and transplanted 8 existing Black-eyed Susans there a couple weeks ago (and they seem to be getting established - at least none have died), I wanted to think of a way to help them a bit.  Well, I collect a lot of thin cardboard from cat food trays from the stores.  So I cut them into 10" squares.  I'll cut a 2" hole in the center and a slot to one edge.  Then I'll slip them around the seedlings to smother weeds/grass.

6.  Mowed the daffodil bed.  In previous years, weeds and grass grew over the Summer.  I've tried covering the area with black plastic sheeting for several years (after the daffs died back), but it collected rainwater and mosquitos bred there so I kept having to poke holes for drainage.  It finally got too brittle from U/V rays and ripped apart.  This time, I'll cover it with black water-permeable fabric.  It is more U/V resistant and lets water sink through.  But that's for "next week" too.

  -------

After that, it was making dinner, watching The January 6th Insurrection House Committee Report summary/analysis on MSNBC, and processing some pics off the camera.  

Monday, June 20, 2022

Fathers Day (Late), But Other Stuff

First, Happy day-late Fathers Day to all Dads out there.  Since I am not one myself (unless you count The Mews), and my own Dad is deceased,I tend to forget it most years.  I mentioned it on The Mews blog around mid-day (when I finally realized it), but didn't post here then because I was busy.

Second, the "busy" was cooking chicken thighs in the smoker.  It was a total coincidence.  Last time I used it was late October.  Well, I've been learning to use the air-fryer since then.  But I bought 10 chicken thighs Friday, drowned them in dry rub overnight Sat/Sun and started the smoker up at Noon.  Naturally, a stiff wind sprung up after I started, so I had to spend more time than usual just making sure things were safe.

And I am safe.  Hose on and ready to use, welding gloves, long tongs, bucket of water below the incoming air vent (in case a bit of charcoal falls out through it), and the skoker is visible through the kitchen window while I am doing work inside.

Lori spent most of the time inside.  She was out when I started, but she likes to jump onto the smoker (she has never experienced it being hot).  And when she made a move on the deck rails toward it, I put her inside.  Like I said "safe".

The chicken turned out well.  I've read that all the smoke you are going to get into the meat happens in the first hour.  So I give it 2 hours and then finish it at 225F.  I can safely say you will never see me on one of the outdoor cooking contests, LOL!

Third, have had 2 minor but annoying wounds recently.  Contacted the Fry Daddy Friday night while making shrimp rolls.  It hurt at the time, but seemed to stop quickly.  Next morning, I discovered a blister the size of a grape.  Right between my right thumb and forefinger, and that was an awkward spot.  I soaked a needle in mouthwash (cheap sanitation) and popped it.  Don't go all "ick".  It is just broken cell contents.  

I dried it with a tissue, dapped some Triple Ointment on it and put a large flexible band-aid on it.  The band-aids hold against water, but not soap, so I've gone through 6 of them.  I leave it exposed when I can (heals faster), but it is a spot that gets brushed often in regular daily activities.  So it is annoying.

I also found a splinter in a finger.  Not anything important in itself, but I kept picking at it.   And when I finally got it out it wouldn't stop bleeding!  That is unusual for me.  I get a shot, they put a bandaid over it and it is clean when I take it off.  I cut a minor cut (I do live a wild life, LOL!) and a wipe ends the bleeding.  So this was odd.  So I end up with bandaids on 2 places on the same hand.  

Fourth, I have 2 digital kitchen probe thermometer/timers and 2 digital non-timing thermometers.  All of a sudden, none worked!  Three of them have batteries I can replace (love those rechargeable batteries).  One has a special battery.  I hate those round one-use batteries.  One registered the house temperature as 200F.  2 wouldn't display at all, and the last has to be tapped a few times to display.

Four all at once going bad?  That is like lottery ticket odds.  And none were especially accurate before.   I tested then all a few weeks ago (using a crushed ice/water slurry and then boiling water).  One of the digital kitchen probe thermometer/timers was 4F low and the other was 4F high.  I could deal with that putting labels on each.  

The 2 digital non-timing thermometers are more problematic.  One is WAY crazy and the other keeps changing the display 4F at a time.  The way crazy one needs the special round battery; the other uses an AAA baterry.  Replacing it didn't change anything.  Actually, I suspect the cabled probes have failed.  I'll have to see if new probes are cheaper than whole new thermometers.

Fifth, I bought an electric lawn mower a few years ago.  It was awful.  It has 2 batteries and each lasts about 5 minutes for light work.  So I bought a much better one (Ryobi self-propelled).  Each of the 2 batteries last about 30 minutes (self-propel takes energy), but it was worth it.  I only used it for trimming work.

But right after the warrantee expired, I hit something that caused the blade to stop turning.  I suppose the is a shear pin in there somewhere.  I keep planning to disassemble the blade connections and look for one, and I keep not doing it.  There is always something more urgent to do.  There is a mower repair shop nearby that mentions they repair electric mowers.  I should just bring it to them and pay to get it fixed.  I really miss the self-propelled feature (forward AND reverse).

Sixth, I got the 40 meadow flower seedlings planted days ago.  They all seem to be thriving and I can't wqait to see what they grow and bloom into.  But I strained my back and knees doing it.  Limped around for 3 days.  I'm finally feeling better today, so I guess I can go out and do something else to mess myself up again.  The garden enclosure that was damaged in heavy snow last January (oddly can't recall if that was this year or the previous) keeps calling out for attention.

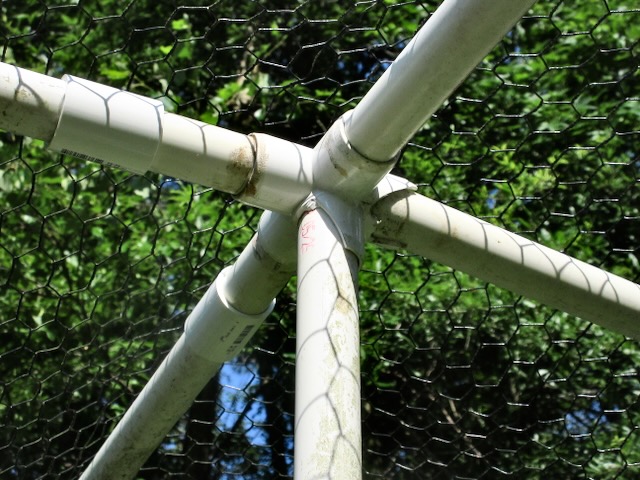
Seventh, speaking of the garden enclosure, the problem is that the electrical conduit pipe I inserted in the PVC pipe was bent and in a couple places, the PVC connections actually broke.  FYI, the metal pipe was for strength; the PVC was for the convenient complex connections not available for the metal.  

It was all my fault.  Several years ago, a snowfall bent them slightly.  But I was able to straighten them in place.  So I added temporary supports at all the half-points on the top.  They are at awkward places in the garden, so the plan was to put them up in early Winter.  I didn't last year (was it 2 years ago?).  And when the forecast was for 2" of snow one night, I didn't worry about it.  But we got 8"!  Everything bent.

I never remember to keep the camera in my pocket, so no pics of the bent pipes...  ðŸ˜ž

Well, any way, I was walking the yard and looked at the bent metal pipes and decided I was never going to fix the garden enclosure if I didn't straighten the metal conduit first.  How do that was uncertain.  But I tried sticking one end on the pipe under the shed It sits on cinder blocks).  That worked a bit but not completely because the ground was too sloped for full bending.  So I carried a cinder block to the other shed and put a pipe end under the riding mower trailer hitch and over the cinder block.  That worked.

Not that the metal conduits are as straight as when I bought them, but it was close enough.  That didn't help my back much, but now all I need is a PVC 4-way connector, 3' of PVC pipe (to replace what I had to cut off), and connectors to join the new short pieces.

I am considering buying serious black iron pipe.  A bit expensive, but snow wouldn't bend that.  I'll give the electrical conduit (with additional supports) another heavy snow before I try the black iron.

Eighth, I almost forgot about shaving my head.  Meagan asked why.  Well, several reasons.  I got tired of trimming my hair myself.  And I don't like going to the barber recently.  There are always a few people who just won't wear masks.  The last visit (last Fall), there was a guy coughing and maskless and I asked him about a mask.  

He was an anti-vaxxer.  Said he was a professional "pharmacueticalist" and that zinc and Vitamin C worked fine.  I said I doubted that, in the face of all the professional research and he got angry.  So I just said "no fight here" because he was leaving.  But I kept my mask on for a while until I had to take it off so the barber could shave around my ears.

The barber is a nice guy, but he isn't going to argue with anyone.  So I haven't been back since.  And so, I decided to just eliminate the need to visit at all.  Shaved my head...

Not like I still had a lot.  I was bald on the top anyway.  Not much to lose.


That odd thing is that my baseballs hats feel odd on my scalp.  I tightened each a notch and that helped them fit better.


Wednesday, May 18, 2022

Dead Trees, Part 2

So it is yesterday evening  and I'm looking at this 12' tree across my driveway.  I can't get the car out directly.  The tree still has intact 3" roots in the ground.  But if I can cut it it 3 places it is probably small enough parts to at least drag off the driveway.  I tried the electric chain saw.  It was like using a butter knife.  

I forgot to take a picture...

So I went back inside see if I had a new blade.  I did, but I just didn't feel up to all the replacement adjustment and I didn't really have to drive anywhere the next day.  So I decided to tackle that in the morning.

I considered using the car to haul it off the driveway.  It would have meant backing out and then pushing between the tree and a shrub on a soggy lawn, but I can repair lawn damage, so I was getting my strongest rope and putting the trailer hitch on the Forester.  

As I was collecting that stuff, I noticed my basement cell phone was blinking.  That means a VM.  Good neighbors Deb and John asked if I was OK.  Which, since I wasn't under the tree, meant "did I need some help".  Yes I did!

So I called.  Basically, to say I could probably get the tree cut apart when I replaced the chain saw blade, but if they could help me swivel the tree off the driveway "I sure would appreciate it".

I should explain that I'm not very good at asking for help.  I'm helpful when asked, but I've lived alone so long, I expect to solve problems on my own.  That's not a good thing, but it is a habit of many years just doing everything myself having little other choice.  Contractors when necessary and I hate it.  But I'm not 30 anymore.  Or 50.  Age is catching up with me.  

Deb and John are very interesting people.  Deb works in conflict management online and is strongly dedicated to helping others.  When we talk as neighbors, she will not leave without a hug.  John seems to be an original "Jack Of All Trades".  He knows enough about "everything" and he has "stuff.  And he matches up with Deb perfectly.  He seems to like being the "ultimate helpful guy".  He has stuff that amazes me.

How did I get so lucky to have them for neighbors?

So, I called them asking for just enough help to drag the tree off the driveway.  Well, that wasn't enough for them!  They looked at the fallen tree, decided the roots had to be cut but he had a good chain saw to cut the trunk off near the ground.  I wasn't sure how much good that was going to do.  But he went back to the house and returned with a chain saw and his ATV.

I knew he had one, but I didn't realize how RUGGED those things were up close.  He cut the trunk from the stump and said he would haul the tree into the woods next to the house.  The tree was heavy, but he said it wouldn't be a problem.  He was right.

After he chain-sawed the trunk loose he brought out a 1" thick rope.  I need one that strong...  Maybe even a chain.  In fact, I want a couple of heavy-duty pulleys, but that is a diffent subject.

I'm not inept.  I was a Boy Scout for 6 years and camped out for 6 weeks once.  I know knots, can cook over an open fire, and I build a dining table in camp out of saplings cuttings once, lashed with vines.

His rope had a loop at one end and was melted (for unfraying) at the other (I do the same).  I asked John if he wanted the loop the ATV end or round the trunk.  And whether he wanted a timberline knot on the trunk.  He said the loop around the trunk was fine.  He tied a perfect double clove knot to his ATV.

I did mention that the sharp edge of that was cutting the rope  and that the round trailer hitch would be easier on it.  He changed it.

And AWAY went the tree!   I don't know how you can drag a 10" wide tree through heavy woods, but HE did, LOL!  And then he went and helped a different neighbor with a smaller one.  

Saved me at least 4 hours of work.  I HAVE to make a banana cake for them...  And they are starting their first garden (in deer territory) and want to protect it.  I know THAT stuff.  So maybe I can repay their help in that way.


Wednesday, February 12, 2020

Computer Problems 3

I'm not winning...  I got the NEW computer to load my Photo Library from the OLD one and thought my problems with photos was solved.  Well, sort of.  I loaded the files, but most were duplicated 2-6 times.  So I found  free program that was described as safe and effective on several Mac sites.  One thing ot does is remove duplicate files and you can specify which folders to search.

So I did that.  You click on "scan".  After it scans all the files in the folder, it compares them all to find the duplicates.  Then you click "remove" and hope...

It found about the right size of files (90GB).  It set about comparing the files. After several hours, it offerred "remove".  I clicked. After another several hours, It removed about 25% of them.  Argh!

I'm trying it again, because I still had the New one connected to the OLD one with a usb cable, and maybe that messed it up.

This is almost becoming a game.  Sort of like Tron or one of those old "quest" games where you form a team of characters and search a castle solving problems to get at the treasure at the end.  Well, better to view it that way than go running down the street screaming in frustration.  Though I have often screamed "WHAT NOW?" after some failures, I maintain a determined (and rather surprisingly) good outlook.

My entire Govt career was FIGURING OUT THINGS and SOLVING PROBLEMS, and to be honest, I kind of miss that.  So the game now is "Cavebear vs The Evil Computer".

The NEW computer doesn't have much on it yet (and the OLD one is actually working), so if it chugs away day and night I'm not really losing any functionality.

  ---------------------

But there is more to life than computers (no REALLY, it's true).  So in that spirit, here is my real life To Do list for the next few days:

1.  Feed the emerging spring bulbs with slow-release fertilizer to improve flower growth next month and bulb  regrowth afterwards.

2.  Lay down that packing paper shippers use as cushioning between the garden beds.  I save it.  I must have 100s of yards of it neatly smoothed and folded.  Then I'll cover it with large wood chip mulch.  That should kill the weeds.

3.  Three years ago, we had heavy snow.  There were enough fallen leaves on the top of my chicken wire garden enclosure for the snow to accumulate.  The weight bent the PVC-covered steel pipes I used.

It took a week to pull each one out of the sockets, straighten then, and replace them.  So I bought more steel poles to support all the centers of the existing pipes.  I need to set them up.

4.  I planted a lot of pansies last Fall, but I had some left over and put them in planter pots.  Ivident;y that doesn't protect them from the freezing weather enough (they and small and withery).  So I might as well bury the pots in the garden soil for insulation.


5.  I have briars growing in the front yard landscape bed.  Bad look.  So I better dig them out before they spread .  It rained a lot a few days ago, so the soil is workable.

Cheers...


Thursday, May 16, 2019

Been Busy

I haven't posted here in a while.  Not that I didn't have things to mention, just didn't do it.  I've been busy...

On the outside (and some of this may not be new but I'm too lazy to check, so forgive me):

1.  Transplanted 4 specimen saplings (2 dogwoods  and 2 sourwood) in the cleared area where the wild blackberries, virginia creeper vines and wild grape vines used to rule.  The saplings will stay about 20' tall and NOT shade the garden like the trees I removed did).

2.  Straightened and re-attached bent PVC tubes (with metal pipe inside) on the garden enclosure (I built it to keep squirrels, groundhogs, rabbits, and weird birds out.  Pollinating insects get through the chicken wire just fine.

3.  Been carefully spraying individual wild blackberries and vines to kill them.  New stuff is growing now that the blackberries aren't shading them, but a string trimmer cuts them down well.  When the sapling start to grow they will cast enough shade below them to prevent new growth.

4.  I used to have a compost bin next to the older shed.  I removed it a few years ago and built another one that is better.  But there was a foot of rich soil left over on the old site.  I moved most of it to the new garden beds.

5.  Years ago, I ordered a dozen seedlings of a nice perennial flower with purple leaves.  They sent me the wrong plant.  But as it also had purple leaves I didn't realize the error.  The wrong plant is VERY INVASIVE. (lychimastria 'Firecracker' I think).    I spent 2 days pulling up all that I could.  I'll have to do that several times, but progress is progress.  And there are some volunteers a 100 yard away.

6.  I have 2 toolsheds.  One I built when I moved here 32 years ago and one I had a contractor build (larger, with a cement floor, and a garage door).  I reorganized everything in both.  Now the equipment I seldom use is packed tightly in the old one and the stuff I use often is in the new one.  And I added shelves to the old one for odd stuff that was clutterring up the basement.

7.  I spread seeds for the meadow garden bed.  Some were saved seeds from last years plants and some were new from a packet.  Supposedly, they are are surface-germinators (well, like a natural meadow WOULD be).  I will be interested in seeing if the bed flowers better this year.

8.  The hummer/butterfly/bee bed was a failure last year.  So I tilled the whole area and spread a new batch of hummer/butterfly/bee seeds.  I also have a few dozen seedlings of the same sort to plant in there.  The seedlings will give the bed a head-start.

9.  I planted 15 annual sunflower seedlings in the meadow bed today.  They were weak last year when I did the same, so this year I planted them around a cylinder of mesh wire (anchored to a stake) and clipped them all the the cylinder.  That gives them 2' of support.  Strained my back doing all that bending-over...  I had 1 left over, so I planted it right behind the mailbox.  Maybe my mailperson will enjoy seeing it.

10.  I've been interested in grafted heirloom tomatoes for several years.  My efforts have always failed.  So this year, I bought 3 grafted tomatoes.  With shipping and taxes, $12 each.  OUCH.  But I really need to know if the effort is worth it.   I planted 2 today.  I have 6 graft attempts I did myself, but I won't know if they worked for a week.  At least THIS time, they are still alive after a week.  And I have 6 more home-grown ungrafted heirloom seedlings as back-up...

11.  I'm fighting some invasive plants.  I get poison ivy coming in from 3 neighbors.  They don't care about it because they don't go into the corners of their yards.  And there has been a vine from deliberate plantings of a 4th yard (2 residents ago).  I finally figured out it is Vinca Major.  It is almost impossible to kill.  My veggie garden is organic.  But I'll use napalm on the Vinca and poison ivy if I have to.  By "napalm" I mean Roundup.  I hate the herbicide, but the vines have taken over half my fence flowerbed.  I'm desperate.

12.  The daffodil/tulip/hyacinth bed is fading, so I gave them a good dose of organic fertilizer suited for bulbs.  That should help them improve for next year.  When the leaves turn brown I will cover the whole bed with landscape fabric to smother the weeds.  Next February, I will remove it.  I tried using regular black plastic last year but all it did was collect rainwater in low spots and Asian Tiger Mosquitos developed there.  So I was constantly going around and poking holes in the plastic to drain rainfall.  The landscape fabric is permeable, so it won't hold puddles.

13.  I planted corn in a bed under the roof edge.  It doesn't get much natural rain, so I'll have to water it regularly all Summer.  But it is rich soil and safe from wind, so the bi-color corn will like it.  I plant a block of 9 corns (3x3, fewer gets poor kernal development) and the bed is 4 blocks long, so I'll plant a new block every 2 weeks for continued harvest.

14.  I pruned my front yard saucer magnolia tree.  For some reason, the backyard one grows just fine with minimal pruning in Winter, but the front yard one grows oddly with lots of suckers and internal shoots.  By the time I was done, half the tree was gone, but it looked a lot better.  With careful future pruning, it should get more balanced.

15.  When I originally cleared the backyard back in the 90s, I discovered that I had a wild rose growing there.  It has small white flowers and a nice scent, and I think it is a 'Hawthorn Rose'.  Unfortunately, it looks just like a wild blackberry, and was overgrown with them among its canes.  I was sad to mow it down with the new DR Brushcutter I bought last year.  But I HAD to get rid of the wild blackberries.

Now, the main area in the backyard is cleared of wild blackberries, but there are some that spread to odd spots and I have to dig them out.

So when I saw white flowers suddenly blooming among a Burning Bush I love, I was depressed at the effort it would take to remove it.  But when I approached, there was The Scent!  The Hawthorn Rose had established itself 150' away from the original plant!

I have to remove it from the Burning Bush shrub, but I'm going to take 36 cuttings (a flat of 6-cels) and try to grow some first.  The rose never spread much from its original spot, so I'm not worried about it taking over like the blackberries did.  I can think of several spots where it would be happy (and I with it).

I think that is more than enough for today.  I still have the inside projects to discuss...


Sunday, March 24, 2019

A Hard Day

My enclosed garden structure is falling apart.

I didn't think that was possible  because the PVC  tubes were so closely bound by the chicken wire and nylon ties.

But 2 winters ago, enough large snowflakes fell on the top to bend the framework.  It was little enough so that I could ignore it intending to push them straight (there are metal pipes inside the PVC for strength), but I never got around to it.

And a 2nd pvc pipe broke and fell this past Winter. So I went out to fix it.

It was a horrible experience!  Nothing I tried, worked.  You can't be on both ends of a 10' pole at once, but I built it to begin with, so I did in a way.

This is the original framework.  PVC tubes with metal pipes inside for strength...
Not enough strength.  I covered it all with chicken wire. And some large snow collected on it.  I didn't expect THAT.  It bent everything!

One pole just fell.  I straightened it.  And spent 3 hours trying to put it back in place... It was utterly maddening.

I THINK I have the PVC pipe with metal pipe insert cemented into place but I went nuts doing it.  I finally had to cut the chicken wire loose to allow me to get at the PVC connections to push the cemented parts together.  And finally used seriously-stretched bungee cords to keep the 2 ends tight together.

I'll see how well the bonding worked tomorrow.  I'm wondering if I have the wrong kind of cement.  I'll find out tomorrow.  If the parts aren't fused, than I need a different kind that has a primer AND cement combined.

And here I thought I was going to plant spinach, carrots, and leeks today after a small repair job...


Tuesday, April 3, 2018

That Surprising Snow

The snowfall we had here the 1st full day of Spring was surprisingly fluffy and sticky.  In fact it never occurred to me that snow wouldn't just fall right down through 1" chicken wire.  But it did.

It collected on the top of my garden enclosure, and snow can be rather heavy.  It bent some of the top frame!
Yes, it is PVC tubing...
But I set metal electrical conduit pipe inside them for strength!
And they bent anyway!   Some people told me I was over-building again, using the metal pipe inside the PVC.  Maybe I should just leave it like that as an "object lesson". 
I tried to straighten one today and the PVC broke out of the attachment.
I'm going to have to think about what to to to fix it.  I really can't just leave it like that.  It looks like a built it shoddily...

Just what I needed; unnecessary work!  Like I don't have enough to do.

Wednesday, October 19, 2016

Yardwork Again

I wasn't sure I was gong to be doing much yardwork the rest of the year.  I usually try to do at least one useful thing each day.  Sometimes I don't, but that is the goal anyway. 

So when I twisted my right knee in early April, and it was difficult to walk the first couple of weeks, I grudgingly waited for it to heal.  I do these sorts of injuries every so often but generally heal quickly enough.  I'm used to it.  You live on your own, you push yourself to do more than you should sometimes, and there is the occasional time your body says hey ease off on me a bit. 

It has happened before.  10 years ago, I casually tossed a rock at a squirrel and strained my rotator cuff and I could barely raise my arm over my shoulder for 4 months!  But it healed fine and I kind of expect that.

But this time, April rolled into May, and May into June and eventually September and it was better but not normal.  Some projects got delayed.  I had planned to repaint the bathrooms and kitchen, but crawling all around washing the walls, putting tape along all the edges and then doing the actual painting seemed too awkward.  But it could wait.

I had also planned to use my gas-powered weed-whacker with the steel cutters to eliminate the backyard brush and brambles that sprung up after I had a few trees removed  several years ago.  That didn't happen.

A few weeks ago, my right knee suddenly felt much better.  Not perfect, but good enough, and I started some minor yard projects and felt ready to do more.  I got some work done.   Mostly de-clutterring the basement the computer room, and the cat room.

And then I went and did something to the left knee.  No idea what I did.  It felt like I had banged it against a door frame, but for 2 weeks, I had 2 bad knees.  I was worried I was sufferring some serious problem (like Lyme Disease affects your joints, or longer term problems like arthritis). 

But I woke up 2 days ago and the left knee was back to normal and the right knee wasn't bad.  I could walk around pretty much normal.

So I had found a sealed bag of grass seed in the basement left over from last year .  I mowed the front yard grass very short.  Today I raked all the loose grass and dumped it where I plan to put a flowerbed island around a large rock and tree in order to smother the grass and weeds and leave some improved soil.  Then I spread the grass weeds all around.  And then I spent 90 minutes carefully spraying straight down onto the grass to beat the grass seeds onto the soil surface and give them enough water to germinate.

It is a bit late to do that.  But I had the seeds and they won't last another year.  And we are having a warm spell, so the seeds should germinate if they are still viable.  There are 2 bare spots, so I will know if they germinate.  At least that is SOMETHING done.

And both knees felt just fine after all that.  So that's good.

The next things to do are planting Daffodils in mid November, tilling some dead areas of the flowerbeds, and eliminating weeds in the paths between the framed veggie beds.  

Are you familiar with those long strips of brown paper used as packing material?  I've been saving the longest strips for several years.  The stuff comes all twisted and crinkled, but I untwist it and lay in on the basement floor and use a push broom to flatten it out.  That works very well.  Then I fold it up in 4' lengths and put a piece of plywood on it to flatten it further and keep it out of the way.  I have several hundred linear feet of it now.

It seems like great stuff to put between the framed beds, on top of weedy dead sections of the flowerbeds, and on top of all the Spring bulbs to smother weeds (with shredded bark on top).  It will probably decompose by Spring, and in not, it will certainly be easy to pull up at planting time.

It may not kill all the weeds, but it sure won't do them any good.  I am reminded of a W C Fields vaudeville joke where he says he swallowed a few moths and said he swallowed a couple of mothballs to get rid of them.  The sidekick asks if it did any good.  Fields says "well it sure couldn't have helped them any".  (Do not do this at home, mothballs are toxic).

My point is that the brown paper cover is worth trying.  If it works, GREAT!  If not, it is easy to remove and will make good compostable material after 5 months exposure to rain and melting snow all Winter and early Spring. 

Gardeners might object that  covers the soil gives voles safe space to run around under.  I did cover part of my flowerbeds with black plastic 10 years ago, and they did love it.  They ate every tulip bulb, safe from predators.  But this time, there won't be anything for them to eat.  Well, the weeds, and if they want to eat the roots of those, they are not welcome, I encourage them.  Otherwise, they don't touch Daffodils or Daylilies (toxic to mammals), the Tulips and Hyacinths are in wire cages they can't get into, and the seeds from the birdfeeder will be on top of the paper where they waill actually have trouble getting to the spilled seeds. EVIL LOL!

So I am getting into the yardwork late, but not impossibly late.  The last project, which is to plant specimen trees that won't grow tall enough to shade my garden and flowerbeds is still in reach.  By "specimen trees", I mean Korean Dogwoods, Sourwoods, Wisteria shrubs, and Star Magnolias.  Those will shade out the brush and brambles like the taller trees used to do, but not cause shade problems across the yard.

I will surround the new trees with used carpeting.  That has really worked well for me over the years.  Rain soaks right through, but weeds won't grow up through it.  And it it is usually free.  Just look for some place being renovated and ask for the old carpet.  They will usually just give it away. 

OK, I'm off to buy some specimen tree saplings...

Back, I ordered 3 Sourwood trees and 2 Korean Dogwoods.  Sourwood trees are great in Fall.  They have small grapelike clusters of yellow berries and burgundy leaves and grow to about 25'.  The Korean Dogwoods are great in Springs, don't have the same disease problems as American Dogwoods, and spread sideways.  I have one on the shady side of the house that has been happily existing for 25 years at 20 feet, and I will take some tip cuttings next June.  It has pink flowers. The dogwoods I ordered have white flowers, so that will make a nice change.


I also filled in all the screw and nail holes in the main bathroom a week ago

Thursday, June 16, 2016

The Veggie Garden

Things are going well with the veggies this year.  The garden enclosure has made a real difference!  No squirrel or groundhog as gotten at the garden, and few insect pest.  Interestingly, bees and other good bugs have had no problem. 

This is a Kohlrabi.  It is a member of the cole family (broccoli, cabbage, etc).  But it grows a swollen part in the bottom of the plant.  Here, you can see the swelling that will grow.  It will become about the size of a tennis ball.  Cole crops were bred in various locations to produce large heads (cabbage, cauliflower), open heads (broccoli), small side heads (Brussels Sprouts), and middle swollen stems (kohlrabi). 

Sometimes I try to imagine why someone decided to grow a swollen stem plant.  I can't.  But it is both "broccolish" and a bit sweet, so I try it every few years. 
These are some of the heirloom tomatoes.   This year, I have Brandywine, Cherokee Purple, Pruden's Purple, Ponderosa Pink, and Striped German.  I also have 2 hybrids of Brandywine (Garden Treasure and Garden Gem) and will see if they have the "heirloom flavor" they claim to have.  All the  plants are thriving; no signs of disease.
My first successful planting of Spinach.  I could have Spinach every night and as much as I like it, that's too much.  Next year, I will plant half the row.
The regular cole crops are doing well.  I found caterpillars on 2 plants and killed them all.  They are usually a BIG problem here, but with the garden enclosure, the cabbage moths don't find them as well.  Yay!
I have high hopes for the corn.  I'm growing 2 kinds of bi-color corn this year.  One early type and one late.  The further back 2 rows are the late ones and the 2 front are the early ones.  I will plant 2 more rows of early ones next week for succession harvesting.  At the very back are cucumbers.  They will grow faster than the corn, so they won't be shaded much.  And corn doesn't make much shade anyway.  You can't see, but there are cantaloupe melons at each end.  They will grow along the ground and shade out weeds around the corn. 
Here I have Italian flat pole beans.  The 1st planting only had 3 beans grow.  A 2nd planting got 100% germination.  I LOVE Italian flat beans.  And you can see carrots growing in the corner.
I took pictures of the Zucchini  and Bell Peppers and Honeydew melon seedlings, but they didn't come out well.  But they are there and growing.

Believe it or not, next week starts the Fall plantings!  I have left a few empty spaces for Brussels Sprouts and Garlic.  And I will continue to plant lettuces and radishes to the end of September as I harvest them in their squares. 


Wednesday, June 15, 2016

Varmint Wars

I was dismayed to step out on the deck yesterday and see a brown shape near my garden.  I initially thought I had left a log out there, but I gave a shrill whistle and it turned to look.  A groundhog!  And it was checking out my garden enclosure.

Well, I sort of trust the garden enclosure.  Its chicken wire around all the sides and top, and there is even 2' of chicken wire off the sides and onto the lawn to discourage exactly that varmint digging under the enclosure.

But I'd rather not have a groundhog beat my defenses one day when my melons are ALMOST ripe.  So I set my live have-a-hart cage baited with a melon slice and strawberry trimmings.  Caught it that night!

I dispatched it humanely and swiftly as possible.  It is now returned to the environment...  I found the burrow and dumped a load of cat poop in there.  There is probably another opening to the burrow, but it seems to have pulled the boards off around the bottom of my raised toolshed and I can't get at anything under the toolshed easily.

So this time I will place cinderblocks against the boards and hope that discourages any new groundhog visitors looking for new homes.

I guard my garden zealously!

Tuesday, June 14, 2016

Garden Harvest

I got my first garden harvest of the year today.  Radishes, Spinach, and Snow Peas!  I ate the radishes before I thought to take a picture.  They were outstandingly good.  Both spicy and slighty sweet.

The spinach was great.  I had never grown it before, reading that it was hard to grow.  But I planted 6 square feet of it and nearly every seed germinated.  I harvested the largest leaves recently.

Spinach is an odd crop.  You cook it and it wilts away into almost nothing.  A basketful of spinach is a small bowlful when cooked.  But oh goodness it is tastier than anything I have bought in the bags in the grocery store!

A bit of olive oil or bacon fat in a large pot, heated moderately, spinach tossed in, covered 1 minute, tossed and cooked 2 minutes, served with a dab of butter and a dash of lemon juice and it is wonderous!

Here is the raw stuff...
And my late-planted snow peas are fruiting!  Picked while small and slim, they are so sweet and tasty!  The grocery store ones are too mature; tough and with strings on the sides.  Yeah, I know how to peel of the strings of mature ones (grab the lower end in one hand and press a thumbnail into it, pulling gently up toward the front).  But my new ones don't have strings and taste better.  
My chinese cabbage is next to harvest.  Plus more radishes.

My garden enclosure is working perfectly.  No squirrel or groundhog attacks.  The corn is growing great, I have tomatoes undisturbed, melons and squashes doing well, cole crops (broccoli, cauliflower, cabbage) of many kinds, and many small crops like carrots, chard, beets, carrots, etc.  This is going to be a GREAT harvesting season!

I have high hopes for the tomatoes.  I plant heirloom varieties because they just taste so good.  So far they seem healthier than in past years.  And I have 3 plants of 2 Brandywine hybrids developed by the University of Florida that were bred for flavor and disease resistance instead of shipping durability.  One is a large main season tomato called Garden Treasure and one is a "salad" tomato called Garden Gem.

"Supposedly", they have an heirloom taste with good disease resistance.  We'll see.  This is a hard area for heirloom tomatoes.  The humidity is very high in Summer, which encourages fungal diseases, and the Winters don't get cold enough to kill off soil parasites (nematodes, etc).

Meanwhile, I have the heirlooms Brandywine, Cherokee Purple, Prudens Purple, Striped German, and Ponderosa Pink.  And for backup, I have a hybrid called Big Beef which is the best-tasting hybrid I know of.

And I also have my upside-down growing cherry tomato plant.  I grow it out the bottom of a 5 gallon pot hanging 10" above ground.  More about that some other day.  I just hung it yesterday, so there isn't much to show other than a scrawny seedling confused about which way is up.

Sunday, April 17, 2016

Started Planting Veggies

HURRAY!  Got some plants in the ground in the garden, and some seeds too.  The transplants were broccoli/cauliflower/cabbage.  The direct seeds were radishes, spinach, carrots, parsnips, scallions, kohlrabi, and

Finally.  It seems that 1st planting day will never come.   Since this year is the first for the new raised bed garden in full planting (I was late starting last year because the enclosure wasn't complete), I wasn't sure where to plant stuff.  So last week was planning.

Nothing fancy, but I tend to generally use "square foot gardening".  I don't do it precisely, and I have to say that 4' wide beds are a bit awkward to reach into, but I do it as a general rule.  Not being sure how much space I had, I scribbled on paper for a while.

Largest stuff first.  The 22" diameter tomato cages take 4 sq ft and I love heirloom tomatoes above all other garden crops.  I set space for 6 cages (I have a place for 6 other cages outside the enclosure).  And no, 12 tomato plants are not too many for me.  Heirlooms produce fewer fruits (but are worth it).

Then comes the trellises of cucumbers and flat Italian beans, that took 11 sq feet at the ends of the beds.  And a few sq ft each for 2 bush squashes (one green, one yellow).

Then I want space for melons.  I love honeydew and cantaloupe melons, and I have some dwarf watermelons started.  But the space they take is not for them alone.  They like to grow on the ground, so there is some space for upright plants that will die before the melons grow fully.  That means broccoli, cabbage, and cauliflower can be inter-planted in 2 beds where the honeydew and cantaloupe melons will grow later.

And then there is the bi-color corn.  I love that stuff (sweet AND "corny").    I'm taking a chance on growing small watermelons and corn in the same bed.  The idea is that the corn will grow high and the watermelons will grow low (and the watermelon won't try to climb the corn stalks).

The American Indians (especially the Iriquois) used to grow The Three Sisters.  Squash on the ground to shade out the weeds, corn to grow high, and pole beans to climb the cornstalks.  I've tried that a couple times and it didn't work.  The bi-color corn I grow has smaller stalks and the beans overwhelm them.  So the beans are separate this year.  The melons want to spread out over my raised beds, but I am going to keeps the vines corralled in the raised bed with tent pegs.  I hope that works.

But what about all the small crops?  Well, after all the space for the stuff above was accounted for , I had about 40 sq ft left.  3 are going to radishes, 3 to carrots, 3 to parsnips, 3 to shallots, 3 to scallions, 8 to spinach, 2 to Chinese cabbage, 2 to leeks, 1 to basil, 2 to kohlrabi, 2 to beets, 5 to bell peppers, and a few flowers to attract pollinators.

And there are some places around the yard where I can plant some herbs.  And some of the crops are "succession" crops, meaning I can reuse the spaces as the season goes on.  Radishes can be harvested and replanted several times a year, for example, and the broccoli/cauliflower/cabbages are harvested in June and a new crop planted in July for Fall harvest.

Hoping for the best!

Thursday, March 24, 2016

Garden Enclosure

Well, with the decent weather, I am turning my attention to finishing the Garden Enclosure.  And I have to thank Marley for kick-starting me into that.  I had noticed some scratching around going on inside the enclosure, and finally noticed Marley INSIDE the enclosure.

Well, I knew I hadn't finished connecting all the strips of screening everywhere, but I thought it was pretty much complete.  So I went out last week and used a few nylon tie strips to finish it.
 mounted cable ties
Usually for bundling wires, they are good for pulling chicken wire tightly together too. I will be using 100s of yards of thin wire like thread to REALLY attach all the chicken wire strips, but I thought it was all pretty good already.

Til Marley appeared inside.  So I called him to see where he came back out.  And tightened THAT spot.  And he got in again, so I tightened THAT spot!  After several days of that, I went out to get the job done right.

I was SHOCKED at how many openings I found Marley could get through.  I understand why he was attracted to it.  6 large boxes of deep soft soil... He must have thought he had found his Forever litter box!

Well, I'm glad he found the opening before I planted the seeds and the squirrels found the openings!  They would have nibbled off my seedlings as if there was no enclosure of all.

So I decided I better get the enclosure sealed against even the squirrels.  First, since there were vines around the edges of the enclosure, I sharpened my sickle of the grinding wheel.  Nothing fancy, just a shot around the curve.  But it cut a piece of paper in half cleanly.

So I used it to slice through the vines at the bottom edges of the enclosure, then got to work with the 8" nylon ties.  They are being used to hold the chicken wire tight around the top and bottom PVC pipes, around the upright PVC pipes, and to hold the 4' chicken wire strips together tightly.

And I spent time cutting the ground level excess chicken wire to extend 2' out from the bottom so that groundhogs can't go up to the enclosure and dig under it.  They are not clever enough to back up 2' and dig from there.  I hope!  If they are, there are other things I can to to stop them.

But the nylon ties are temporary.  They will deteriorate in sunlight after a few years and start popping loose.  Which is why my next step is to start threading long lengths of galvanized wire through the seams of the chicken wire like stitching a hem.

The nylon ties are 2' apart.  The wire will thread through every couple of inches.  If I can get the wire through all the seams (hoping I don't miss some), no varmint is going to eat my seedlings again!!!

If I seem obsessive about this, it is due to sad experience.  Varmints in suburban areas are generally desperate for food.  In their natural environs like open fields or oak-filled forests, they have plenty of food.  In my yard, the only good food they can see is MY GARDEN!  The ones in my yard are the losers who have been driven out of their natural habitat by other varmints.

I really do feel vaguely sorry for them, but not sorry enough to let them eat all my veggies...

So back to Marley.  When he can't get back into the enclosure, I know I will have stopped the groundhogs and hopefully the squirrels.

Marley got extra treats tonight for his efforts to get inside the garden enclosure...  LOL!


Friday, August 28, 2015

Good and Bad News

The good news is that I found a residential excavator who is willing to come some distance to do most of the work I need.  I'm at the edge of his regular service area.  He'll do the leveling of the 6'Hx50'Lx15'W ridge and haul away the brush and gravel/clay soil, but he really isn't into bringing in topsoil and raising the front lawn level.  Well, I can get THAT done locally.  It will be 2 weeks before he can arrive though.  At least he assures me he WILL arrive to do the work.

The bad news is that I was a bit casual about finishing the garden enclosure and left some small seams open while I fussed around with getting the enclosure door  to fit (it kept getting out of square each day as the posts settled and the soil around them dried).  And then I had the tree removal crew here for several days and spend time after that cleaning up (they cleaned up, but there were still piles of ground-up tree stump chippings for me to spread out and such).  And I wasn't seeing any varmints bothering the garden.

Well, the varmint situation changed overnight several days ago.  I walked quietly into the backyard one late afternoon and caught a glimpse of a groundhog running away.  There were a few melon leaves nibbled off nearest the enclosure door, so I set up a live-trap cage in the barely-open doorway.  I didn't catch it, but there was no further damage.  So I figured it was both suspicious of the trap AND baffled about getting in otherwise.  The other open seams were way around the back of the enclosure. 

Foolish me!  I went out yesterday afternoon and found my 2 small (unripe) dwarf watermelons and 2 of my 5 (unripe) honeydew melons completely gone, and another half-eaten.  It had obviously found the backside openings!  I closed the enclosure door and set the baited cage trap closer to the path it must have taken to the back with a part of the half-eaten melon (a trapping website said to use whatever is being eaten as bait - though melons were usually best).  So melon was best for bait of both counts. 

This morning the cage trap was sprung but no groundhog.  But the bait was pulled out, so it must have reached in carefully and tripped the lever while still outside the cage enough to get free.  Well, I've never thought that varmints were exactly dumb; if they were, they would be extinct.  The idea is to use their habits against them.  I set up a "V" of upright 2"x12" boards to "guide" the groundhog to the trap.  That has helped in the past.  and I covered the cage trap with landscaping fabric to make it look more like a safe tunnel.

I'll bet it doesn't work.  But I did finally lock the enclosure door frame in place and seal the chicken wire seams around it, so that's no longer and problem.  There are still 2 more opening in corners, but it was dinnertime today and I was starving!  So I put a piece of chicken wire over the remaining melons, piled some melon leaves (which it also seems to eat) at the remaining openings (for distraction bribes) and called it a day. 

If I don't catch it by tomorrow morning, I have pieces of leftover chicken wire cut to size to seal the remaining openings.  After that, my garden area should be safe anyway. 

I still need the groundhog gone.  It will eat flowering plants too, and I can't protect everything.  In past years, a groundhog would show up in Spring, I'd trap it and relocate it.  Or find it's burrow and dump used cat litter into the hole until it fled in disgust.  But this August appearance is a surprise and I can't find the burrow (it may be in a neighbor's yard).

That melon-eating varmint has GOT to go, one way or another.


Saturday, August 15, 2015

Garden Enclosure Screen Door

The garden enclosure door is giving me trouble.  The posts holding it keep getting out of alignment.  Sometimes the top sticks.  Sometimes, the latch won't catch.

I've bought some additional pvc pipes to help hold it in place, but I had to get the frame in alignment first.  One post had to be raised 1/4", and that was trickier than I thought.  Since it is stuck in the ground 2', the idea was to pry it up 1/4" and then hold it there while nature lets the soil below it expand and fill in.

So the first part was to lift the post.  Easier said than done.  I dripped water in around it for an hour, and that did loosen the post.  But lifting the post isn't just pulling it up a bit.  There had to be something to hold it up the 1/4".  And I don't mean to suggest that I am strong enough to just pull it up that much.

I had the idea of screwing a 2x4" board to the post and prying on the bottom of that board.  That would work, but how would I hold it there?  I tried putting a 4x4" post against the top of the frame and then lifting it with shims.  I did that, but the frame didn't rise.

All I was doing was pushing the post into the dirt...

Arggh...

And if I put a board under the 4x4" post, that was too tight to make it fit under.  I had to re-think it.  And the 4x4" post I was using to raise door frame was the wrong length by 1".

AHA!  I set a scrap piece on board in the screen doorway and set the post that was "just" too long on the board at an angle.  Pounding that 4x4" post that was at an angle, toward the post I wanted to lift worked!

Look at it another way.  The door frame post and the ground made a right angle, with the bracing post resting on a board at the bottom making the hypotenuse.  By pounding the bottom of the bracing board with a small sledgehammer, I pushed the top of the door frame up the required 1/4".  Hurray!

But how to hold it up?  The bracing post prevented the door from closing...

Well, that baffled me for a few minutes.  But then I realized that if I screwed on a board near the bottom of the door frame post  on the opposite side, it would hold it up for ever.  Well, I didn't need "forever", just long enough for wet soil to settle below the door frame post.

SO...   I set a cinder block next to the door frame post, stomped on it a few times to settle it into the soil so it wouldn't sink under pressure, and put a scrap piece of 2x4" board atop the cinder block.  And I screwed that board into place.

So the post holding the latch side of the screen door (that I had just raised 1/4") won't settle back down (the piece of 2x4" is resting on a cinder block that won't settle into the ground and the 2x4" board is screwed solidly into the door frame post).

I can leave all that in place forever.  Its not in the way of the door closing.

But the latch doesn't "catch",  I can solve THAT.  A small piece of aluminum fill fix that.  Actually some would a plastic credit card.

Just accept that the door and latch will now work, and that the screen door closes as smoothly as silk!

Sunday, August 9, 2015

Tree Removal

My back yard is semi-wild.  I like it that way.  I hate removing trees, though I have removed a lot of them over the years.  When I moved here 29 years ago, the backyard was mostly filled with too many junk trees, too closely spaced for their own health.  I thinned out the smaller junkiest ones (especially a type of locust tree with thorns like needles all around the trunk).

At the same time, I looked at the drainage easement along the property line.  For those of you not familiar with a "drainage easement", it is an artificial rainfall control channel that leads to a natural body of water (in my case a swamp across the street).  But the drainage easement wasn't the natural drainage.  There is a 3' deep ravine that cuts across the neighbor's back yard and used to cut across the side of my front yard.  The county-mandated artificial drainage easement that goes between our property lines cut my part off.

So I first just wanted to fill in my ravine, and I did so with a full dump trick load of average fill soil.  I spread it all out myself.  It was some bit of work, all with rake and shovel.  But there were 2 fully mature oak trees right next to the new drainage easement, and I realized that the roots had been entirely sheared away on one side.  I had them removed so they wouldn't fall over on the house.  I left the 3rd oak tree standing because it was farther from the drainage easement and I wanted the shade on the roof (passive cooling was a big idea at the time). 

Then I thinned out some that were just too shaded by larger trees to ever thrive.  That still left a complete deep shade canopy across most of the back yard.

But even the larger trees were still "youngish", and didn't stop growing.  10 years later, I had about half of them professionally removed.  Later, one of the larger trees leaned over enough to fall in a windstorm and the top half of another snapped off and a 3rd one was starting to lean, so they had to go.

But lately, I've become obsessed with the idea that the remaining massive oak will fall on the house.  The past 5 years, it has been dropping 6" diameter branches and I doubt its health. It's only 20' from the house, and the prevailing winds would push it in that direction.  Given the estimated weight of the tree is at least 3,000 lbs (6,600 kilos), it would pretty much crush the entire house (and likely myself as well).  I can imagine the newspaper headlines.  "Local man has tree fall on house, drowns in his own waterbed"...

I'm having it removed tomorrow along with a large sweetgum tree that has been leaning over slightly.  I talked to my home insurance agent about it.  He admitted that should the tree fall onto the house, I was 100% replacement-covered, but it could take months of reconstruction and I would probably need to move out during the reconstruction.

It seemed like a great property when I chose it 29 years ago.  But having lots of mature trees near your house is over-rated.

It will be an adventure watching this oak removed.  I wasn't at home to see it's 2 siblings removed ( I was supposed to, but they arrived a day early and when I got home from work that day, they were just GONE!  The other trees I've had removed have been nowhere near as large as this one.

The tree guy says that the upper branches will be removed first by a combination of a crane and tree-climbers, and lowered by rope for eliminating collateral damage to other trees (and the house and deck).  The massive trunk itself will be cut off (lowered) 8-10' at a time and will be carried off by some sort of "grabber" to a flatbed truck.  I hope that's not "hype".  I will be taking pictures all the way and will post them.

The good news is that they will be taking down the sweetgum tree first.  It's small than the oak, and I will see how carefully they do that job.  If they seem careless or find that tree difficult, I can tell them to stop before they start on the much larger oak tree.  They have a "A" rating on Angie's List, but not a LOT of reviews.  It's possible they got their "A" rating from smaller simpler jobs.  I'm being careful.

There is some deconstruction work involved at getting at the massive oak tree, too.  At the least, 2 sections of my 6' shadowbox wood fence have to be removed (the tree is just inside my fence), and it is possible a gate and a concrete-set fence post will have to be removed (they suspect not, but if so, their "grabber" can just pull the 6"x6" fence post right up out of the ground without even damaging it and it can be set back down into the hole afterwards as sturdy as before.

I actually believe that last part.  I've set enough posts into the ground without concrete myself to know how well clay soil hardens around any bare post in plain clay.  One with an 12" cylinder of concrete around it should settle in better.  And it might be an improvement.  That post leaned slightly after being installed 25 years ago and the connections to the fence sections are loose anyway.

For generally useful information for anyone considering this kind of work themselves, the quote is $5,500.  As I understand it in very general terms, $500 is just for bringing all their equipment (a crane, a "grabber", and 2 flatbed trucks) and crew from 15 miles away to the worksite, $4000 is for the massive oak tree, and $1000 is for the sweetgum tree.  The cost includes detailed cleaning of all debris, removal and replacement of fence, and grinding both stumps 2' below ground level.  It seems worth it...

So anyway, tomorrow is going to be VERY interesting.

I will be watching them through the entire process of course.  Partly for knowing what happened if there is some accident, partly just out of fascination for a process I can hardly imagine, and partly because it is a rare opportunity to take some really interesting pictures (for my scrapbook and for blogging - one never wants to miss a chance at great pictures to blog about, LOL!).

But one can't spend the entire day taking pictures and hoping no one falls out of the trees.  So I have saved some yardwork for myself to do while the tree guys are doing their thing.  It is all stuff I can do while keeping an eye of the tree-work while being safely out of the way.  I have the garden to water, some trellises and screen door supports to install in the garden enclosure, and if that takes less time than I expect, part of the far backyard is getting overgrown with blackberries, thistles, and  and I have a gas-powered weed-whacker with a steel blade I need to start using.

And after that is done, I have excavation work to be done in the backyard!  The ridge in the middle of the backyard is going away and the sunken area of the front yard (that gets flooded every thunderstorm) will be raised 18"!  That's to be scheduled after the trees are gone.


Friday, August 7, 2015

Been Busy, Part 2

Part B) of the projects this past week...  The PVC pipe frames for the concrete 6" mesh wire...

It was an adventure cutting, drilling, and marking the 1" PVC pipe for the trelises.  The cucumbers and pole beans are wandering around the garden surface looking for something to climb.  I thought the pole beans would climb the cornstalks happily, but the corn is a short bicolor variety  and the pole beans need higher supports.

So I'm late in adding the trellises to the enclosed garden.  But maybe not TOO late.  I tested a pole bean and it can be unwound from the corn stalks.  I'm barely getting to the trellises in time!

My delay was due to the difficulty in getting at the concrete mesh.  I stacked in against the fence last Fall to get it out of the way, and the Evil Vines from the neighbor's yard have entirely taken them over. 

It took several hours to rip the D*** vines loose from the wire mesh 2 days ago.  And things are so tight between the new garden enclosure and the fence that I cant just pull out the 30' of concrete mesh to cut it apart on the open lawn.  I'll have to do it where it is.

Fortunately, I have a saws-all.  The metal blade cuts through even concrete mesh like a hot knife through butter.  But I have to construct the PVC frames the comcrete mesh will be attched to first so that I know exactly what sizes to cut.

And that means making the PVC frames first.  I have them in pieces.  Tomorrow, I'll attach them to the framed garden beds.  When the PVC frames are attached solidly, I'll cut the 30' of old trellis concrete remesh to size. 

Pictures will follow...

Thursday, August 6, 2015

Been Busy, Part 1

Well, OK, I always TRY to stay busy doing something useful around the house each day, but some things aren't worth reporting on.  I'm pretty sure no one cares that I mopped the floors, did laundry, paid bills, weeded gardens, cleaned litter boxes, etc.  Not that those things don't take time and have to be done, but they aren't generally things I bother to post about. 

So, having been busy with such routine things, I haven't posted for a week.

I am pleased to say that the last 3 days have been at least a bit more busy on interesting things.  They fall into 3 categories:  Garden, Clutter, and "Other Stuff".  And because each part gets a bit long, I'm going to address one of the 3 parts in separate posts.

First (today) is the garden, and there are several parts to that work over the past week. 

A) While I was pleased to announce that the free-standing screen door to the new garden enclosure was finally completed previously, it apparently wasn't quite.  The posts have settled slightly, and even with metal corner braces, the door rubs on the top of the frame, and I can see that heavy rains will always make it a little bit loose.  So I designed some support structures of PVC pipe braces that should help.

B) The climbing plants need trellises to, well, climb.  Pole beans and cucumbers mostly.  So I designed some basic PVC pipe frame that can support concrete mesh wire.

C) The vining crops like melons spread out in all directions and need to be constrained to their own framed beds.

D) Raising one side of the frame 1/4".  That doesn't sound like much, but it is the difference between the door sticking and not.

So, a week ago, for part A) I went shopping at the Big D-I-Y stores looking for the parts that would brace the free-standing screen door.  I don't want to get overly detailed, but the idea was to attach 2 PVC pipes from the door frame to the nearest upright PVC post on each side of the door, and 2 from the horizontal post above down to the top of the door frame.  It was just a best guess of holding the free-standing door frame in place. 

The D-I-Y stores didn't have the right attachments, so I improvised.  That didn't work.  Part involved cutting the upright posts to add a "tee", and I realized that the upright posts were so locked in place by the chicken wire enclosure that I couldn't get that tee installed.  There is something called a "snap tee" that doesn't involve cutting the upright posts.  Literally, you just cement and push the snap tee onto a pipe. 
FIMCO FIMCO Drain Tubes & Fi…
But that part that sticks up in the picture has to fit into another pipe, and somehow it just wont.  I suppose it is designed for some other purpose.  Then it struck me that a connector fitting (intended to attach 2 PVC pipes together) might work.

 It wasn't tight as if designed for the purpose, but close enough to cement after several applications.  And if the cement doesn't hold, I can put a bolt though it to get the same holding effect.

The trellis frames, part B) were a lot easier.  They are just an upside-down "U" of PVC pipe with the bottoms attached to the outsides of the framed beds in the back of the garden (so as to not shade the other lower-growing plants).

"Easier" doesn't mean "easy" though.  I still had problems.  I wanted the PVC pipe uprights to be solidly attached to the framed beds so I could then attach 6" grid concrete mesh wire to them.  I wanted them to be level up and sideways, and 2' below the top of the enclosure (so the vines wouldn't crawl up through the top). 

So I made a cardboard template that was even to the top and side of the frames.  Repeatability is wonderful.  I used the cardboard template to mark drilling spots in the frames.  I then used the template to mark drilling spots on the PVC upright pipes. 

Since the uprights had to be 7' (from a 10" PVC pipe, they had to be cut.  I tried clamping the pipes to 2 sawhorses, but the vibration from my saws-all
Product Details
kept knocking the clamps loose.  I had to bring the 6 pipes inside the clamp them to the sturdier workbench.  Cut to 7' lengths, I then had to mark the spots to drill holes to match the pilot holes in the garden frames.  That's where the cardboard template helped A LOT!  The same holes in the cardboard HAVE to match up to the pilot holes in the garden frames, right?

We'll find out tomorrow...

Part C) was serendipitous.   I needed a whole lot of small bamboo stakes to keep guiding my free-ranging melon vines back into the beds.  Packs of 25 bamboo stakes cost about $7 and I need a few dozen.  But I was shopping at Target today and found 12" kitchen bamboo skewers 80 for $1.27.  That works for me!

One of the most useful discoveries I've made in life is that products meant for a purpose are expensive, but very similar things meant for another purpose can be quite cheap.  My favorite example is a plastic scoop.
Product Details


Not the exact product, but an example... In a pet store, it was $6.  In a hardware store, it was $3.  Same thing, different customer...  *I* use the scoop to transfer the kitty litter in the 35# buckets into more wieldy smaller containers.

But back to the bamboo skewers...  I want to guide the melon vines in circles to keep them in the beds and out of the paths.  The 12" skewers will work just fine for that!

Part D), raising one side of the door frame 1/4" is a bit trickier.  I've figured out a way to do it.  I'm going to screw a short scrap of 2"x4" board near the bottom of the post I want to raise 1/4".  I will put a brick on the ground and stomp on it hard to make sure it won't settle deeper.  Then I'll use another 2x4 to use as a lever to pry the attached 2x4 1/4" higher.  I'll clamp it temporarily until I can wedge shims between the brick and the screwed 2x4.

That will hold the post up the 1/4" I need.  But it is going to have to stay there for months until routine ground expansion and rain fills in the spot.  Bet it is still there several years from now, LOL!

Despite the 4x4 posts being set 2' deep in the soil, I bet I'll always have to adjust the screen door frame from year to year.  Some things never stop needing attention.

I originally got the idea of building a chicken-wire-covered garden enclosure from a website HERE 

But I found some problems with the design, and fixed them for myself.  Well, I hope everyone improves on construction ideas they find on the internet or elsewhere, mine included.

You would be amazed at the way things travel around the internet.  

Next posts:  "Clutter" and "Other Stuff"...

Tuesday, July 21, 2015

The Garden Inside

I have been planting while I built.  I risked losing plants to the Evil Squirrels or Groundhogs, but I've managed to avoid them this year.  I may have reduced the local population down to where they don't like getting into my space.

Which is good, because there are still gaps between the rolls of chicken wire I need to patch. 

They great news is that my garden, while incomplete, is growing well.

First, I have my first main season tomato.  It is a Big Beef, which is a hybrid and not my favorite, but it is still better than the store-bought ones.  The heirlooms are just now fruiting and will take a couple weeks to ripen.
I'm trying somehing in one bed based of the Three Sisters of Native America plantings.  Thats growing corn, letting pole beans climb the cornstalks, and growing melons below to shade out weeds. 
I may have planted the corn late; the beans are growing faster.  But I'll see what happens for this year.  I can stick 8' posts in the ground between the corn plants to let the pole beans climb (and the pole beans are the flat italian kind which taste better than standard ones to my mind).  The melons are honeydew.
The heirloom tomatoes are growing unusually tall.  New soil with good compost, I guess.  But most have blossoms now.  Below them are 2 green squash and 1 yellow squash.
This bed has cantalope melons.  I'm planting Fall crops around it.  I'm off-schedule with most plantings this year because of the enclosure construction work.  I should be back on schedule next year.  But it is a rare opportunity for Fall crops that I usually don't get around to.
This cherry tomato was planted late.  It sat in a tiny 6-pack cell for months and I had about given it up for dead and/or stunted.  But after being in ground for only 2 weeks, it went from a 8" sprig to this.  Talk about GROWTH!  I may harvest cherry tomatoes yet...
This is more late plantings.  Broccoli, Leeks, Cabbage, and Celery.  All I can get from Celery around here is leaves, but they sure are strong-tasting!  Which is exactly what I want in my salads.

And I have Brussels Sprouts, Radishes, Carrots,

Adventures In Driving

 Last month, my cable box partially died, so they sent a replacement.  But they wanted the old one back anyway.  The store in town only hand...