Some advice requested...
I have several boat cover ideas in mind, and some have good points and bad ones. And since I have been diagramming many for days without success, I need some help. Traditional boat covers just dont work well on this jon boat. Rain pools in the cover and has to be bailed out. There just isn't any cover that fights right because of some minor modifications. And the expensive covers don't last more that a few years.
Idea #1 is a PVC frame with a tarp cover that I can just pull over the boat when I park it. The advantage is that, once built, it is really easy to use. But it is annoyingly hard to find the right pvc parts locally or online retail to build it.
Idea #2 is stretching ropes across a high stand in the center of the boat. Bungee cords and the height in the center would mean that rain should run off easily. But that would require some detailed arranging of the cover every time I used the boat. And it still requires a cover and I'm not sure how to fit it. I have problems fiting a cover because I have seats and a front motor attachment that are above the surface of the boat.
Idea #3 is a bit extreme. Park the boat in the garage and leave the car outside. Well, the car is actually a bit more weatherproof than the boat. Never let it be said I am not considering all options... LOL!
Idea #4 is to just cover the boat in black sheet plastic weighed down by bricks and cinder blocks. I have a HUGE roll of 12' wide black plastic. Its a possibility and no harm if it gets some holes poked in it (duct tape to the rescue). If it only lasts 2 years, so what? There's lots more of that on the roll.
Any suggestions? Other ideas? My ears and mind are open...
Friday, September 25, 2009
Thursday, September 24, 2009
OK, Time For A Little Humor...
Life is not all projects...
Consequences of retirement:
1. Getting up at 10am is "early".
2. You learn more about your pet's daily life then you even imagined.
3. It IS possible to eat all day long.
4. Beer: "Breakfast of ex-champions".
5. Late-night Nickeldeon cartoons are great. I can't live without 'Robot Chicken'.
6. It is harder to relate to Dilbert comic strips.
7. Neighbors who mow their lawns at 10am should be arrested.
8. Never shopping at Walmart on a weekend.
9. Dr and vet appointments at 2:30 on a Thursday are great!
10. "Manyana"...
11. Spending an hour preparing dinner is not a waste of time.
12. "Inflation-adjusted annuity for life"...
13. Not sharing air with flu-ridden carpool members.
14. Watching birds at the feeders for an hour.
15. No "justifying your job" during office reorganizations.
16. And no "annual performance reviews" either.
17. And no office cafeteria food, for that matter.
18. Great movie on at 3am? No problem.
19. Going fishing on a Tuesday. Or Wednesday. Or Thursday.
20. Zinfandel with lunch!
21. Golf or fishing?
22. No kids at movie theaters.
23. My cats don't remember a time when I wasn't "there all day".
24. Making real bread.
25. Remembering truly long, boring meetings and ROTFLMAO!
26. Forgetting Excel...
27. Using a Mac and not that damn Windows computer I had to have for "compatibility".
28. No longer faking "working" on telework days.
29. Getting emails from frustrated former co-workers.
30. And just replying to them about the joy of tending to the tomatoes...
I'll leave it at that... ;)
Wednesday, September 23, 2009
The PVC Learning Continues - Part 2
This is becoming maddening. The manufacturers make all sorts of PVC fittings, but no one sells them locally. I have checked out all retailers within 15 miles and they have only the most limited selection.
The parts I want are available wholesale, but I don't qualify for that.
I don't want to have to buy a box of 20 when I need 5 items.
I went to 5 stores today. The last one was "the store that had everything". It didn't! They didn't even know what a "street 60 elbow" was! Well after weeks of researching, I do. I am SO PISSED!
The consequence is that I have to design the structure with what is available. That ticks me off royally, but it's my only option. Back to the drawing board...
Tuesday, September 22, 2009
The PVC Learning Continues...
LOL! It seems I misunderstood "slip". Slip connections won't fit into each other, but they do fit into pipes. That helps. And it means I don't have to worry about "hubs"!
But still, I went back to Home Depot and Lowe's and they just don't have complete selections in any size. I am going to a plumbing specialist store tomorrow. The Home Depot Plumbing Manager suggested one locally. I certainly didn't know about the place.
The local HD and Lowe's have basic parts and I wrote down the prices of the parts they do stock (and to indicate what parts they stock). But I'll be fair about it, if the specialty plumbing store offers competitive prices (within 10% of the HD and Lowe's cost) for the basic parts, I will reward them for the selection by buying all parts there.
Wow, this project is taking so much more time for the design and supply, it is weird. I normally work in wood, so the design is the hard part and the supplies are easy!
I can't wait to get this one done because the parts are so annoying to obtain!
Sunday, September 20, 2009
No Project Day
Well, maybe call it "Project Relax". I simply had a good relaxing day today.
First, I went fishing with my best friend Jeffrey. On the way to the fishing place, we stopped at a farmers market. There is lots of crap merchandise there, but still some Amish stands. We bought pickles and relishes from them, and we found a small basket of tomatoes to split between us. There are a few stands with tools and we saw some very strange ones. I wish I had remembered to bring my camera. Some tools were really THAT weird.
We got to the "lake" (a reservoir actually - no one outside of Maryland would call it a lake). Maryland is one of the few states that actually has no natural lakes. But we like to fish there.
We were out on the water at 4 pm. Fishing 10 minutes later. We were using only top water flies and bass bugs. The wind was light, the water was still, the temp was 75 degrees F, the light was partly cloudy... A perfect day to be out fishing. We didn't catch a thing (the previous time, we caught a bass and 3 panfish, so there ARE fish there). But we had strikes and nibbles, so there was some excitement.
Fly fishing for bass is not productive, but we enjoyed it. The lake (it is actually also a State Park) closes at sunset, so we were on our way home after only 3 hours.
As we returned home, we stopped at Home Depot (a big box hardware store if you don't know of it) and looked for some stuff. Jeffrey wanted special cleaning product (which we didn't find), but he found knee pads. I found some neoprene gloves and nylon strap tie-downs for the boat. My old ones weren't holding any more.
After Jeffrey left for home, I made a great dinner. Filet Mignon, baked potato, steamed broccoli, and tomato salad. With wine (Zinfandel)...
Watched some great TV afterward, (Miracle Planet for 3 hours, and finally my favorite animation - Kim Possible - at 1:30 am). Next time, back to projects! I finally cleared out another framed garden box a yesterday! No more weeds, poison ivy, or day lilies left there! And it took an hour to finally dig out the sapling that was deep in that bed. I had to dig down 2 feet in a 2 ft circle to finally get it up. But it was worth the effort!
More about that next time...
Wednesday, September 16, 2009
Boat Canopy
I am so tired of buying $200 boat covers that pool water no matter how tight I tie them, rip at the corners and only last 2 years anyway! So, I got it in my mind to simply build a tentlike cover of standard black plastic sheet on a PVC pipe frame that could just be slid over the boat like a movable carport. I have spent 4 days learning all sorts of things about PVC fittings and is is very complicated. I found sites that had designs for structures, I found sites that sold connectors, and I found sites that sold kits.
Nowhere did I find a site that actually explained what all the fitting choices meant! There are "slip fittings", "hub fittings", "fipt fittings", "sanitary fittings", "street fittings", "furniture grade", "utility grade", "gray", "white", schedule 40", schedule 80", etc, etc, etc.
But I did figure it all out eventually. Indeed, I now know more about PVC pipe fittings than I ever wanted to! Add in the fact that the manufacturers don't want to sell to individuals and the local retailers carry limited selections, and it gets really hard to design what you want.
Just as examples (as best I have figured it out): "Slip" means the end fits inside a hub. "Hub" means there is a larger flange for a slip. "fipt" means that the pipe fitting screws on. "Sanitary fitting" means that the angles go out in a curve. "Schedule" means the amount of pressure the pipes can withstand. "Gray" is more UV resistant than "white". "Street" means that one end has a hub and the other end is a slip. Arggh!
Building a box frame from PVC pipe is not tricky or expensive. Its the FITTINGS and COUPLINGS of any form that deviates from that that are. I designed a first one easily. All I needed were some "4 way 60 degree angles". But no one makes those.
And even when I figured out a design that used standard manufacturer fittings, I discovered that no local stores sold all of them (individually or collectively). Some manufacturers will sell individual fittings "by the box" to individuals. Great, I need 3 on something, and the box holds 20!
As long as I am ranting on this, I will complain about local "big box" retailer websites. They are totally unorganized. You would think they would list their PVC fittings either by pipe size (1 inch, 2 inch) or by type (90 degree elbows, tee fittings, etc). No, they are totally random. You have to search through hundreds of items to find the one you want. And they don't list half the fittings that I know are in the store! That's BAD website organization...
The "kit" sellers are the worst. They offer plans for various constructions, but mention that you have to buy all the pipe separately. In other words, all they are selling are the connectors. And they get 3 times the price for those. LOL! Its like finding a shed "kit" and discovering that all they are selling you is a design and nails...
I'll work the design out tomorrow with what is available locally retail...
Saturday, September 12, 2009
Fishing Rod Rack Project, Completed
I decided to give the rod rack 2 coats of polyurathane. I couldn't do all surfaces each day, so it took 4 days. It's not that it will get much wear and tear, but in the garage it will be exposed to a lot of humidity changes and there isn't anything in the construction that will allow much natural warp shifting.
So here are the final pictures:

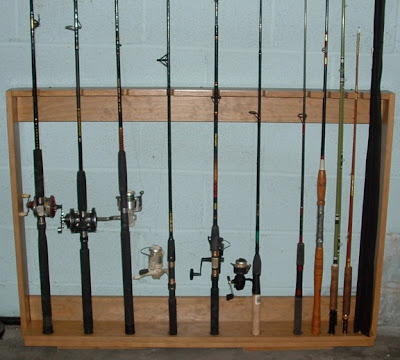


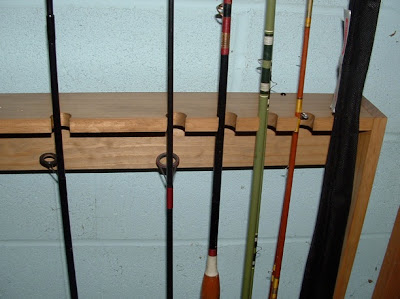
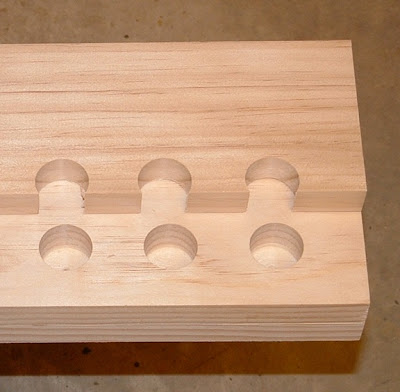
Construction Notes: If I had it to do over again, I would have made the 3/4 holes on the top shelf smaller. The opening only needs to be large enough to accept the upper part of the rod. Also, I would make the base holes a bit larger (or at a slight angle). A couple of the base holes were a bit tight.
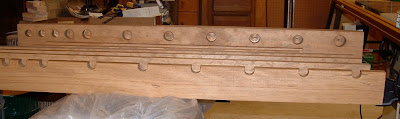
Fishing Equipment Notes: Anyone looking at the actual rods will notice I have 3 bait-casting rods, 4 spin-casting rods, and 3 fly-casting rods. From the left, the first 3 are for casting baits and large weights into tidal waters, the second 3 are for casting different weight lures in freshwater, and the last 3 are fly rods. 1 of those is a short rod for barrel loop casts in shrubby conditions, 1 is for for casting heavy bass flies and popping bugs, and the one in the cover is my "good real fly rod" for trout. The one spinning rod without a reel (7th from left) is just kind of lonely and waiting for a new reel. The short stubby rod (8th from left) is a "Chesapeake Bay" rod for dropping bait from a boat straight down. I've never caught a fish with it, but I keep it around just in case it is "the right one for some trip". LOL!
If anyone has a question about the construction (or anything else), just leave a comment...
Next project: Movable PVC frame tent for the boat.
So here are the final pictures:


Construction Notes: If I had it to do over again, I would have made the 3/4 holes on the top shelf smaller. The opening only needs to be large enough to accept the upper part of the rod. Also, I would make the base holes a bit larger (or at a slight angle). A couple of the base holes were a bit tight.
Fishing Equipment Notes: Anyone looking at the actual rods will notice I have 3 bait-casting rods, 4 spin-casting rods, and 3 fly-casting rods. From the left, the first 3 are for casting baits and large weights into tidal waters, the second 3 are for casting different weight lures in freshwater, and the last 3 are fly rods. 1 of those is a short rod for barrel loop casts in shrubby conditions, 1 is for for casting heavy bass flies and popping bugs, and the one in the cover is my "good real fly rod" for trout. The one spinning rod without a reel (7th from left) is just kind of lonely and waiting for a new reel. The short stubby rod (8th from left) is a "Chesapeake Bay" rod for dropping bait from a boat straight down. I've never caught a fish with it, but I keep it around just in case it is "the right one for some trip". LOL!
If anyone has a question about the construction (or anything else), just leave a comment...
Next project: Movable PVC frame tent for the boat.
Tuesday, September 8, 2009
Fishing Rod Rack Project, Part 6
I took a few days off from the project (fishing, errands, shopping, TV) but got back to it yesterday. It was "glue and screw" time. I took the time to very carefully align all the corners square and flush.
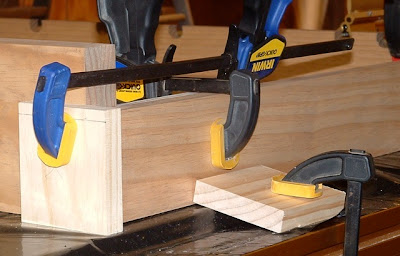

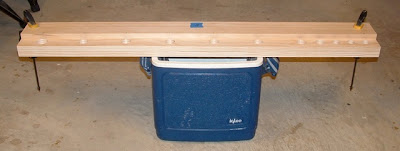
Since I was using mostly 1 x 4" boards and had many places where I was screwing through the wide edge into endgrain, I made a small drilling jig. Nothing fancy, just a piece of scrap from 1 board. I drilled pilot holes centered halfway of the thickness and set 3/4" from the ends. You can see it in the 1st picture (where I was using it as a clamping block). It really made it easy to drill pilot holes evenly spaced, straight, and right in the center of the boards.
I did half of the basic frame yesterday and let it dry overnight, using a framing square to keep it, well, "square".
Today, I glued and screwed the other half, plus attached the 2 cross braces. When that was done, I prepared to cut (to fit) and attach the 2 vertical braces.
OOPS! I had estimated the 2 pieces to be 23" (and had a 46 1/2" board for the purpose. Guess what? The space to be braced was actually 23 1/2" on each side. I was 1/2" short. I HATE "nominal sizes"! Why can't a 1 x 4" board actually be 1 x 4"?
Fortunately, with all the corners being connected in 3 directions, and glued and screwed on all the edges, it was solid as a rock. So here it is, ready to be polyurathaned tomorrow.

I'll post the "finished" picture when the polyurathane is dry and I have the rack in place with the rods on it...
Thursday, September 3, 2009
Fishing Rod Rack Project, Part 5
Yee Hah! I got half the sides stained early today and did the other sides stained this evening (fruitwood stain). I have to say that brushing on stain with scraps of old white tee shirts works great! It goes on so smooth and evenly. I wear cheap disposable latex gloves, so there isn't even any stain on my skin.
I did one full side, one long edge, and one short edge on each board this morning, and all the other edges this evening. I'll be putting on at least one coat of polyurathane tomorrow. Might do 2 coats.
I did one full side, one long edge, and one short edge on each board this morning, and all the other edges this evening. I'll be putting on at least one coat of polyurathane tomorrow. Might do 2 coats.


Tuesday, September 1, 2009
Fishing Rod Rack Project, Part 4
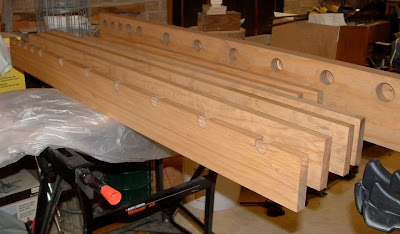
OK, today I remade the rod shelf. First, I clamped it to the base and transferred the centerpoints with a square.
Drilled the slots on the upper shelf, and set it back on the base to check for errors.

It all looks good. I had to eyeball it a little, even with the square. But they all matched up within 1/8", so that's fine.
After I was satisfied that almost all the cutting was done ((2 side pieces need to be fitted into place at the end, I gave all the pieces a thorough sanding. The boards were quite smooth, but as I learned from a previous project, there is a slight film that makes for uneven staining. I went to a 150 grit. With the random orbital sander, that does a nice job for a garage rack. If it was for in-the-house furniture, I would go to 240 and maybe even 320. But there is a limit to how smooth you can sand softwood anyway.

Tomorrow, I'll dry-fit the pieces together, drill pilot screw holes, and tape the areas to be left unstained for glueup. Then, stain the pieces. Next day, I'll give it 1 coat of polyurathene. After that, it's "glue, screw, and done"!

Drilled the slots on the upper shelf, and set it back on the base to check for errors.

It all looks good. I had to eyeball it a little, even with the square. But they all matched up within 1/8", so that's fine.

After I was satisfied that almost all the cutting was done ((2 side pieces need to be fitted into place at the end, I gave all the pieces a thorough sanding. The boards were quite smooth, but as I learned from a previous project, there is a slight film that makes for uneven staining. I went to a 150 grit. With the random orbital sander, that does a nice job for a garage rack. If it was for in-the-house furniture, I would go to 240 and maybe even 320. But there is a limit to how smooth you can sand softwood anyway.

Tomorrow, I'll dry-fit the pieces together, drill pilot screw holes, and tape the areas to be left unstained for glueup. Then, stain the pieces. Next day, I'll give it 1 coat of polyurathene. After that, it's "glue, screw, and done"!
Subscribe to:
Posts (Atom)