Sunday, May 31, 2009

Shoe Rack Finished

I completed the assembly and istallation today. Yay! Naturally, I forgot to take pictures as I went. I have GOT to remember to do that. But I get involved in projects and forget. I'll try to do better about that.

So I was able to install the shelves into the frame this morning. I made the shelves to hang at a slight angle (about the same as at a shoe store). That turned out to be more complicated than I thought. Living alone has some drawbacks. Mainly, not have a 2nd pair of hands around the house... So I have learned to be resourceful. It took time to set up clamps to hold both ends of the shelves at the same time, but I managed.

I would show you pictures, but as I mentioned above, I just got totally focussed on the work at hand (sigh). I got it rock-solid though and screwed the 1st (top) shelf to the frame. Looked great.

I installed the bottom shelf 2nd. I wanted the bottom edge of the lower shelf to be even with the bottom of the frame. That took a bit of work. I finally thought to clamp a framing square to the frame, but even that wasn't enough because I had to match the angle of the shelf to the angle of the top one.

It's a good thing I have lots of scrap wood around. The jig looked like something made by a spider crossed with a beaver! LOL! It worked though. Both shelves were at a 20 degree angle.

The middle shelf drove me nuts! I thought it would be simple to space it evenly between the top and bottom shelves. It wasn't. I thought it would be simple to get it at the same angle. It wasn't. I fussed around with the darn shelf for a half hour. When I tried to clamp it in the right position I would find out the distance to the top and bottom shelves were slightly different. The angle would be a little off.

I was losing my mind! I finally pulled it out and sat it on the table saw. It wobbled! The darn thing had torqued slightly after being glued and screwed. ARGH...

So I did the best I could. I got it centered between the top and bottom shelves and cut scrap wood to pin in in place. Then I clamped it in the frame with 19 degrees at one end and 21 degrees at the other (the most I dared force it straight).

I looked at it carefully afterwards and I can't detect the misalignment. After all, a couple of degrees of angle is not very much. But it still annoys me.

Mistake #2 - I should have cut a shallow dado to guide the shelves into identical angles. It would have been easy to cut the dadoes identical distances apart, they would have served as guides for assembly, and I wouldn't have had to cut the shelves shorter and restain the cut edges!

The installation was (relatively) easy. I put 2 pieces of board against the wall and set the shoe rack on it. Then I shimmed one board until the rack was level. But it wanted to fall forward. So I got a spreader clamp to press it from the bed frame to the wall. That was a bit awkward to manuver around, but I managed.

All the wall-mounting screws hit studs with no problems (like I had on the left side of the hat rack). That was a pleasure. Unfortunately, I didn't have any pan head screws long enough to go through the wood, drywall AND an inch into the studs, so I had to use flatheads. That meant I had to drill countersinks into the frame.

The top wall attachment board was easy, but the angled bottom shelf prevented me from getting a level hole and countersink, so I had to put them in at a slight angle. But it looks great installed. Here is the shoe rack, installed:


And here is the rack with my shoes on it.


That's the problem with making one of everything. The 2nd would be SO much easier to build!

Saturday, May 30, 2009

To Da Bear

From Da Bear: “I noticed your router table. My Kids are thinking about giving me one for father's day. I am looking at a nice Bosch one. Do you have any recommendations?

What kind do you use? Are you happy with it?

What problems to look for?”

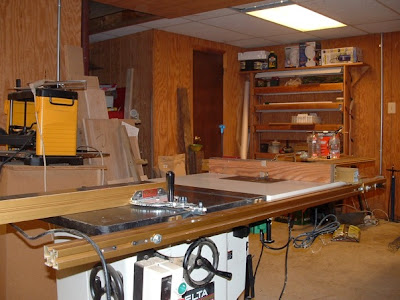
To Da Bear: Thanks for liking my router table. As you will see from the following pictures, it is actually a table saw connection on the right side. I feel badly about this, because I can’t find a record of the brand. I THINK it is an Incra add-on, since I have an add-on Incra fence, miter gauge, and rails to match. But I can’t find a brand name anywhere on the router table extension itself.


I love the Incra system fences and tables, so you couldn’t go wrong with those. The precision is astonishing. You might want to check http://www.incra.com/ for the newest products as I bought this stuff 10 years ago.

FYI… My table saw is a Delta 3 amp 220v. I had the basement wired with 4 220v outlets so that I could move it round. I have all my shop equipment and cabinets on HTC mobile bases. Not cheap but worth every penny.

The router table has a permanent mounted Hitachi M12V. I wired a rocker switch to the router table for convenience of turning it on and off easily.

A quick check of some good tool discussion sites said that Bench Dog 40-031 http://www.amazon.com/gp/product/B00005RHP5 ProMax Cast Iron Router Table and ProMax Cast Iron Router Table http://rt1000.com/index.html seemed well regarded. Amazon also gives high ratings for a different Bench Dog http://www.amazon.com/gp/product/B00005RHP5. You might want to take a look at all those.

Everywhere I check Bosch seems middle rating. Nothing wrong, but not ever best. I like my Incra system and recommend it, but if I was to buy a new one, I would have to investigate Bench Dog also.

If I’ve learned one thing, it is not to buy cheap power tools or tables/fences. Sometimes they are very similar, but mostly the ratings are seriously different!

Hope this helps…

Friday, May 29, 2009

Shoe Rack Project

Well, since we are in our 4th day of rain and I can't get at the vines over-running some of the old garden beds, I'm working on the next indoors project. I decided to build a shoe rack to get all the various shoes and boots up off the floor and closet. The closet floor space is too valuable as storage for boxes, and it is a pain to vacuum the floor with all those shoes. The vacuum is adept at grabbing stray shoelaces with the rotating brusher head...

The shoe rack is going up on the wall to make it easier to vacuum. To be honest, I had planned the shoe rack at the same time as I did the hat rack, so I cut, chamfered and stained the boards at the same time.


Yes, that's the same photo as for the hatrack. I did all the boards for both projects at the same time. :)

I assembled the frame today. I would have assembled the whole thing but I discovered a problem. (I almost feel like I am writing “how not to” descriptions of my projects). While I’ve built 2 decks, a fence and a shed, I have seldom done any furniture type items and “sturdy” was more important than fine “craftsmanship”. So I’m learning that part as I go. There is a reason I am starting with really simple stuff…

Mistake – There are 2 boards to attach the whole thing to the wall. The sides attach to the wall boards, and the shelves attach to the sides. Somehow, I got the shelves 1/8” longer than the wall attachment boards. I had to rip the shelves shorter to fit.


I was VERY careful to make sure I got that right! I measured twice, cut a piece of scrap wood to fit, and used that to position a stop block at my radial saw. I tested the first shelf I cut and it fit perfectly. Then I cut the other 2 shelves to match

But I had to sand, restain and polyurathane the cut edge. So I have to wait until tomorrow to finish the assembly…

Thursday, May 28, 2009

Hatrack Project Finished

Well, I got the hatrack boards installed in the bedroom today. Yay!

First, I used a studfinder to locate the studs. I marked the spots with blue painters tape.


Then I decided exactly where to place them. I wanted to attach them in the center to a stud and then level the boards then screw the ends to studs as far out as possible. Naturally, a couple of good places to attach the boards with the screws were right where hat pegs were. I KNEW there would be some surprises!

So, I had to move the first board right and left a bit until I found a position that allowed a center screw and some at the far ends. It worked.

With the first board attached to a stud with a center screw, I used a level to screw in the ends. Then I just measured down from there to place the other two boards.


Except it was very hard to drill on the left side. It was like there was concrete there, or sheet metal. I don't know what was under there but it was difficult. I can't think of anything that would logically be there. The screws didn't hold there, so I had to install drywall anchors. Very odd. I wish I had seen that part of the construction of the house!

But all I had to do after that was space the other 2 boards evenly underneath and hang up my hats.

Tuesday, May 26, 2009

Second Project - Hatrack

Because it rained all day yesterday and was dark and drizzly today, I couldn't take good pictures of the Herb Garden Project. So I started an indoor project yesterday.

Having realized I had about 30 hats of various kinds, clutterring up the closet shelves, I decided they needed to be hung up somewhere. So by "hatrack", I don't mean the kind that stands in a corner of a room and holds 4 hats and coats, but more a long length of board with pegs to hang hats on.

I set down some baseball style caps (the bulk of the collection) and decided that 9" between pegs worked well. I'm making three 8" boards. That allows 10 pegs per board. One board has the 2 outside pegs 12" from the others to accomodate 2 wide brimmed straw hats (very good in hot weather).

I thought about the design a bit. I wanted some workmanship in it, but not too fancy. And there was some practicality, too. I decided to make the boards with simple chamfered edges and I wanted the pegs at a slight upwards angle so that the hats wouldn't gradually fall off. I decided to stain the wood (simple clear pine) and finish them with a single coat of water-based polyurathane (no hard traffic involved, so a single coat is fine).

Yesterday, I cut the boards to length, trimming off the rough ends with the radial saw. Then I set up the router table to do the chamfers. I was surprised to discover that, in spite of using featherboards on the side and top, there was still a bit of chatter on the routed edges. It is not a problem with the router.


Perhaps pine is too flexible Or I didn't have the featherboards tight enough against the boards, but I had to run each edge through the router several times to get a smooth chamfer edge. I even sanded them a bit after with a simple flat sandpaper block.

Mistake #1: I should have sanded the untouched surfaces of the board. But they seemed so smooth, I didn't think it necessary. I paid for that when I stained the wood and got uneven penetration. I guess wood develops uneven coatings while being shipped. On the positive side, it made the project look a bit old afterwards. I'd prefer an even stain, but I can live with it.

I then stained the wood twice. I wasn't sure what color stain to use. I have a wood waterbed frame in fruitwood that I built last year, 2 dressers in a walnut stain, and a secretary in honey oak. I went with fruitwood.

I have to say that, no matter how well you sand end-grain wood, it will stain darker than the long-grain wood. Fortunately, the endgrain wood is not very visible.

I was able to get all that done yesterday while it was raining. Today I drilled holes for the pegs. Getting the angle on my drill press was easy. I simply taped a dowel against the fence to create a slight angle. That worked great. I drilled holes for the pegs using a forstner bit.


If you notice that the board is not stained, it is because I forgot to take pictures of it as I worked and recreated them using a scrap piece... Sorry!

I had intended to use Shaker Pegs for the hangers, but they were 2 for $3 and I didn't feel like spending $45 dolarrs on the pegs. The dowel joinery pegs however were 30 for $2. They have slots lengthwise for great glue surface, but I don't think the hats care about that. And it is not as if this is an heirloom piece of furniture. This is cheap fast functionality... LOL! I had stained the pegs yesterday by simply putting all the pegs in a cheap margarine container and pouring in a little stain. I shook it around a bit and took them out after 5 minutes. I stood them upright on a piece of scrap wood to dry. Worked fine.

Mistake #2: I should have applied the polyurathane finish to the boards before I glued in the pegs. It was hard to get a smooth finish around all the pegs. I had been worried that the polyurathane would get into the holes and interfere with the glueing. I was incorrect about that.

So, anyway, the boards are all finished. Tommorow or the next day, I will mount them on the bedroom walls. I can't wait to discover what surprises I find doing that! There are always surprises...

Monday, May 25, 2009

First Project - The Overgrown Garden Beds

Well, when I first moved here over 20 years ago, the backyard had a small field on the left side and horribly overgrown woods for the rest. The field was just a sand and gravel silt plain that led to the swamp across the street.

The overgrown part of the back yard was vines, thorny locust trees about 6-12' tall, and poison ivy, with a thick growth of 30' tulip poplars, maples, river birches, and a few huge old oak and sweet gum trees.

I spent 3 years hacking down the undergrowth and trying to kill the thorny locust trees. Those thorny locust trees and just plain evil! The thorns are vicious and they would just regrow a couple of feet every year after being cut, but with multiple trunks. Like the Hydra. I read once that early farmers would cut them down and use the trunks as fenceposts and they would start growing again! I believe it.

Trying to garden at ground level in the field was impossible. Tomatoes, peppers, cukes, etc don't like sand and gravel. So after a couple of years, I built 5 raised framed beds of 8' x 3', a single 8' x 2' bed, two 3'x3' and a trellissed bed 30" x 2'.


The picture has an error. The bottom bed is 8x3, not 8x2. Sorry, but too much trouble to correct the image. That bottom one, BTW, is an asparagus bed, so nothing ever changes there.

I started gardening the framed beds and worked at improving the non-gardening field soil. I collected bags of leaves each Fall from my neighbors (who were leaving them out as trash) and tilled the leaves into the soil. At least I can grow grass there now.

But over the past 5 years, I let upper half of the framed beds (from the square ones and above) get overgrown with honeysuckle and Virginia Creeper. Well they are shaded by a new shed, so they weren't very useful. I am going to disassemble and move them to the bottom! Another corner of the back yard where I used to keep firewoodhas underbrush taking it over again I moved chunks of tree trunksin there and then couldn't mow the area. The center of the back yard has a lumpy ridge about 6' high, 60' long, and 30' wide that has been reclaimed by the vines. Too uneven to mow.

SO! It is time to reclaim my back yard. I am starting with the vines in the framed garden beds. I'll start with the right square box. The vines are atrocious to pull out, but I have to do that just so that I can find the roots and dig them out. I want to plant herbs in that box. As they don't like really fertile soil but DO like good drainage, I will be adding a couple of bags of sand (the soil level is low anyway).

"Before" and "After" pictures tomorrow (weather permitting). I am planting oregano, chives, sage, tarragon, thyme, parsley, basil and cilantro.

Sunday, May 24, 2009

Starting Over

OK - I am going to try this as a home and yard-site blog about the daily activities of ME, Cavebear, trying to reclaim the yard from the weeds and vines and build a few projects and bits of simple furniture in the house.

I'll take "before" pictures tomorrow in the sunlight. Hundreds of square feet overgrown with vines, weeds and poison ivy. To be returned to good garden space in a year... Pictures all the way.

Tommorrow...

Watch this space!

Dr Visit

I put off the annual exams because of Covid, but went today (been 6 years, actually).  More questions from the Dr than I remember from past ...