I apologize for providing no pictures. I just couldn't think of any good ones to take. Mole tunnels do not show up well and my cats didn't catch any voles today... So, I'll just move along to narrative.
I'm trying to discourage moles. Not because they cause me much trouble, but because their tunnels are used by voles. And VOLES cause me a lot of grief. Voles eat plant roots and I have a lot of flowers and veggies in my yard.
Just as an example, I planted tulip bulbs 5 years ago in my flowerbed. And, in an attempt to kill off the winter weeds that plague me in the Spring, I covered the entire flowerbed in black plastic When I removed the plastic in the Spring, I found the oddest thing. There were circles of 8" deep holes all around the flowerbed. I couldn't figure out what caused them. That is, until I discovered a half-eaten tulip bulb in one of the holes! They had thrived under the black plastic (safe from predators) all Winter and found nearly every single tulip bulb I planted.
And then I noticed that each spot was near a mole tunnel. "Often, moles will serve as the "highway crew" and make tunnels in search of grubs and worms. Voles will often follow the mole tunnels and eat the plants which the moles ignore." (citation)
They can also be trapped, but you will never get most of them. So I decided that I had to discourage the moles to reduce the voles. First, I applied Milky Spore to reduce the mole's favorite food (chafer grubs) last year. Today, I applied parasitic nematodes to the entire area where I have seen mole tunnels or vole damage.
The parasitic nematodes seek and feed on grubs. My best friend and I both have grubs in our lawns. He doesn't have moles or voles, but when I was helping him plant crocuses in his lawn last Fall, I discovered his lawn was infested with grubs (oddly little evidence in the health of his lawn though). In my lawn, I surmise their presence by the activity of moles and the evidence of voles following the mole tunnels.
It was quite an interesting experience. The parasitic nematodes come in a small envelope of dissolvable material. You put it in a hose end sprayer, watering can, or pump sprayer to disperse them. It sounds simple, and for most people, it would be. I, however, never have "normal" experiences... *SIGH*
First, you have to soak the area. I was clever (fortunate) enough to have a short rainshower this afternoon. Yay! So that step was free. They I had to apply the nematodes. I had a watercan full of rainwater and at outside temperature, so that was perfect. I used it to fill the hose end sprayer I had. The instructions were quite specific that the application device not have any chemicals in it. Mine was unused (after 15 years, LOL!). Just never used it before (I have two of them, the other has been used many times).
So I mixed some of the nemotode material into the hose end sprayed container and turned it on. It not only leaked around the coupling, spray hit my face from the leaks. I had to shut the water off fast and fuss with it a bit. I finally found some combination on tightenings and rotations that stopped the leaking.
I set about spraying the waterborne nematodes all around the yard and woods (the moles like the woods best here for some odd reason).
Oops, I should mention that the lawn grass is 6 inches high and was soaking wet from the rain. That's because my mower is broken and has been at a repair place FOR A WEEK and they haven't even called with an estimate yet... I never have simple problems. I have to warn repairmen that whatever the problem is, it won't be what they expect. Like if I have an electrical problem, it is never just a blown fuse. Or if the cable signal goes bad, it is never just a cable box problem; the wire was burned by a lightening strike...
So, back to the nematode spraying. My hose end sprayer was leaking like a seive and I had to keep fighting with it to prevent the leaks (a mist really) getting all over me. I sort of assume I didn't want to be inhaling parasitic nematodes. But I eventually got that to stop.
I had 30 fun-packed minutes of spraying nematode water all over the yard in 90 degree heat and 90% humidity. I made sure to soak all areas where I had ever seen mole/vole evidence heavily and all other areas lightly.
Then I had to hose down the entire area again with plain water per instructions (I imagine because lots of little nematodes were sprayed onto grass leaves and not the soil itself. That took another 30 minutes (after fighting with a standard hose nozzle on a "quick-connect" coupling that was working perfectly well previously but now refused to connect THIS time).
Even having a towel with me was not enough to keep the sweat from dripping into my eyes and down my neck. My shoes and socks were soaked through from the rain and hose water on the lawn grass.
By the time I was done at 6:30, I was soaked in water up to my knees and from sweat down to my waist. Inside later, I found a tick on my head and one on an arm. I sweated for 30 minutes (lost 2 pounds, which was nice), and my hand was cramped from holding the hose nozzle for 20 minutes (off and on).
At this time I can say that, happily, the dehydration justified drinking an entire bottle of wine (Old Vine Zinfandel by Twisted Wine Cellars - really good inexpensive wine)
So when I say I don't have "routine problems", this is what I mean.
My next step in the attack is do apply a 2nd round of Milky Spore Disease. After that, I will spray cartor oil around the yard. That doesn't kill ANYTHING, but it makes the grubs taste terrible to moles.
So the moles will find less food and what the find will taste awful and they will leave my yard. The voles won't have the mole tunnels to use to find plant roots, and they will be easier for cats and owls and raptors to find and eat. Then, when I place mousetraps under boxes at vole exits, I will catch the last of them.
I don't have to kill all the voles, just keep the population in check. But if I COULD kill the last one in my yard, I wouldn't mourn their absence. LOL!
Iza the cat would though. She likes catching them. Unfortunately, she isn't very good at actually killing them... I've watched her. She leaves them after they stop trying to escape. I'm more lethal. When Iza leaves them, I go out and stomp them...
Sunday, June 13, 2010
Friday, June 11, 2010
That Compost Tumbler
I thought I should explain about the compost tumbler I mentioned in the previous post. There are large ones with a crank handle to rotate a large drum on a frame and there are smaller ones you just roll around on the ground to keep the materials mixed.
I have the large one on the stand. It seems like a great idea. The kitchen waste is safe from scavengers and the handle makes it easy to thoroughly mix the contents. The frame holds the drum just above the height of a wheelbarrow, so it ought to be easy to unload the contents when "cooked". There are vents for letting air circulate for aerobic microbial breakdown.
I don't know about the small portable ones, but the big ones don't work!
1. The vents are too small for good air ventilation, so the breakdown occurs mostly anaerobically ("without oxygen"). Anaerobic decay is cold and slow, which means weed seeds aren't killed and it takes forever. It also smells bad (anaerobic microbes produce ammonia).
2. It is awkward and messy trying to get the material out when you want it. The drum is too high to shovel the stuff out, and turning the opening to the bottom to let it fall into the wheelbarrow doesn't work well. It doesn't want to fall out on its own, and rotating the drum back and forth over the wheelbarrow spills half of the "compost" on the ground.
3. You would think a metal drum in the sun would heat up on its own. Nope! The vents are large enough to prevent that. The door does get hot enough in Summer though to approach "painful to remove".
4. The thing is a haven for insects. Clouds of fruit flies come out each time I open it. And there is some sort of black fly that loves the rotting (yes rotting, not composting) material as breeding grounds. I've had to take the vents apart several times to empty out all the dead bodies because that's where they try to escape through.
Do yourself a favor if you are considering one of these things. Build a normal compost bin instead!
Thursday, June 3, 2010
Avoiding Last Year's Mistakes
I made 2 really silly mistakes last year and I am pleased to say that I remembered them well enough to avoid them this year.
The first mistake was my compost. I have a tumbler compost bin. I add all my kitchen scraps and shredded paper to it. It doesn't work like they advertise. It never heats up, but it breaks down eventually. Most important to me, the fresh high-quality kitchen scraps are not available to scavengers like raccoons. I use the tumbler only for that reason. As soon as the stuff is beyond scavenging, I move it to my real (normal") compost bins which work very well.
Well, last Spring my real compost bins were all full of cornstalks, flower canes and other stuff which was slow to break down. So I used the material directly from the compost tumbler and dug it into the soil in my long trellis bed. I know about sheet-composting, where you just bury all the fresh scraps straight into the soil. So, no problem, right?
The second mistake was my fertilizer. I have 2 kinds of organic fertilizers. One is "W.O.W." (8-2-4) which is a corn gluten product. It is great for lawns because on the nitrogen and because the corn gluten inhibits seeds from growing the initial root. That really cuts down on the dandelions and other weeds if you time the application properly. The corn gluten doesn't harm established plants at all and it is a fine source of nitrogen. The other is "N Lite" (2-5-6). I like having the 2 of them because I can use either separately or blended (10-7-10), according to what the plants want.
OK, so here's what happened last year. First, I got a 1,000 melon and cuke seedlings sprouting from the lousy compost tumbler material! I couldn't distinguish MY melon and cuke seedlings from the ocean of hybrid melon and cuke seedlings. I tried to guess which ones were mine for a month, but finally pulled them all out. I replanted.
That's where the second mistake came into play. After scuffle-hoeing the whole area several times to make sure all the scrap melon seeds were spent, I carefully added a blend of the fertilizers to the soil and planted all my regular small crops. Most of my good crops are seedlings grown indoors and transplanted out. But I also have all those radishes, carrots, beets etc that are direct-seeded.
The fertilizer included the corn gluten. That stuff that inhibits seeds from sprouting... It was a month before I realized why nothing was growing! ARGGHH!
Things are growing better this year...
Wednesday, June 2, 2010
Asparagus
ASPARAGUS! I have an 8' by 3' asparagus bed. I'm proud of it. I harvested over 60 spears this year before letting the plants grow to replenish for next year. It was great! Last year I barely got a dozen (and they were late to emerge) and I thought they were dying. I LOVE asparagus! Fresh asparagus tastes better than grocery store ones! And they are tenderer while still crisp when steamed...
I started with 10 crowns 15 years ago, but am down to 7. I should replace the lost ones. Or maybe I should just replace them all this Fall. I haven't decided. 2 years ago, I covered the entire bed with black plastic to kill all the weeds. That didn't work. The weeds survived and the voles went crazy under the safety and warmth of the black plastic. They killed several crowns entirely and damaged others.
But because I wasn't sure where the new spears were emerging (so I didn't want to chop them with the shovel) and didn't want to dig weeds out around the bed, the weeds are taking over.
Anyone want to come over and weed my asparagus bed?
 I seem to have a lot of tree saplings and grass... Yes, they grew THAT high just in this year!
Well, when I dig all the saplings and grass clumps up, I will do what I USED to do that helped. Place folded up sheets of newspaper between the asparagus stalks. It works great. I just kind of overlooked it the past two years...
I started with 10 crowns 15 years ago, but am down to 7. I should replace the lost ones. Or maybe I should just replace them all this Fall. I haven't decided. 2 years ago, I covered the entire bed with black plastic to kill all the weeds. That didn't work. The weeds survived and the voles went crazy under the safety and warmth of the black plastic. They killed several crowns entirely and damaged others.
But because I wasn't sure where the new spears were emerging (so I didn't want to chop them with the shovel) and didn't want to dig weeds out around the bed, the weeds are taking over.
Anyone want to come over and weed my asparagus bed?

Well, when I dig all the saplings and grass clumps up, I will do what I USED to do that helped. Place folded up sheets of newspaper between the asparagus stalks. It works great. I just kind of overlooked it the past two years...
Monday, May 31, 2010

Saturday, May 29, 2010
Garden Started Outside 2
I thought I would provide more information about the trellis area of the garden. While I enjoy growing my tomatoes the most, the trellis is the place I enjoy most. First, let me describe it.
It is 30' long by 2' wide by 12" tall. It is that long because that's the total length of the individual adjacent beds when I first constructed the garden. It is 2' wide because I grow the trellised crops on the front foot and plants that can use some shade on the back foot. Plus, I built it after the rest of the beds as an afterthought and if it was any wider, my push mower wouldn't fit between it and the fence.
There are 4x4" 8' posts at each end and one in the middle. The trellis itself is concrete remesh wire with 6"x6" openings. The remesh is 6" off the ground and 5' high. Attaching the remesh was quite a project in itself about 15-20 years ago. My best friend and I decided that remesh was the best tomato cage material (and I still agree, but if I could get vinyl-coated remesh, I would buy it). We researched sources and costs and the price was dramatically better past a certain length.
Well, that was more than we needed, but I had been thinking of a sturdy trellis. Serendipitously, that length got us close to the "good price" and we ordered that. There was 20' extra, but I found a good use for that 2 years ago (more on that in the future).
So, we made our tomato cages and I used most of the rest for the trellis. It was difficult to attach to the posts. Well, we were inexperienced at such things. The vertical wires didn't line up with the posts, so we had to bend the remesh around the outer corners to fit (just try that sometime; the wire is really strong). And we couldn't get it to pull tight along the length and from top to bottom (like a bedsheet with wrinkles).
I figured out a way later, but it was too late and that's beside the point. But I'm keeping it in mind because after all these years, it needs to be replaced soon. The remesh is still sturdy, but the posts are rotting.
Anyway, I told you all this to talk about what I grow there...
I garden by the Square Foot Method (Mel Bartholomew) as best I can. I do it for small crops. I don't agree with it for large crops (can't help it, I just like large cages for big heirloom tomatoes). But the trellis area is seriously "Square Foot".
I planted garlic in the front foot last Fall 15' long (2 garlics per square foot). On the back side, I have alternated individual square feet for carrots, scallions, beets, radish, shallots, spinach, celery, chinese cabbage, leeks (and I am probably forgetting a couple) in succession planting. When the first are harvested, I will replant with the same crops but in different squares (Square Foot gardening makes for automatic crop rotation). I am adding parsnips this weekend.
I harvested my first radishes of the year yesterday. SPICY! Not like that bland stuff you get in grocery stores. And I should start harvesting the garlic next month or early July.
Here's the only picture I have at the moment.
 You can see the garlic, the beets and the radishes. The other stuff is still way too small to see. Well, the celery is large enough, but its not in that picture. You can see the remesh wire if you look carefully.
It is 30' long by 2' wide by 12" tall. It is that long because that's the total length of the individual adjacent beds when I first constructed the garden. It is 2' wide because I grow the trellised crops on the front foot and plants that can use some shade on the back foot. Plus, I built it after the rest of the beds as an afterthought and if it was any wider, my push mower wouldn't fit between it and the fence.
There are 4x4" 8' posts at each end and one in the middle. The trellis itself is concrete remesh wire with 6"x6" openings. The remesh is 6" off the ground and 5' high. Attaching the remesh was quite a project in itself about 15-20 years ago. My best friend and I decided that remesh was the best tomato cage material (and I still agree, but if I could get vinyl-coated remesh, I would buy it). We researched sources and costs and the price was dramatically better past a certain length.
Well, that was more than we needed, but I had been thinking of a sturdy trellis. Serendipitously, that length got us close to the "good price" and we ordered that. There was 20' extra, but I found a good use for that 2 years ago (more on that in the future).
So, we made our tomato cages and I used most of the rest for the trellis. It was difficult to attach to the posts. Well, we were inexperienced at such things. The vertical wires didn't line up with the posts, so we had to bend the remesh around the outer corners to fit (just try that sometime; the wire is really strong). And we couldn't get it to pull tight along the length and from top to bottom (like a bedsheet with wrinkles).
I figured out a way later, but it was too late and that's beside the point. But I'm keeping it in mind because after all these years, it needs to be replaced soon. The remesh is still sturdy, but the posts are rotting.
Anyway, I told you all this to talk about what I grow there...
I garden by the Square Foot Method (Mel Bartholomew) as best I can. I do it for small crops. I don't agree with it for large crops (can't help it, I just like large cages for big heirloom tomatoes). But the trellis area is seriously "Square Foot".
I planted garlic in the front foot last Fall 15' long (2 garlics per square foot). On the back side, I have alternated individual square feet for carrots, scallions, beets, radish, shallots, spinach, celery, chinese cabbage, leeks (and I am probably forgetting a couple) in succession planting. When the first are harvested, I will replant with the same crops but in different squares (Square Foot gardening makes for automatic crop rotation). I am adding parsnips this weekend.
I harvested my first radishes of the year yesterday. SPICY! Not like that bland stuff you get in grocery stores. And I should start harvesting the garlic next month or early July.
Here's the only picture I have at the moment.

Friday, May 28, 2010
Poison Ivy Woes
I have constant problems with poison ivy. It's partly because this neighborhood was developed from mature woods in the 80s/90s and partly because I left most of the backyard wooded. It took a decade just to get the scrub trees (like thorny locust) cleared out. I like the semi-natural look I have.
But it is partly because 2 adjacent neighbors totally ignore their yards next to mine. One has a drainage easement through their back yard (10' from my fence) and they basically ignore everything on the side near me. The other has 10' of brambles near my fence and just never bothers with that area. A 3rd neighbor is basically absent for some reason (I think the property is involved in a divorce dispute), and while he mows the yard every couple of weeks, he pays no attention to the edges.
So I am constantly fighting off poison ivy coming in through the fence.

I used to have little reaction to it, but several years ago, I got a full body rash from it. It was a miserable 2 full weeks. Some of the poison ivy in the neighbor yards is mature enough to produce berries and the birds evidently drop the seeds all around the yard. New plants spring up out of nowhere even near the house.
I saw the first new poison ivy plants leafing out 2 weeks ago. They are now fully leafy. I am an organic gardener. But that garden/flowerbeds/lawn. For poison ivy (and also rampant honeysuckle, wild grape, and some vine I haven't identified), I turn to Brush-B-Gon!
So today was "Spray Day". I filled up my large pressure sprayer (portable, but just barely) and made the rounds. I was shocked at how much poison ivy was around the yard and how mature some of the plants were! That's partly because I have been clearing problem spots and revealing places I haven't looked into for years. For example, I discovered (to my horror) that there is a huge poison ivy vine coming up over the fence and growing 20' up a tree in MY own yard!

I can pretty much kill off most of the plants in my yard, but I can't get rid of the sources. I spray carefully (short controlled spray individual plant by plant) through the fence as far as I can (the neighbors have no landscaping near the fence), but there is always more growing back the next year.
So I have a dilemma. If I ask the neighbors to control/spray the poison ivy in their yards, they will spray wildly right through the fence on a windy day and kill all my plants and flowers. If I don't mention the problem, I will have poison ivy forever.
Maybe I should ask them if I can spray in their yards and do it carefully...
Anyway, I went around the yard spraying poison ivy plants with great pleasure. I can't wait to see them turn brown and die! It was a sunny and nearly windless day, so it was safe. And only an hour later, all the leaves were dry, so I know they soaked in the spray.
I'll try to remember to post pictures of the dead poison ivy next week...
Wednesday, May 26, 2010
Perennial Day 2, Part 2
Well, I went to plant the new hostas I received a few days ago and got a real surprise!
The existing hostas are all fully grown. So I just assumed that where there weren't any, they had died, and I had ordered replacements. At every spot but one today, I found vole holes around the roots, but each one was still surviving and just now sending up new shoots!
Now I have 9 hostas to find new places for. I have 2 hosta beds. The backyard one has hostas placed far enough apart so that they are individual specimens. I don't want to add more there. The front yard bed has them crowded and overlapping (poor planning on my part, but the effect IS lush), so I CAN'T add more there.

Guess I'll have to make a 3rd hosta bed. I certainly have enough shade...
Tuesday, May 25, 2010
Garden Layout
This is a reasonably good view showing the garden layout. It is mostly six 8' by 3' by 12" high framed beds, plus a 30' long by 2' wide trellis bed and two 3' by 3' beds. The trellis gets the cukes, italian flat pole beans, snow peas, and sometimes I try growing cantaloupe up it (without much success).
 The 2 red beds have 4 tomatoes, 2 bell peppers, and a bush watermelon each. I'll be adding basil and marigolds soon. The red is a plastic that is supposed to reflect the light frequencies tomatoes use most efficiently. When you don't get full sun in your garden, you try anything. LOL!
The bed between them has broccoli, cabbage, and radichhio (a red chicory). It is half-full of beebalm (Monarda) that I moved there "temporarily" 3 years ago. I've left them there because it seemed a good idea to have a great bee attractant in the middle of the garden.
The nearest bed is the one I moved from a shady spot to this sunnier one last month. In most of the garden, I have black plastic covered with old carpet to suppress weeds between the beds. So, the lawn growing between the rest of the beds and the new one is temporary. As soon as I get ahold of some more old carpet, I'll eliminate that. Meanwhile, it is spaced just far enough to allow my lawn mower to fit.
The 3' by 3' beds are for herbs.
 I have thyme, tarragon, oregano, chives, cilantro, sage, and parsley. And there is a rose draping over to liven up the colors. The 2nd 3x3 bed has the rose in it right now. I really need to move that rose. I just don't know exactly where to put it. And since it is the last remnant of my 1st landscaping project here (24 years ago), I don't want to just toss it.

The bed between them has broccoli, cabbage, and radichhio (a red chicory). It is half-full of beebalm (Monarda) that I moved there "temporarily" 3 years ago. I've left them there because it seemed a good idea to have a great bee attractant in the middle of the garden.
The nearest bed is the one I moved from a shady spot to this sunnier one last month. In most of the garden, I have black plastic covered with old carpet to suppress weeds between the beds. So, the lawn growing between the rest of the beds and the new one is temporary. As soon as I get ahold of some more old carpet, I'll eliminate that. Meanwhile, it is spaced just far enough to allow my lawn mower to fit.
The 3' by 3' beds are for herbs.

Sunday, May 23, 2010
Perennial Day 2
Yay, I got more of the plants I wanted to fill in most of the spaces to make BIG patches of the same plants. I ordered some of the plants I needed to fill out large patches (about 8' circles) but not enough to really do it. I just can't get myself to spend enough money at one time. So I had to place 2 orders of plants to do it in 2separate orders. LOL!
But the fill-ins are here ($200 later). I don't really mind the cost, it just can't be so much in a single order. I'm weird that way.
Well, they ARE perennials. They will live for many years. And I have chosen ones that have long lives and do well here.
But the fill-ins are here ($200 later). I don't really mind the cost, it just can't be so much in a single order. I'm weird that way.
Well, they ARE perennials. They will live for many years. And I have chosen ones that have long lives and do well here.
Friday, May 21, 2010
Happy Birthday To Me
Turned 60 today. Heh.
I didn't care when I turned 30. Or 40. Or even 50. But I thought I would care when I turned 60. Somehow, I thought turning 60 would be a major change, like turning 21.
Nah. I feel the same as 40. That's actually weird. I feel like I SHOULD feel different. I think I SHOULD feel older at 60. I just don't though. I'm just as competent or not competent at the same things as I was 20 years ago. I know more science than I did at 40, but that's only because there is more science to know now and I do keep up with it. I don't understand people any better now than I did at 40, but that's probably just me.
I guess I'm still in that "middle-aged" limbo. Somewhere between "stupid young adult" and "losing-it old guy".
I'm not doing anything today to celebrate it, but I'm not doing anything to mourn it either. I just don't feel like today is all that different from yesterday or a day 10 years ago. Maybe 70 will start to feel "old". I'm just not there yet.
Which is maybe a good thing...
Last year on this day, my parents were visiting. Once, my Mom asked what the date was. I said "May 21st, my birthday". She asked again an hour later and I said the same thing. That didn't even get a reaction from either parent. Dad was there at the table. Neither one recognized "my birthday" as having any meaning among us. And that's when I knew they were "losing it". Because Mom never forgot my birthday before. And Dad was supposed to be the "memory" for both of them. She has lost her memory and HIS memory no longer serves them. And they don't realize it. That is so sad...
So today, and each year on this day, I mostly now mourn the "loss" of my parents. They are still alive, but their memories, their "selves", our connections, are gone... I will never have "them" back.
*SIGH*
Tuesday, May 11, 2010
Belated Mother's Day
I tried my best to get the scanner to work Sunday and Monday, but I couldn't. I fixed it today.
This is the picture I wanted to post...

All my love, Mom...
Mark
This is the picture I wanted to post...

All my love, Mom...
Mark
Saturday, May 8, 2010
Perennial Day!
I usually order some new perennial seedlings from Bluestone Perennials (a wonderful supplier) each year. In the past, I've ordered 3 of this, 6 of that... But the flowerbed always looks disorganized. And I have a difficult "partly shady" bed. This year, I decided to order more of the plants that have been successful here and enlarge the individual groups. I want larger areas of successful flowers.
The Salvia Purple Rain have done well and expanded to 8x8 feet and looked great last year. They're what got me changing my mind on the design. So the 6 Stokesia were good and I ordered 15 more. The 6 Veronica Royal Candles did well, so I added 9 more. And the Trollius thrived, so I added 9 more of them too. My Goldenrod are spreading politely, so I will let them expand in the 2 spots they occupy. The asters always do well here and they are spreading, so I will leave them some room. I intend to end up with about 8x8 foot areas for all of them.
Some have not done so well. I had a large are of Columbine ans one adjacent of coreopsis. They all died after 3 nice years. Maybe they are short-lived perennials... But I won't be getting more of them. For whatever reason they didn't like my soil or watering habits or sunlight. I love Columbine, but if they won't thrive here, I won't keep trying. I had them in 4 different places and they just don't like my yard. Oh well!
The coreopsis thrive in the planters, but not in the ground. Lovely as they are, they are "out" of the main flowerbeds.
The coneflowers do well, and I divide them every few years to spread around. They don't seem to mind being divided and return beautifully.
All my Black Eyed Susans did great in one place for 4 years then almost all died last year. Well, more accurately, they just didn't return this year. I have no idea why. I'm growing some from seed and will try to replant at a different location.
In the places where perennials died, I am planting annuals this year. Grown from seed, there is less of an investment, and if they grow well, I will know it is not the soil. In the Fall, if the annuals do well, I will dig the soil deeply and add more compost etc. Then try perennials again.
So, I got to work in the garden today planting some of the additional perennials!
First, I scraped the soil with the scuffle hoe to undercut as many weeds as possible. I doubled the number of Trollius. I wish I had ordered 3 more. That would have JUST filled the spot.
Before...
 After...

I added 9 more Veronica Royal Candles. That was about the right number. I had 9 before.
Before...

After...

The Stokesia Asters Professor Jellito (or something like that) were great last year. I am increasing them for 9 plants to 24. But that means moving 2 groups of a few surviving plants not doing very well. I have a spot to move them to. Sunnier, so maybe they will be happier (and a source for more plants of their kind next year if they do well).
But I haven't planted them yet. First, the area is covered with mock strawberries (the bane of my garden) and I had to go though and dig them out individually first. And it is also covered with a a very invasive Salvia called Purple Knockout. that I originally planted 40' away.
Warning, don't ever buy Salvia Purple Knockout! It self-seeds into the lawn, the apple bed, the other flowers, etc. It is evil! It spreads EVERYWHERE! If I hated a neighbor, I would give him cell packs of this perennial nightmare. If my property was to lay abandoned for 20 years, the only growth would be mock strawberry, salvia purple knockout, virginia creeper vines, and poison ivy. ARGHHH!
And I spent 2 hours pulling mock strawberry plants out of the area where I want to remove the Salvia purple knockout and plant more of the stokesia. It isn't easy easy! They don't up by the roots easily. You have to pinch down a bit and get ahold of the knobby crown. They are so hard to eliminate. If you don't get the knobby crown out, they return and send out runners.
And then there are all the wild onions! I've learned there are only 2 times you can pull then out. When the soil is very dry, or when the soil is very wet!
I collected quite a pile of weeds pulled out one by one today...
 It may not look like much, but that's 1' high and 3' across. And it's compacted because I raked it up across the lawn. Each weed was carefully dug up with a dandelion fork to make sure the roots were out. Those damned mock strawberries love to grow right up close to plants I want to save, so it take almost surgical skills to remove them.
I got almost 200 square feet cleaned of those mock strawberries today, and that was a big deal. If it was a farm, I could just undercut the entire area and leave the weeds to dry and die. But it is a perennial bed, so I have to go through the 100' x 10' bed picking through the desirable plants like going after hair lice nits.
The Salvia Purple Rain have done well and expanded to 8x8 feet and looked great last year. They're what got me changing my mind on the design. So the 6 Stokesia were good and I ordered 15 more. The 6 Veronica Royal Candles did well, so I added 9 more. And the Trollius thrived, so I added 9 more of them too. My Goldenrod are spreading politely, so I will let them expand in the 2 spots they occupy. The asters always do well here and they are spreading, so I will leave them some room. I intend to end up with about 8x8 foot areas for all of them.
Some have not done so well. I had a large are of Columbine ans one adjacent of coreopsis. They all died after 3 nice years. Maybe they are short-lived perennials... But I won't be getting more of them. For whatever reason they didn't like my soil or watering habits or sunlight. I love Columbine, but if they won't thrive here, I won't keep trying. I had them in 4 different places and they just don't like my yard. Oh well!
The coreopsis thrive in the planters, but not in the ground. Lovely as they are, they are "out" of the main flowerbeds.
The coneflowers do well, and I divide them every few years to spread around. They don't seem to mind being divided and return beautifully.
All my Black Eyed Susans did great in one place for 4 years then almost all died last year. Well, more accurately, they just didn't return this year. I have no idea why. I'm growing some from seed and will try to replant at a different location.
In the places where perennials died, I am planting annuals this year. Grown from seed, there is less of an investment, and if they grow well, I will know it is not the soil. In the Fall, if the annuals do well, I will dig the soil deeply and add more compost etc. Then try perennials again.
So, I got to work in the garden today planting some of the additional perennials!
First, I scraped the soil with the scuffle hoe to undercut as many weeds as possible. I doubled the number of Trollius. I wish I had ordered 3 more. That would have JUST filled the spot.
Before...


I added 9 more Veronica Royal Candles. That was about the right number. I had 9 before.
Before...

After...

The Stokesia Asters Professor Jellito (or something like that) were great last year. I am increasing them for 9 plants to 24. But that means moving 2 groups of a few surviving plants not doing very well. I have a spot to move them to. Sunnier, so maybe they will be happier (and a source for more plants of their kind next year if they do well).
But I haven't planted them yet. First, the area is covered with mock strawberries (the bane of my garden) and I had to go though and dig them out individually first. And it is also covered with a a very invasive Salvia called Purple Knockout. that I originally planted 40' away.
Warning, don't ever buy Salvia Purple Knockout! It self-seeds into the lawn, the apple bed, the other flowers, etc. It is evil! It spreads EVERYWHERE! If I hated a neighbor, I would give him cell packs of this perennial nightmare. If my property was to lay abandoned for 20 years, the only growth would be mock strawberry, salvia purple knockout, virginia creeper vines, and poison ivy. ARGHHH!
And I spent 2 hours pulling mock strawberry plants out of the area where I want to remove the Salvia purple knockout and plant more of the stokesia. It isn't easy easy! They don't up by the roots easily. You have to pinch down a bit and get ahold of the knobby crown. They are so hard to eliminate. If you don't get the knobby crown out, they return and send out runners.
And then there are all the wild onions! I've learned there are only 2 times you can pull then out. When the soil is very dry, or when the soil is very wet!
I collected quite a pile of weeds pulled out one by one today...

I got almost 200 square feet cleaned of those mock strawberries today, and that was a big deal. If it was a farm, I could just undercut the entire area and leave the weeds to dry and die. But it is a perennial bed, so I have to go through the 100' x 10' bed picking through the desirable plants like going after hair lice nits.
Wednesday, May 5, 2010
Animal Crush Videos
I am against crush videos, of course. There is enough suffering in nature. No animal should ever be harmed for no useful purpose. That said, I have to agree very reluctantly with the Supreme Court ruling.
The law, though well-intentioned, was poorly written. When I first learned of the law last week, I spent some time thinking about it. The law was intended to prevent obvious abuses. Filming animals being slowly and painfully crushed is beyond defense. It is my personal opinion that only a very sick individual would want to watch such pain, and that such a person needs immediate therapy. So it is hard to defend the Supreme Court striking down the law aimed at preventing that.
But I gave the law a decent reading and considered the objections to the existing law. Some of the objections are weak and self-serving. But some of the objections are legitimate. As I understand it, the existing law could prevent:
1. Documentaries trying to show animal abuse in order to promote more humane laws.
2. Documentaries opposing dogfighting to be used in criminal cases.
3. Documentaries opposing abusive animal experimentation.
4. TV hunting shows.
5. Personal videos of hunting activities.
6. Nature films where any animal is hurt or killed naturally.
Do I think those likely? No. Is it intended? No. But it is possible under the existing law, and therefore it is “overly broad”. For that reason, the law needs to be re-written to specify the kind of abuse intended. It is not a question of whether exploitive and cruel crush videos are permitted, just how to define them properly.
I struggled to develop an analogy for this. Suppose that someone made a real crush video for exploitive purposes. And then suppose an animal rights activist made a copy of the video to use to raise public awareness against the practice. The same scenes, but for different purposes.
Both would be equally punishable under the existing law. That is not right, and that’s where the existing law went wrong. Intent matters!
I fully support a more carefully-written law that specifies details and intent to protect animals from deliberate abuse more clearly. The existing law just didn't do that very well.
Friday, April 30, 2010
Tomato Day
Hurray! I planted my tomatoes today. I have been expecting to do it for 2 weeks, but the 5-day forecasts kept throwing nightly temps in the 40's. And it did, indeed, get down to about 45 here just 3 nights ago. But with the extended forecast staying above 55 for the next ten days, I decided to go for it today.
First, I put down reflective red plastic. It maximizes the light frequency tomatoes use best. Plus it makes a good weed suppression cover. Notice there are 2 tomato beds. The bed between them his half monarda (the bees love it, which provides great pollination) and half cole crops (broccoli, cabbage, and radicchio). Then I selected my best seedlings.
 I have 3 Cherokee Purple, 2 Brandywine, and 1 each of Aunt Gerty's Gold, Prudens Purple, and Tennessee Britches. I have a cherry tomato for a hanging pot, but that goes elsewhere. You can guess from that that I prefer Cherokee Purple. It is very productive and hardy for an heirloom and the taste is subtle and complex. I like the Brandywine a lot too (who doesn't), but it is a meager producer and it tends to die early. I will actually be planting some new ones this week for replacement for the late season. I may just root a few suckers and see how that works.
Second, I dug 10" deep holes to set the seedlings down as far as I could. For those of you not so familiar with tomatoes, they develop roots from all buried stem. That helps a lot. It also keeps the early rootball well insulated from temperature and moisture fluctuations. I mixed the dug out soil with good slow-release organic fertilizer. I mix my own from 2 types and the final ratio is about 9-6-6. Too much nitrogen means lots of foliage and not many fruits!
 Then I back-filled the holes, making a saucer around them do hold water.
Third, I staked the seedlings in the center, put on the cages (22" diameter by 5' high remesh), and separately staked the cages. I love the remesh cages. They have 6" openings so it is easy to harvest the tomatoes, they are very sturdy, and they seem to last forever. Mine are about 15 years old and going strong. I gave them 2 good deep waterings (the soil was dry).
 I also attached the seedling to the center stakes and the cages to the outside stakes. I found these need plastic spring clips that make that so easy. I used to use plastic trash-bag ties but the clips are much better.
Here is a closeup of one of the seedlings. Even buried 10" deep, they are 8" above the surface. I usually plant about Tax Day, but like I said, the weather was fluctuating a lot this month. I usually use Wall O' Waters to protect them, but they really are a pain to set up and fill and I decided not to do that this year. But the stems are solid, the weather looks good, and they should be off and growing quickly.
 I wanted to show the remesh cages a bit better, too. At least you can see it in the above picture.
I plan to foliar feed the plants more often this year. That means spraying a liquid fertilizer directly on the leaves. They can absorb it through the leaves and what runs down the stem gets into the soil around the roots.
I think I will celebrate tonight with a steak, some home-grown asparagus, and a home-grown salad. And some wine. And "snacks" for dessert...
 My desserts are not like most peoples' desserts. LOL! Those bready-looking strips are banana cake. Think "spice cake" without the spices but with a cup of ripe banana mashed into the batter... Yum!
Do you like my placemat? I eat dinner on a TV tray while watching my favorite shows... Science, Nature, and Cooking.
 My favorite cooking show is 'Good Eats' by Alton Brown... He doesn't just cook, he explains the "why" of cooking.
First, I put down reflective red plastic. It maximizes the light frequency tomatoes use best. Plus it makes a good weed suppression cover. Notice there are 2 tomato beds. The bed between them his half monarda (the bees love it, which provides great pollination) and half cole crops (broccoli, cabbage, and radicchio). Then I selected my best seedlings.

Second, I dug 10" deep holes to set the seedlings down as far as I could. For those of you not so familiar with tomatoes, they develop roots from all buried stem. That helps a lot. It also keeps the early rootball well insulated from temperature and moisture fluctuations. I mixed the dug out soil with good slow-release organic fertilizer. I mix my own from 2 types and the final ratio is about 9-6-6. Too much nitrogen means lots of foliage and not many fruits!

Third, I staked the seedlings in the center, put on the cages (22" diameter by 5' high remesh), and separately staked the cages. I love the remesh cages. They have 6" openings so it is easy to harvest the tomatoes, they are very sturdy, and they seem to last forever. Mine are about 15 years old and going strong. I gave them 2 good deep waterings (the soil was dry).

Here is a closeup of one of the seedlings. Even buried 10" deep, they are 8" above the surface. I usually plant about Tax Day, but like I said, the weather was fluctuating a lot this month. I usually use Wall O' Waters to protect them, but they really are a pain to set up and fill and I decided not to do that this year. But the stems are solid, the weather looks good, and they should be off and growing quickly.

I plan to foliar feed the plants more often this year. That means spraying a liquid fertilizer directly on the leaves. They can absorb it through the leaves and what runs down the stem gets into the soil around the roots.
I think I will celebrate tonight with a steak, some home-grown asparagus, and a home-grown salad. And some wine. And "snacks" for dessert...

Do you like my placemat? I eat dinner on a TV tray while watching my favorite shows... Science, Nature, and Cooking.

Monday, April 26, 2010
Small Pond
Small Pond looking GOOD! I attacked the overgrown roots and cut them back to pot size. That was massive work It took all my effort to haul the huge root balls out.
.
First, mud and roots...


And weighing the pots down with stones took some work. I had forgotten the pots fell over when top heavy. But I got it all right eventually. It looked good at the end.
The lilies will take 2 months to recover and the sweet flag will take a month. But at least there is room again for the goldfish to swim around.
I'll wait a week for the water to lose the chlorine from the new water again before adding goldfish. But I will do that.
The pond will be so nice with a few goldfish in it. again.
Serious cleaning-up to do. See all the excess roots?
 All the excess leftover roots would fill the whole pond...
.
First, mud and roots...

I scooped it out wearing large water proof boots.
With the newly cut out pieces removed and chopped, I replanted the pond with pots....
Repotting the pieces of plants took serious cutting apart of ingrown roots.


And weighing the pots down with stones took some work. I had forgotten the pots fell over when top heavy. But I got it all right eventually. It looked good at the end.
The lilies will take 2 months to recover and the sweet flag will take a month. But at least there is room again for the goldfish to swim around.
I'll wait a week for the water to lose the chlorine from the new water again before adding goldfish. But I will do that.
The pond will be so nice with a few goldfish in it. again.
Serious cleaning-up to do. See all the excess roots?

Sunday, April 25, 2010
Pond Renovation
My large pond (8'x10') liner started to leak in 2008. When the water level fell to 4", it stopped. I had a billion mosquito larvae in there! So I punched more holes in it to drain the water. I expected to repace the liner fast!
Well, I didn't. The daunting task was moving the stones around the liner. I built the pond 20 years ago and I've learned that I an nowhere near as strong as I was 20 years ago! 20 years ago, I lifted those stones and set them in place carefully. Now, at 60, it is all I can do to merely roll them over out of the way. One stone must have weighed nearlt 100 pounds and it took me 15 minutes to just roll it over!
I can hardly believe I ever moved them to begin with! I recall lifting each of them into a wheelbarrow and moving them into place. They were "heavy" then but I could lift them into the wheelbarrow. I can't imagine doing that now! I could barely roll them today... One had actually fallen into the pond and it about killed me to lift it outside the area. I'll probably wake up tomorrow with pulled back muscles.
Being 60 ain't like being 40! I'm no special sports athlete, but I've always been able to push my body farther than my friends. I'm now losing that. :( There are some of those stones that I could lift into the wheelbarrow at 40 that I can't lift off the ground now...
But I DID get them moved eventually. It was quite a trick in some cases because I have plants all around the pond and didn't want to crush them.
Next, I have to shovel about 4" of composted leaves from the past 2 years out of the bottom. That's good stuff and I will use it in my garden, but it is going to be awkward getting it out. I'll be down 2' and lifting it up to the wheelbarrow 2' high. I think the snow shovel is the way to go.
Then I can put the new pond liner in over the old one, bury the edges on the ground, move the stones back on the edge, and refill the pond. I'll bet that takes a week! At least it should be good for another 20 years. After that, I won't be able to renovate it again.
Saturday, April 24, 2010
Friday Work
Well, in spite of having several flats of annuals from seeds, I looked at the total coverage and saw I was short. So I looked at the most successful perennials here and ordered more of most. Some are just too expensive to order more of. Beware "specials" because they get costly to get more of in further years! I have 3 Brunerra that I bought cheap once and now they cost $16 each!!!
I will have spots about 100 sq ft each of Stokesia, Troillus, Veronica, and Oriental Lillies. That doesn't include the large areas I already have of ruddbeckia, coneflowers, astilbes, and asters.
I'm killing the Salvia "Purple Knockout". They are so invasive they are in the lawn. OK flower but too much trouble. I'm surprised the world isn't covered in them. They are worse than dandelions.
I've been weeding actively. The bane of my yard is the Mock Strawberry. I pull them up constantly, but they are small and so numerous. I probably can't ever eliminate them. But I can reduce them with effort. They are like miniature dandelions; there are always some around. I spent the whole day pulling up those Mock Strawberries. 6 hours! And there are more scattered all over the back yard.
The Baptisia are finally coming up. Lovely large flowering plants. They take a few years to get established but I am seeing multiple stems now. Should be spectacular in July. Given how big they grow each year, I better give them extra fertilizer.
The butterfly bushes are coming along well. It feels odd to cut them down so much each early Soring. They probably need extra fertilizer too. The butterflies just swarm them, so it is worth it.
Hey, here's a neat trick. I learned this 10 years ago. When you buy carrots that have a little leafy growth on top, cut the top off 1" and just stick the top into the ground. It will grow the second year growth. Why? Because Black Swallowtail butterflies love them. They lay eggs on the stalks and the caterpillars eat the plant. The carrot isn't growing a root carrot the 2nd year, so no harm done. It's just for the butterflies.
And I saw my first hummingbird of the season 2 days ago. Yay! I had feeders out for 2 weeks. Well, better earlier than later... Don't want the little hummers to arrive and find no food.
Wednesday, April 21, 2010
Update
Well, with the weather turning unseasonably cool and wet, I haven't put the tomato seedlings in the new framed bed. I'll wait a few days.
At the same time, I suddenly got it in my mind to renovate the 2 ponds... The small preformed one had 3 goldfish, but they died. I decided to pull all the potted lilies and sweet flag out. Ack, the roots filled the entire pond! No wonder the fish died. It took a day to chop the roots apart into pieces I could pull out!
The larger pond (10' diameter and 2' deep) has a liner that developed holes 2 years ago. I had avoided replacing the liner because it was covered with heavy rocks. When I put them in place 15 years ago, I could lift them. Now I can't. But I put everything onto the effort yesterday and rolled every one out of the way at least off the liner top. I'll detail each project as I can and take pictures, but it looks like crummy cold wet weather through the weekend. May be a few days.
Just wanted to let you all know I am still here and working on projects, just having weather delays...
Just to help, here are my tomato seedlings and a few flats of annual flowers I'm growing from seed.
 They are a bit tall because they don't fit under the grow lights anymore. but that's OK because I plant them deep (for those who don't know, tomatoes develop roots from all buried stem). And next weekend is the normal time to put them out around here. I just got excited because the weather was unusually warm last week and I thought it was going to stay that way.
There are flats of annuals too.


 Simple stuff like marigolds, forget-me-nots, impatiens, carnations, etc to fill in holes in the perennial beds while I think about them this season.
I've realized I had too many spots of just a few perennials, and I want to have more of the ones that do well here. I mean, instead of having a few square feet of a dozen different plants, I want 100 square feet each of a few good ones.
And while I have ordered some additional perennials of the ones that are doing well, I've left spots for annuals this year while I make a final evaluation.
At the same time, I suddenly got it in my mind to renovate the 2 ponds... The small preformed one had 3 goldfish, but they died. I decided to pull all the potted lilies and sweet flag out. Ack, the roots filled the entire pond! No wonder the fish died. It took a day to chop the roots apart into pieces I could pull out!
The larger pond (10' diameter and 2' deep) has a liner that developed holes 2 years ago. I had avoided replacing the liner because it was covered with heavy rocks. When I put them in place 15 years ago, I could lift them. Now I can't. But I put everything onto the effort yesterday and rolled every one out of the way at least off the liner top. I'll detail each project as I can and take pictures, but it looks like crummy cold wet weather through the weekend. May be a few days.
Just wanted to let you all know I am still here and working on projects, just having weather delays...
Just to help, here are my tomato seedlings and a few flats of annual flowers I'm growing from seed.

There are flats of annuals too.


I've realized I had too many spots of just a few perennials, and I want to have more of the ones that do well here. I mean, instead of having a few square feet of a dozen different plants, I want 100 square feet each of a few good ones.
And while I have ordered some additional perennials of the ones that are doing well, I've left spots for annuals this year while I make a final evaluation.
Monday, April 19, 2010
"New" Raised Planting Bed, Part 2
I got a good start on finishing the "new" framed bed today. Here is where I left off yesterday...

So I added another layer of the old garden soil...

Added more composted mulch...

Leveled it all out, and added a last layer of garden soil...

It was finally time to finish the project by adding the red reflective plastic (the tomatoes love it)...
 The bed will hold 4 heirloom tomatoes in 24" diameter remesh cages. I will tuck a few basil plants around them on the sunnier side. It was way too windy to plant them today. I've been hardening them to outside conditions gradually for a week, but the wind was vicious. Stuff was blowing off the deck...
I've been debating whether to use the "wall o' waters" this year. Next week is the average last frost date, but we haven't had a frost since February. On the other hand, the warmer the better for early tomatoes. The wall o' waters means a little less sunlight, but the warmth and the wind protection is worthwhile. I guess I will use them this year.
I'll dig the holes for the tomatoes first, set up and fill the wall o' waters tomorrow, then let them warm up a full day. Then plant the tomatoes the next morning. The soil temperature is up over 60 F, so they won't mind being planted. But wind can just dehydrate them so badly when they are getting established!
So I added another layer of the old garden soil...

Added more composted mulch...

Leveled it all out, and added a last layer of garden soil...

It was finally time to finish the project by adding the red reflective plastic (the tomatoes love it)...

I've been debating whether to use the "wall o' waters" this year. Next week is the average last frost date, but we haven't had a frost since February. On the other hand, the warmer the better for early tomatoes. The wall o' waters means a little less sunlight, but the warmth and the wind protection is worthwhile. I guess I will use them this year.
I'll dig the holes for the tomatoes first, set up and fill the wall o' waters tomorrow, then let them warm up a full day. Then plant the tomatoes the next morning. The soil temperature is up over 60 F, so they won't mind being planted. But wind can just dehydrate them so badly when they are getting established!
Saturday, April 17, 2010
"New" Raised Planting Bed
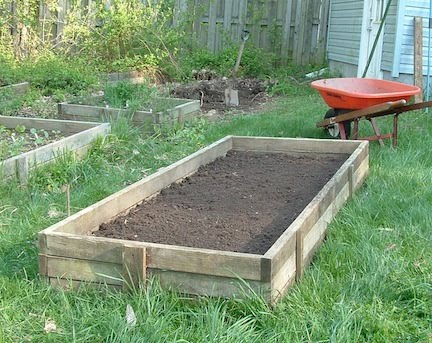
It's time to plant my tomatoes! So I looked around the garden for a place I hadn't planted them in for a few years. No luck! Part of the problem is the tool shed I had a contractor build 5 years ago (concrete pad, cinder block foundation, standard pitched roof - I wasn't going to try that on my own) is that it shades 2 of the framed beds. I haven't been able to use them for 5 years. But that means they haven't had any crops in them either!
Here's the general picture of the garden. It doesn't show the whole garden well. There are six of the 8x3 frames, two 3x3 frames, and a 30x2 trellised bed. The mailbox is a very convenient place to store small hand tools (try it, you'll love it).

Two of my framed raised beds were put in shadows because of that shed, so It was time to take action! Rather than build new beds, I decided to simply move the two. It didn't seem like a big deal. Just lift off the frame, move it, and transfer the soil...
Yeah, right... I tried just lifting the old frame off the bed, but it wouldn't move. I pried under it with a crowbar, and that didn't help.
So, I decided to remove the braces holding the frame together and move each level of the framed bed one by one to a sunny spot. The frames are 8' by 3' of 2x4s, so the whole bed is about 10" deep. I had 1" by 4" vertical boards holding the 3 levels together. The boards are all pressure-treated pine. I wouldn't have used that had I known about the dangers 20 years ago but I figure that after that many years, there isn't much chemical to leach out.
The next generation of raised beds will be made of plastic or composite material, but that's a project for a few years from now when I rebuild ALL the framed beds.
So here is the progress so far:
I removed the frame layer by layer...

I covered the bottom with several overlapping layers of newspaper...
 Started adding soil from the old location (see the unframed soil above the new location?)

Then I went to my "free compost" pile. The county provides free shredded mulch (you come, they load, you haul), and I make it a point to get an extra load each year to cover and let break down for a year or 2. This season's pile was barely recognizable are "mulch". It is more like rough compost. The outside is still "mulchy", but the inside is composted.

I added 2 inches of that...

Then more of the old bed soil, and leveled it... You can see the old bed soil disappearing. I added the vertical braces back to the the frame (before the soil got too high).
 And that's where I stopped for the day. I only spent a couple hours at it, but it was a good start. Sometimes, the hardest part of any project is just beginning it. After, that, momentum takes over (you do feel compelled to finish it). LOL!
Here's the general picture of the garden. It doesn't show the whole garden well. There are six of the 8x3 frames, two 3x3 frames, and a 30x2 trellised bed. The mailbox is a very convenient place to store small hand tools (try it, you'll love it).

Two of my framed raised beds were put in shadows because of that shed, so It was time to take action! Rather than build new beds, I decided to simply move the two. It didn't seem like a big deal. Just lift off the frame, move it, and transfer the soil...
Yeah, right... I tried just lifting the old frame off the bed, but it wouldn't move. I pried under it with a crowbar, and that didn't help.
So, I decided to remove the braces holding the frame together and move each level of the framed bed one by one to a sunny spot. The frames are 8' by 3' of 2x4s, so the whole bed is about 10" deep. I had 1" by 4" vertical boards holding the 3 levels together. The boards are all pressure-treated pine. I wouldn't have used that had I known about the dangers 20 years ago but I figure that after that many years, there isn't much chemical to leach out.
The next generation of raised beds will be made of plastic or composite material, but that's a project for a few years from now when I rebuild ALL the framed beds.
So here is the progress so far:
I removed the frame layer by layer...

I covered the bottom with several overlapping layers of newspaper...


Then I went to my "free compost" pile. The county provides free shredded mulch (you come, they load, you haul), and I make it a point to get an extra load each year to cover and let break down for a year or 2. This season's pile was barely recognizable are "mulch". It is more like rough compost. The outside is still "mulchy", but the inside is composted.

I added 2 inches of that...

Then more of the old bed soil, and leveled it... You can see the old bed soil disappearing. I added the vertical braces back to the the frame (before the soil got too high).

Monday, April 12, 2010
The "Project" We All Hate
Income Tax Preparation Day - Who loves it? I could have done it earlier, but at least I didn't put it off to the very last day, like some people do.
I've used software for it the past 3 years. It isn't really any faster, but it sure is EASIER! And it saves money. And writing! The last is because I have to make an effort these days to write legibly. The "easier" part is that the software imports all the basic data from the previous year's file (you do get to review and change it) AND you just answer "interview" type questions and the software puts the answers in the correct places on the tax form. It also provides a lot of examples of the items to be included on each tax form line.
I especially like that the software does both Federal AND State forms (the Maryland tax form is worse than the Federal one).
Printing out the forms is wonderful. I was able to print out all the backup forms and worksheets for my files, so everything is well-documented.
The "saving money" part is most appreciated. The first year, I did the taxes by hand and then compared that to my software-provided return. I saved about $600 with the software! Not any sleazy tricks, just things I didn't understand or hadn't known about before. I was very careful to research the savings the first year, but they were indeed legitimate. Mostly, those were details of reportable stock and dividend exclusions. I can discuss a lot of subjects knowledgeably, but financial terminology drives me crazy!
I have even learned (too late) about credits I could have applied in the past that I knew nothing about.
The "it isn't really any faster... Actual preparation is faster, but it does take time to buy and download the software, save and print the forms and backup worksheets, and answer some of the questions you automatically know don't apply. From start to finish, it took exactly 3 hours, 2 beers, and 1 pack of cigarettes. About the same as "before software". But so much easier. And I am more confident the submission is valid and accurate.
The software cost $60 (Federal and State), but it was well worth it. Next year, I'll try to remember to do it in March! LOL!
Saturday, April 10, 2010
Storm Drain and Drainage Easement
The Drainage Easement has been the mild bane of my existence. A constant itch I can never solve. If you ever read the phrase "drainage easement" in a house you want to buy, go elsewhere!
When I moved here, 25 years ago, there was a drainage easement on one side of the property. It divided the 2 properties. That makes it joint responsibility. You DON'T WANT THAT. Your neighbor will NEVER want to do what you want to.
In my case, my yard is lower than the neighbor's. So when it floods, it is only MY problem.
Well, I woke up this morning and heard heavy equipment running outside. It was county people cleaning the storm drain at the bottom of the drainage easement! I got dressed fast and ran outside to see what they were doing.
Some background... A storm last Winter washed down tree branches that got so interwoven over the storm drain that I could not pull them apart. Then leaves and dirt piled on top and made a dam. Half my front lawn is sodden. I mean squishy to walk on like a bog.
Coincidence: I wrote up a list of things to do this week and the 1st item was to contact an excavator to dredge the easement. The storm drain itself is untouchable county property. But I was going to contact them about that.
My neighbor beat me to that. He is selling his house and called the county to clear the storm drain. Yay!

I noticed that they had shoveled the drainage path 5' upstream, so I asked if they could use their bucket dredge to deepen it. No go. They only own that 5' upstream. The rest is mine and the neighbor. I've looked at the drainage easment. It is silted up almost 2' because the (idiot) neighbor planted willow trees along it. Willow tree roots LOVE water and grow thick and trap dirt.
When I saw him planting the willows 15 years ago, I begged him not to for that reason. He ignored me. Why not? The problem would all be mine.
Now, they are trying to sell their house. I'm a good neighbor. If the county cleared the storm drain, I can clean up my corner of the yard. I spent 2 hours clearing the brush from the boggy corner.
Before:

After:

Here's the view from the street. best in at least 10 years!

Since I had the pruning saw and loppers out, I took out several saplings that had chosen to grow up through some shrubs. But no pictures of that. Just happy to have gotten THOSE spots off my list.
Next, the "ugly corner of the yard where I used to stack firewood and has grown all brushy"...
Friday, April 9, 2010
Garden Started Outside
Finally, stuff planted outside!
Well, I did get the snow peas planted outside 3 weeks ago and they are emerging well.
But the other stuff had to wait. I should mention that I love "square foot gardening". Well, it's just me here, so I don't need much of anything at one time. Can you just imagine me using a 20' row of cabbage all at once? LOL!
So I plant in square feet individually in succession, as long as the season permits and then for Fall too. So right now, I have individual intensive plantings of carrots, 2 kinds of radish, spinach, beets, shallots, scallions, chinese cabbage, and kohlrabi. I have leeks ready to transplant in 2 weeks.
 Nothing but labels right now, though there are seedlings emerging everywhere but the spinach. I had no luck with that last year; it may be the seeds.
My garlic planted last Fall is doing well... They are on the opposite side of the trellis from all the small crops.
 My cole crops are looking good as transplants. I gave the seeds better light this year and it shows. This year I have broccoli, cabbage and radicchio. I'll be trying brussels sprouts as a Fall crop this year; it just doesn't work here planted in Spring.
 I know it looks like so little, but 3 of each will keep me for a month and I have succession plantings scheduled for 2 weeks. I will start more of them for a Fall harvest too.
My small herb garden, planted last year, is doing great! I have parsley, tarragon, thyme, chives, sage. And I am growing the few annual basil plants.
 I am even trying celery and parsnips, but it is too early for transplants or direct seeding.
The more regular veggies have to wait for a few weeks. My heirloom tomatoes are great this year. They are short and compact with good stems. I have transplanted them once indoors and they will go out in 2 weeks. I have red, yellow, orange, and lilac sweet bell peppers ready to go in early May.
There will be flat Italian pole beans, cukes, 3 kinds of melons, squashes later. but that's for May days, not April around here.
And I have 6 flats of annual flowers going now. THAT should brighten up the garden. I love my perennials, but only annuals give a backbone of lasting color and I am using more this year. And I can plant them in different places next year for a change of appearance. Salvias, marigolds, forget-me-nots, impatiens, and coleus. Nothing special, just some plants to lock in season-long color in varying light conditions.
There are a few perennials I am ordering more of this year. Some that grew well where I put them and I plan to make larger areas of those successful plants. The stokesias and troillus did well, so more of them . My flowerbed was too full of too many small groups of flowers. I want larger areas of those that do well here. Instead of 6 square feet of something; 60! That's still only 6' x 10' per plant!
My total long flowerbed is about 100' by 10', so there is plenty of room.
Well, I did get the snow peas planted outside 3 weeks ago and they are emerging well.
But the other stuff had to wait. I should mention that I love "square foot gardening". Well, it's just me here, so I don't need much of anything at one time. Can you just imagine me using a 20' row of cabbage all at once? LOL!
So I plant in square feet individually in succession, as long as the season permits and then for Fall too. So right now, I have individual intensive plantings of carrots, 2 kinds of radish, spinach, beets, shallots, scallions, chinese cabbage, and kohlrabi. I have leeks ready to transplant in 2 weeks.

My garlic planted last Fall is doing well... They are on the opposite side of the trellis from all the small crops.


My small herb garden, planted last year, is doing great! I have parsley, tarragon, thyme, chives, sage. And I am growing the few annual basil plants.

The more regular veggies have to wait for a few weeks. My heirloom tomatoes are great this year. They are short and compact with good stems. I have transplanted them once indoors and they will go out in 2 weeks. I have red, yellow, orange, and lilac sweet bell peppers ready to go in early May.
There will be flat Italian pole beans, cukes, 3 kinds of melons, squashes later. but that's for May days, not April around here.
And I have 6 flats of annual flowers going now. THAT should brighten up the garden. I love my perennials, but only annuals give a backbone of lasting color and I am using more this year. And I can plant them in different places next year for a change of appearance. Salvias, marigolds, forget-me-nots, impatiens, and coleus. Nothing special, just some plants to lock in season-long color in varying light conditions.
There are a few perennials I am ordering more of this year. Some that grew well where I put them and I plan to make larger areas of those successful plants. The stokesias and troillus did well, so more of them . My flowerbed was too full of too many small groups of flowers. I want larger areas of those that do well here. Instead of 6 square feet of something; 60! That's still only 6' x 10' per plant!
My total long flowerbed is about 100' by 10', so there is plenty of room.
Thursday, April 8, 2010
Flowerbed Problem
Sometimes, perennial flowerbeds just DIE. Oh sure, there are often 2 of 12 plants that don't return and need to be replaced. But I mean a place where, for no known reason, an entire area just DIES...
Last year, this spot was filled with columbines and coreopsis. They seemed healthy at the end of the year! They are are up and 6" tall in other spots in the garden. But they are just completely gone here.

What you see there are winter weeds. Purple deadnettle or something like that. I've pulled them up relentlessly before they flower in years past, but they seem unstoppable. Yet, they shouldn't make any difference. I mean, they shouldn't be stopping any perennials from growing back in Spring.
I'll give them several weeks to show up, then I'm scraping the surface a few inch deep with the spade and then planting annuals (hmmm, maybe tomatoes) this year. This coming winter, I'll cover the hole area with black plastic and kill all the winter weeds.
Sometimes bad things happen and you just have to start again...
Subscribe to:
Posts (Atom)
Odd Stuff
Random Odd Stuff... Luna Moth: Mylar balloons last a long time. These arrived May 21st and are still floating. American Atheist Necklace....
