Showing posts with label Projects. Show all posts

Wednesday, November 4, 2015

The Last Edging Circle, 2

Well, you may recall that I had a ridge leveled in my back yard, the soil moved to raise a part of the front yard and that I was creating some areas bordered with edging so I could plant stuff.  And that I had become royally tired of digging trenches for the edging in the rocky soil.  And because there were some large tree roots I did not want to cut which meant cutting the edging to fit on top of the roots.

So I left the last one half done for a week and did other stuff.  Well, I am happy to report that I finished it today.  No more digging in that soil...

There are 3 edged areas.
The far one has perennial wildflowers mixed in with enough compost to barely cover.  I have no idea what will happen there.  The package of seeds did not specify which plants were, and they grow so slowly that I won't recognize any until they bloom, and there were already some small weeds growing there.  I might end up nurturing 400 sq ft of weeds until next Summer when I see nothing blooming  when I have to replant more carefully.

The middle smaller area is for Lychimartra Firecracker, a lovely bronze foliage plant about 24" high with lots of small yellow flowers.  But it is a bit invasive and needs to be contained by itself.  It has its own 200 sq ft circle so that I can mow around it!

The nearest area, also 400 sq ft will be a combination of daffodils, tulips, and hyacinths for Spring color; with transplants of purple coneflowers, black-eyed-susans, and goldenrod for Summer and Fall color.  Plus I plan to add a few dwarf butterfly bushes.  I may get a package of seeds of plants that attract butterflies and bees to scatter among the plants next Spring. 

This last area will take some work planting.  Tulips and Hyacinths don't last long here because of the voles, so I have to make cages to plant them in.  The daffodils are fine without cages, being toxic.  But the bulbs haven't been delivered yet, and the transplants still have green leaves so I can't move them yet. 

Which means I can start on the new border of the older flowerbed (up against the fence to the left of the above picture).  I originally planted the border with alternating 12" sections of yellow then purple crocuses.  And 4" gaps between sections for annual Summer flowers.  The voles ate most of the crocus bulbs in just a few years, so this time, I am planting them in cages.  I'll still leave a 4" gap between the cages because it is nice to have Summer flowers there too and change them each year (yellow marigolds one year, dusty miller the next, orange zinnias after that, etc).

At least I don't have to install more edging there.  It's already in place!  And the soil there is soft and the border is the width of my spade.  "Piece of cake".  Right?  Yeah, right...

Fortunately, the weather is forecast to stay nice into mid-November, so I may get away with all this before the first hard freeze hits.  But I had better get working of those cages.  Two sizes of cages actually.  8"L x 6"W x 4"H for the crocus bulb border (so I need about 50 of those).  I haven't decided on the size of the cages for the tulip and hyacinth bulbs yet.  I need to sit down and diagram cages what use a 3' wide roll of wire mesh efficiently.

But I have the crocus bulbs now, so they come first.  The tulip cages can wait a few days...  But they will look basically like this...

Bulb Cage 


 12-18" square, 6" high.  It only needs making a wood form to bend the wire mesh over.  Not that that takes no time, but it beats buying cages at $30 each!

Saturday, October 24, 2015

Projects

Ever feel you are mentally done doing yard projects for the year?  But they're not finished?  I'm tired, but there is more to do.  I did finally get one done.  The far edged area intended for wildflowers...

I needed to loosen the soil, and I couldn't get the rototiller to start.  It has always been an "iffy" engine.  So I tried to rake the soil loose.  Too much gravel.  But it is supposed to rain lightly tonight and tomorrow while staying above 50F and that would be good for germinating the seeds.  So I thought about it...

Well, I had 2 trashbarrels of a half compost, half topsil mix.  What the seeds want is to get thoroughly moistened to trigger germination, some soil to surround them to trigger rooting, some soil below for the roots to penetrate, and some regular moisture after that for the roots to absorb water and minerals to send upwards to stems and leaves. 

So I used my 2 barrels of compost/soil on the area.  It only came a 1/4" deep when spread around, but the soil under there is decent.  So if they root, they will grow.  Wildflowers are exactly that; "wild",  They don't depend on people spreading fertilizer and in fact usually don't want it. 

So I spread the meager compost/soil mix, scatterred the seeds, walked all over the surface (and using a flat rake to also press down), and then watered the area.  Once lightly, waited 10 minutes and did it a gain, and repeated. 

Why water before a light rain?  To settle the soil around the seeds.  There is less chance now of a rain causing the seeds to get washed into uneven pockets.

And I did it later than I should have.  The package instruction say they want 2 weeks before the first hard frost.  Well, we've already had a frost, but that was before I planted the seeds and the forecast is for at least 10 days without another freeze.  So I may get lucky...

I'll know in a week to 10 days...

Sunday, October 18, 2015

The Digging Edging Trenches Blues

I am getting rather tired of digging trenches for edging around the new landscaping areas...  So I'm writing about it.  So here are "the blues".  Or at least, "the aquas"...

"I'm grabbin my shovel,
And digging the ditch.
All round the outside,
Then inward, kapish?

Its tedious working
And boring as Hell.
Can't wait til it's over, 
I'm sure you can tell.

I got the busted cramped left foot jambed down on the shovel blues....*

The shovel's 6 inches
The edgings 80 feet.
That's 160 times,
Foot and shovel must meet.

And sometimes there are rocks,
And the pounding repeats,
It aint nice at all 
Pounding shovel with feets.

 I got the busted cramped left foot jambed down on the shovel blues....

First it looks like no progress,
Just a few feet at most.
But then its some more feet,
And the ending is close.

But I'm fooled by the shadows,
And I finally see.
I'm just half-around,
Can that possibly be?

I got the busted cramped left foot jambed down on the shovel blues....

I wish I could do
Like Paul Bunyan did.
Drag a huge axe behind me
So a ditch I could dig.**

But I finally finished,
Halalluah I said.
Now all I have left,
Is to grub-hoe and dredge.

I got the busted cramped left foot jambed down on the shovel blues....

I'll wait til tomorrow
The grub-hoe work instead.
For now I have cramps
So I'm going to bed!

I got the busted cramped left foot jambed down on the shovel blues....

* Some things I do are lefty, some righty.  I think I was a natural lefty as a tot but taught to be a righty.  Sometimes I think that affects my thinking too.

** Legend says Paul Bunyan got tired of carrying his huge axe on his shoulder so he dragged it behind him once, creating the Grand Canyon.

But seriously, the end is in sight.   I did finally finish digging both around the outside and the inside of the edging and tomorrow I can scoop the loosened soil out of the trench and put the edging in.  There are a few shallow spots with largish stones that need to be cleared, and there are apparently 2 places where there are tree roots.  I'll cut the edging to fit over those.  Just one more bit of work, LOL!  But backfilling the edging is the easiest part and will only take half a day.  


Then I can finally plant!  I sure didn't expect it to take this long.  But I routinely under-estimate the time projects take.  Maybe that's what allows me to take on some projects.  I suppose if I knew how much time each one would actually take, I would never start any.  And then where would I be?

I guess I would rather under-estimate the effort and DO the projects then accurately estimate them and NOT do them... 

Thursday, September 3, 2015

Bye Bye Ridge!

There has been this ridge in the backyard since I moved here 29 years ago (and by coincidence, this is the very week I moved here).  It has always been a problem.  Too sloped and uneven to mow.  A few years after I moved in, I was able to get it mostly cleared of scrub trees and vines.  But they kept growing back and English ivy slowly took over.  I cut back the tree seedlings many times and even painted herbicide on the cut trunks, but it hardly slowed them down.

I finally contacted an excavator who came out and gave me a quote for leveling the ridge and raising a portion of the front yard that flooded after heavy rains.  I accepted the quote on the spot and they said they would do the work the following week.  When they didn't arrive, I called only to be told they were too busy.

So I contacted some other excavators who decided the job was too small.  Only one agreed (reluctantly - he is 45 minutes away from here) and would not come out to give a quote - I would have to accept the cost afterwards. 

Then, Monday afternoon, the original contractor called to say they had a break in their schedule and could do the job the next morning if I was still interested.  I was, and they did!

I am delighted with the results.  They did even more than I thought they could (considering 2 small trees I wanted to save).

It looked like this to start...
They started by scraping the scrub tree seedlings and ivy off the top and sides.
Dumping it in a truck for disposal.  You can see the amazingly long ivy roots hanging down.  No wonder that stuff is so hard to kill!
The ridge was already nicely lowered from just that.
I would have had them just pile the scraped ivy all up in a corner to compost, but there was enough soil mixed in that they probably would have just kept growing.
See the soil dust rising from the bucket?  We havent exactly had drought here (lots of rain in June, but almost none since then).  Even 4' deep, the soil was dusty-dry.
The equipment is cool (literally).  The Bobcat cabin is sealed, air-conditioned, and has a stereo system inside!
They carefully worked around the 2 trees, watching for the 1st sign of main roots.  This one is a holly tree.  It's hard to kill.  When I first cleared the ridge so many years ago, I accidently cut it down and it regrew multiple trunks from that mistake. 
After all the scrub tree saplings and ivy were gone, they heaped up the remaining soil to examine the quality.  We had expected the ridge to be unusable gravel and clay, but it turned out to be good sandy loam so they moved it out as a base to raise the sunken front lawn.
Then they dumped 2 truckloads of topsoil on that!  They spent a good bit of time grading it carefully.   The whole area is now a foot higher than the drainage easement at the property line.  Unless we have a really severe hurricane before the grass I'll plant sets in good roots, my front yard flooding should be over.
They even spent time carefully smoothing the added soil to the existing lawn.
Here is the new front lawn...
And here is the new back yard!
I don't plan to cover the entire area in lawn.  Lawn is boring...  I plan to put a mix of Spring and Fall blooming azaleas around the inside edges of the trees and wildflowers and some long-lived perennials in  between them.  It will be fun to decide exactly what to plant where...

I need to drag out the roto-tiller first.  Even though the Bobcat has track treads to reduce soil compaction, the new surface is still too packed to just plant in.  The front yard will just get grass.

I wish I had had this done 20 years ago!

Tuesday, June 9, 2015

The Garden Enclosure

I finally got the tightening on the chicken wire right.  It wasn't easy.  With new things, sometimes you gotta do it wrong a few times before you get it right.  But I did.  Now I have the tops as tight as is possible.  The two other sides will be easy.  The chicken wire there will just hang.

And because I have the top complete, it means I don't have to worry about dragging wire across the beds so I can finish planting corn and beans and cukes.  A bit late for this year but I'll get some harvest.  Next year will be the real start under the enclosure.

My tomatoes are doing very well.  I have 8 heirloom tomato plants in cages, one hybrid Big Beef (for backup if diseases hit) and a cherry tomato for snacking.  The bell peppers are growing well.  And I have 2 whole beds now for Fall crops of Bok Choy, Leafy Celery, Radishes, Spinach, etc.  I'll plant some garlic in a back row for harvest next Summer.

The screen door to the enclosure still needs adjustment, but it is closable enough to keep varmints out.  The last remaining chicken wire is just going to be hung from the sides, and after all the exoerience of the top and other sides THAT will be a piece of cake.  It is SO good to be nearly done with this project.  I've had mostly better ones and this was about the worst.

Relining the pond will be simpler and I will be glad to get at that.

There is always SOMETHING.

I think that if I didn't have something to look forward to doing, I would just fold my cards and die.

But not today.

The hardest part of this projects has been the exteme physical work.  Not general hard work, but the specific work my body isn't used to.  Like pulling the chicken wire real tight by hand.  It didn't seem all that bad at the time, but my hands cramped up seriously afterwards.  I could barely prepare dinner later! 

I m sure that if I did the same work daily, it would be just fine.  But doing unusual things on an irregular basis is brutal.  It was so, bad that I couldn't hold a kitchen knife.  And since I was preparing a stir fry, there was a lot of knife-work.  I had to take 2 ibuprofen and smear my left hand with a muscle relaxing cream.  And even that took an hour to take effect. 

Nothing like hand cramps to make preparing dinner hard...

Friday, May 15, 2015

Different Day, Same Subject, New Problem

Two Garden Enclosure Fun Surprises...

1.  When I assembled the PVC pipe frame, the pipes jammed into the connecting fittings so tight I couldn't even pull them out again.  No need to cement the top pipes together.  And the rest of them sat with gravity.  The only pieces I cemented were at the bottom, because they merely snapped on to other pipes and had upward pressure from attaching the chicken wire tightly.  And with the sides all closed with taut chicken wire, the top pipes couldn't very well come loose.

RIGHT...

2.  The enclosure is 20'x20'.  So five 4' wide rolls of chicken wire had to fit across the top exactly!  5x4=20, right?

RIGHT...
 -----------------------------------
Dang I'm stupid sometimes.  Well, OK  "inexperienced".  I continue to try to fight "Murphy's Laws".  It's not that I don't recognize their reality, it more that I never see ahead of time when they will apply.  Actually, that may be the secret of Murphy's Law; it WHEN you don't think it can apply that it does...

Take the item #2.  The 4' chicken wire rolls are, after checking, 4'11".  The 10' PVC pipes are anywhere from 10' to 10' 1/2".  And each PVC connector adds about 1/4".  The result is that the chicken wire comes about 5" short of covering the top.

OK, a little thinking, and I realize that if I leave the gap at the edges, I can cover the gap with the chicken wire coming down the sides by starting 4" over the top.  If that's not obvious to picture, just trust me.

So to do that, I have to slide all the wire over the top  along the top PVC pipes.  The first roll I tried to slide, one of the pipes came loose and fell to the ground.  With the weight of the wire on them, it took me 15 minutes of struggling to get it back up, and I realized I would have to cement all the top PVC pipes after all.

Most of the pipes were in solid, but I wanted to cement all the joints.  So I had to tap most of them loose with a rubber mallet, apply the cement, then tap them tight again.  Half the effort was moving the stepladder around in tight areas.

It only took 2 hours, but I resented every minute of it.  It was 2 hours that I THOUGHT I was going to spend making the final tightening on the chicken wire from the top to the bottom.  So that I could start the last part of the project setting the screen door in place.

And that wasn't the last.  I had been fastening the chicken wire with nylon ties.  Those are thin ribbed straps that hold tight once pulled.  In fact they are SO tight, they won't slide along the PVC pipe.   So to make the chicken wire move along the pipes, I had to cut most of them loose.

When I got that done, I stopped for the day in relative disgust.  Fortunately, I had gone grocery shopping, so the fridge was full of my favorite foods.  I pan fried a chicken thigh, cooked corn on the cob, steamed asparagus and made a light cheese sauce for it, and made a very complex tossed salad.  With Zinfandel (and I don't mind saying I had several glasses)...

But I'll be back at it tomorrow!  Just my luck, Saturday and Sunday are forecast to be hot and humid...


Wednesday, May 13, 2015

Another Garden Enclosure Post

I'm beginning to wonder when this is going to end!  When I started it last Fall, I expected it would take most of 2 weeks.  Sad laughing at THAT now!  A day to break up the first couple of old rotting raised beds and transfer the soil to the other beds, build a couple new ones, transfer the soil to the new ones and then remove the other old frames. 

Then a day to dig holes for the new frame (15 minutes each, right?), and the rest of the day to construct the basic frame (just "tinkertoy" stuff, right?)  Another day to toss chicken wire over the frame.  Then a day to tighten the chicken wire all around.  And then a day to build a screen door into the structure.

Oh what fools we mortals be...

I keep finding problems to solve.  Now, I'll grant that solving problems is an enjoyable challenge.  But "2 weeks" has turned into "2 months" (given a break over Winter), and it's not finished YET!  I am both HORRIBLE at foreseeing problems AND estimating time to do work.

In my defense, doing things you have never done before in any way is difficult.  But I PLANNED this and had a pretty good idea of the work.  Sort of...  Well, I didn't expect digging a simple 2' deep hole wouldn't take just 15 minutes, but 30, and after several I was worn out for the day.  I bet my estimate of the total time is only 1/2 was it was, but what I didn't realize was that I couldn't keep at it 6 hours a day.

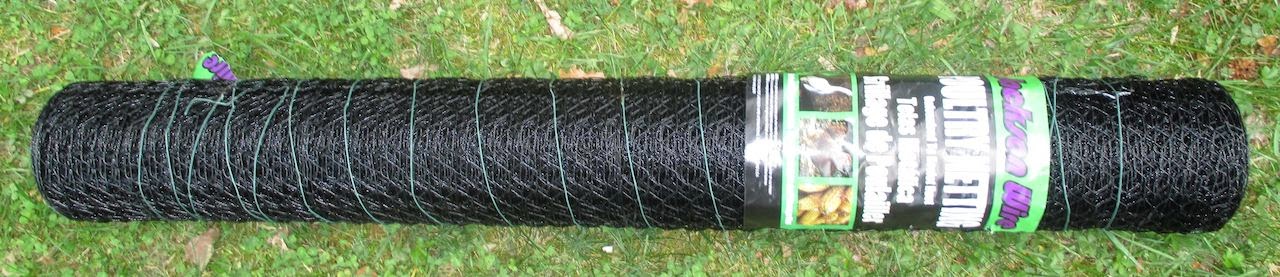
I then there were surprises.  Who knew chicken wire was so heavy and resisted being pulled tight?  Who knew that tolerances for fitting PVC pipes (with steel conduit inserted in the PVC pipes for rigidity) would be so important?  Who knew that making the tops of the frame would be so tricky on ground that sloped East/West AND North/South.  And I assumed the hanging chicken wire would be easily attached to the ground with 6" landscaping staples.

So today, I decided I needed to attach steel conduit reinforced PVC pipe at the bottom of the frame (to attach the bottom of the chicken wire).  I went to the local big-box DIY store to buy them.

The idea was to use something called a "snap-tee" to attach the PVC pipes at the bottom of the frame to attach the chicken wire using nylon cable ties.


It fits over existing PVC pipes by friction, but can also be cemented.  So I bought more PVC pipes and the snap tees and conduit steel pipe, and got them home.  Brought out my can of PVC cement and read the instructions.  The instructions mentioned that if the cement was "jellylike", DO NOT USE .

So I opened the can of cement and of course, it was "jellylike".  Well, it WAS 10 years old.  So back to the DIY store for fresh PVC cement.  Everything takes more time than you expect...

OK, I had the cement, the PVC pipes, and the steel conduit rods for rigidity.  I was confident the rest would go well today and quickly.  I had set the upright frame VERY carefully, so the  PVC pipes at the bottom HAD to fit perfectly, right?


Of course not!  So much as a 1/4" off and each cross pipe at the bottom required cutting to size.  And with the fitting, the steel conduit pipes had to be 1 1/4" shorter.  Argh!  I had to cut each steel conduit pipe shorter and the PVC pipes shorter by varying amounts (they are NOT all exactly the same lengths, varying by as much as 1/2").

There was a lot of cutting involved...


It's all maddening, sometimes!

So, I was ready to use the snap tees and cut-to-length between each individual set of uprights pipes.  That should be all that was required, right?  No.

The snap tees weren't exactly what I thought.  I thought they fit over half the pipe, so that another could be placed opposite each on the other side of the pipe.  But they fit 2/3ds over a pipe.  So you can't put one opposite the other on the same pipe.
They have to be one above the other...

If I had it to do over again, I would have made a jig to cut the snap tees to fit half the pipe instead on 2/3rds, but I was half done before I realized the problem.  And when the PVC cement sets after 10 minutes, there is NO undoing it.
It sets in just several minutes.   So when it is put anywhere, it STAYS there!

So I had to figure out another adjustment...

Doing some dry-fitting experiments, I figured out  could I place one snap tee over another.  In effect, all I accomplished in 2 days was attach 7 PVC pipes with steel conduits in them along all the bottom of most of the structure.  My guess before would have been 1 hour at worst.  It took 4.  O the hottest day of the year so far...  90 degrees and 90 humidity.  ARGH!!!

But like every other problem, its done!  Another unexpected problem solved...

At least I can next attach the chicken wire at the bottom tightly tomorrow!  Unless I discover some NEW problem to solve.

Next will be installing the screen door..  That's going to take more hole-digging, but at least I know how slowly that goes into the dry gravel/rock/clay soil.  I've been delaying that, seeing forecasts of rain to soften the soil a bit.  But it hasn't rained (naturally) so I'll have to do it the hard way like I did for all the upright pipes.

I have the screen door framed with 2x4"s.  The holes I dig will hold 4x4" posts set 2' deep.  The door frame holding the screen door will attach to the 4x4 posts.

And I bet something will just NOT work about that.  What would this project BE without one more surprise...

Tuesday, May 5, 2015

And Yet More Garden Enclosure

OK, I've been making progress on the enclosure.  I built the frame around the screen door.  I wanted to make tenon joints because that means twice the glue surface.  But the the tenoning gadget has to have the boards straight up from the table saw, and there isn't 8' above the table saw to the ceiling.  So I went with half-lap joints.  With glue/screws/corner braces, that ought to last as long as the preservative-treated wood itself.  Which is about 25 years.  And in 25 years, I'll be 90 and probably won't care.

So I did the half-lap joints...


Don't worry, the joints fit better than it looks.  The pictures were taken before the glue/screw.

So the idea was to have 2x4 boards attached to the door, and then attach the 2x4s to 4x4" posts set in the ground.  A couple days work, and the exact placement depended slightly on matching the chicken wire.

But I was getting anxious to plant my tomatos.  I couldn't do it before I had the chicken wire overhanging the garden frame.  The chicken wire was going to drag along the raised beds as I installed it and that would rip up any tomato seedlings.  What to do, what to do?
And building the door itself would take days.  So I was looking at a delay of planting the tomatoes (and some other stuff) almost 3 weeks after the proper planting time after all this work was done. 

Ah blessed non-sleep!  I sometimes do my best thinking lying in bed trying to go to sleep.  And yesterday was no exception.  As I lay there, turning over the problem in my mind, a solution struck me.  I could lay the chicken wire over the frames of the closest 2 beds without doing the final tight attachment work!  As long as it was generally up on the frames, I was home free to plant in the 2 left beds...

Hurray!

I did that today.  The chicken wire is hard stuff to handle.  It comes wrapped tightly coiled.
The coil has a memory.  It has to be unwound, turned over, and rewound the opposite way for an hour or so before it lays flat.  THAT is an adventure in itself!  I start by unrolling a foot and putting a cinder block on it to hold it in place.  Then unroll the 50" length.  It gets harder to unroll toward the end, being tighter and smaller roll.

At the end, you are fighting tight wire in a 2" roll.  But placing a board on the unrolled part prevents rerolling.  And the last foot is straightened by hand.

Chicken wire usually has sharp wire edges.  Fortunately, this stuff I bought (Jackson Wire, and it is a personal unpaid recommendation)
is black vinyl-coated galvanized wire with (mostly) no sharp edges!  It is unusually easy-to-handle chicken wire!

So I spread the first roll out the 50' length in the direction it wanted to roll up.  Then I turned it over and re-rolled it up the opposite way.

After an hour, the wire memory was neutral!  It laid FLAT!


I was able to drag the 4' wide 50' length over the top of the frame.  Not easily.  I had to do it 10' at a time.  It worked.  Not like sliding a tablecloth over a table, but sure well enough.


So I did that that and with the wire overhanging, was able to plant tomato seedlings safely just as the rain started at 6pm.  And into the house I went to make myself a fine steak dinner with asparagus in cheese sauce, a tossed salad, and home-fried potatoes...

Next time:  The draping-the-chicken-wire-over-the-PVC frame-process...


Thursday, April 23, 2015

Garden Enclosure Again

I'm pleased to say that I set the last post and cross-piece of the garden enclosure frame yesterday.  Most of the posts are set 2' deep in clay and gravel (and the soil around them is tamped down hard), so they should stay secure.
The ground slopes both ways, but the top is level, which was more complicated to construct but will look better.  One thing I've learned over the years as that a couple days extra work makes things better forever.

The framing is 1" PVC pipe, but I put metal conduit pipes inside them for strength. 
Note that the upper cross-pieces don't sag...

I got the basic structure from a website HERE but I had to make some improvements.  First, there are some parts of the site's plans that seem to require at least 2 people.  Second, mine is larger.  Third (and forgive me) but I couldn't make PVC connectors fit onto metal conduit like the site suggested. Fourth, the site hung the chicken wire horizontally and that seems harder.  I am draping the chicken wire over the top and down the sides to use the frame as a support while I work.

Yes, I could hire someone to help, but part of the point of doing this is doing it myself.  I could have just hired a crew to build the whole thing.  A big part of my life has been "Mark Do", LOL!*

Today I made sure all the posts were as level as possible as I tamped the clay soil around the posts with a piece of 4"x4" post (checking with a post level all the way around).   

JOHNSON - Post Level, 3 Vials
BTW, I just grabbed that image now.  I had had some difficulty attaching the level to the PVC pipes conveniently with a bungee cord.  When I saw the rubber band in the image it was "slap forehead time".  DOH!  Live and learn...

So today I went and checked the posts for solid footings.  They CAN move; it will take weeks for the clay soil to settle and harden.  I've done that with other uprights (like birdfeeder poles and trellis support 4"x4"s) and it is strong/solid eventually.  But I'm going to be throwing and dragging heavy rolls of 4'x5-' chicken wire over the tops and pulling it tight, so I wanted some temporary bracing.

I considered screwing some 12' boards diagonal across the posts (leftovers from building the fence years ago), but decided rope would do.  Pounding some 3' metal bars into the corners, I tied ropes along all the diagonals until the whole structure seemed solid enough for some pushing.

I'd show a picture of that, but my long ropes are camo colored and simply don't show up.  So just trust me they are there.

But before I can cover the structure completely with the chicken wire, I have to build a door.  The website I based the design on was going for "cheap" (under $100) and used gifted old window screens.  I'm not trying to waste money, but "better" is more important that "cheap".  The original design site is several years old; I wonder how solid the structure is now?  I need this to last 20 years. 

Instead, I think I will buy a good screen door, build a frame for it, then mount that in line with one of the paths between the framed beds.  That way I can get a wheelbarrow inside the enclosure.

I haven't decided on how to build the screen door frame and attach it to the general structure, so I will probably over-build it so it can stand on its own.  "Over-building" is my fall-back position when I'm not sure how well things will work out.  I'm thinking a frame of 4"x4" posts to attach the screen door with 8" flat metal braces on all corners and on both sides and some 8" lag screws in each corner both ways for peace of mind.
Product Details


Did I mention I "over-build"?  Well, it's better than "under-building".  Have you ever heard a bridge-builder say "I think I'll under-build this one?  Would you want one to?  LOL!

Getting the rolls of chicken wire over the structure is going to be a bit tricky.  I have 3 stepladders (8', 6', and 4'**), so I  can set one up at each post across the frame.  The balancing of them across the top baffled me for days, but last night I envisioned laying some of those old 12' boards across the 10' spans like railroads.  Is THAT cool or what?

So the chicken wire rolls will unroll across the top on the boards and down both sides.  And I will leave an extra foot of chicken wire at the bottoms to fold outwards to thwart squirrels or groundhogs digging under the edges to get into the garden.

I am slightly dreading the effort to cover the whole structure with the chicken wire.  It isn't going to be easy.  I expect some frustrating moments.  But I expected (and had) some frustrating moments setting the posts in place and getting the cross pieces attached.  So I'll get the chicken wire rolls laid across one way or another.

Pictures of that as it goes next time...

* "Mark Do" comes from childhood where I demanded to tie my own shoes when Mom tried to do it for me.  I didn't do it well at first (she told me years later), but my shoelaces were never loose.  My adult guess is that Mom had a challenging and independent child.  I don't remember it.

**  My box black oil sunflowers seed bird-feeder is up on an 8' pole.  The 8' stepladder is heavy and awkward.  So I bought a 4' one.  It was too short to reach above the box for refilling.  So I bought a 6' one.  As Goldilocks might have said: "Ah, just right"!  So I have 3 stepladders...


Sunday, April 19, 2015

The Garden Enclosure

It progresses.  I discovered some real problems as I went recently.  I want the top of the enclosure to be level.  But the ground slopes front to back and right to left.  That makes digging the holes for the frame real tricky.

I tried to measure the slope of the ground first.  That got me a general idea that is dropped 1.5' in both directions, but it wasn't very exact.  I suppose I could have lived with that, but my Dad was always one to point out minor flaws in anything I ever built (no matter how well built), so I have a reaction to that even though he is gone now.  Old habits die hard.  And there IS a point to seeking perfection in any project, Dad criticisms or not.  A few extra days work means years of admiring work well done.

So I wanted to make sure that, even though the ground was sloped, the top of the frame should be level.  If I had surveyor's equipment, that would have been easy.  But I don't.  So I thought about it a few days.  With some complicated ways that seemed really awkward in reality.

As I was trying to get to sleep the previous night (and I did the construction yesterday, so that was 2 nights ago), I kept turning the problem over in my mind.  It finally struck me...  A water level!  I would build the enclosure from the top down!!!

For those of you not familiar with the idea, water in a bucket with a long tube attached will stay at the same level as the bucket even when you move the tube around.  It's not a new invention, but it was a new thought to me.  I found a nice (free I hope) picture to describe it...

Well, saved me the effort of drawing and scanning it myself.  And I wasn't cutting off the tops of the PVC pipes, I just dug my holes a bit deeper to make them match at the top.  I marked each PVC pipe 8" down from the top and made the water level match it THERE.  So the tops of all my PVC frame uprights are level.

The garden enclosure is 20' by 20'   with the raised framed beds I built, that gives me 2' between each bed and 2' around the outside of them (inside the enclosure).  I hope that makes sense.  When I post this in a few weeks as an instructional post, I'll add diagrams.

But the point is that it finally solved my difficulties with the sloped ground.  Some pictures of the general steps...

The holes dug.  The digging was horrible.  The basic soil in the back yard is gravel, clay, and more gravel.  A post hole digger wasn't sufficient.  I had to use a breaker bar.  That's a 5' solid iron rod about 1.5" in diameter, with a chisel point at the bottom.  It weighes 12-15 pounds.  You lift it, you pound it down, you swivel it about.  Its the "breaker bar 2-step dance".  LOL!  THEN you use the post hole digger to scoop the loosen debris out.  It's great (but unwanted) exercise.  Good for causing hand blisters too.

This is the lowest end of the yard.  The higher end holes got to 2.5' deep
Here are the PVC pipes sitting in the holes at one end.  They may not look all in a row, but they are.
As each one was individually set at the proper depth so that the top was level, I shoveled dirt back in and stomped it down hard.  There is still some "wiggle" room to allow for attaching more pipes at the tops.
 Here is a corner, showing the connections.  It's not easy, being just me to be at both ends of the pipes, but I set up ladders to hold one end of each pipe while I set the other end in tightly.  I'm used to having to construct "helper" supports on projects.  A 6" spring clamp atached to a ladder makes a nice "V" shape to hold the far end of a pipe temporarily...
I initially thought it would be easiest to start at one corner and work my way around the perimeter, but it  wasn't.  Doing all the north/south first was easier for supporting the pipes!  BTW, see the spring clamp attached to the ladder there?  It was a very good "third hand".
And a secret.  The PVC pipe is too flexible for a good solid structure.  Metal is better.  But I couldn't find the kind of connectors I needed that fit the metal conduit pipe (unlike a site I found about building such a structure said I could).  So to get the rigidity of metal conduit pipe AND the connections that fit PVC Pipe, I put metal conduit pipe into each PVC pipe! 
THAT solution took a few days thought last Winter...  And metal conduit pipe is inexpensive, so that was not a concern.

I have most of the uprights and half the crossbeams in place.  Took two days but it will be worth it.

Why am I doing this?  Well, the squirrels and groundhogs developed a taste for my garden seedlings a few years ago and basically ruined my garden 3 years in a row.  When I cover this frame with chicken wire, they won't be able to get in.  And I will place bent chicken wire at the bottom to stick out 2' to prevent any tunneling.   Bwa-Ha-Ha!

I will have a garden yet...

Sunday, November 16, 2014

Fun With Lumber

Or I could title this "I have bad luck on minor things"!  I went out and bought the lumber I needed for the remaining 2 framed garden beds a few days ago.  Back at home, I decided to back the trailer up to the garage so I wouldn't have to carry the heavy preservative-treated wood from the far corner of the front yard where I store the trailer.

I'm sure anyone who has some experience in backing things up with a car knows that the longer the hitched item is, the easier it is to back up because the directions don't change as quickly as with short items.  Well, my trailer is only 8' long, and I couldn't even see it in the rear view mirror, or by opening the front car door and looking out.  I finally had to go in the garage and clamp a board upright in both rear corners of the trailer.  I think I will attach a couple of small flags on dowels attached to the trailer corners!

But I got the twelve 8'x2"x8" boards unloaded into the garage and the trailer put off into the yard corner.  Today, I set about cutting them to size.  The preservative lumber is odd.  They are not a full 2" thick or 8" wide, but thy ARE longer than 8'!  Perhaps that is so the poorly-cut ends can be recut better.

Anyway, I needed most of the boards cut to 7' long, so it didn't really matter.  Except the few end boards which I wanted to cut into two 4' long boards.  Still, the extra length made that not a problem.  I carefully measured each board's length before I made any cuts, and they were all 8'1" long.  Perfect.

Except one board.  Which I failed to measure.  Which was one of the few boards I chose for the two 4' pieces...  So I got a 4' board and a 3'10" board, which just won't make a rectangular framed bed!

Think about it.  For 8 of the boards, it didn't matter (they were getting cut to 7').  For 3 of the remaining 4 boards, I measured (and they were all at 8'1").  The ONE board I didn't remember to measure NEEDED to be 8'1" so that I could square the ends with good smooth cuts.

So the ONE short board had a 1/3 chance of being among the 4 boards that HAD to be over 8' long AND a 1/12 chance of being the only board I didn't measure.  Giving a 1/36 chance THAT board was the only one I didn't measure AND was too short.  Which means that, with 36 sets of identical boards, I would have NOT had a problem 35 times and a problem only once...  And I managed to achieve that "1 in 36 times event".

I have the worst luck with minor things!!!

So now I have to go back to buy 1 board.  Grumble, grumble, grumble...

Thursday, November 6, 2014

Energy Use After New Insulation and Other Stuff

1.  Energy Usage After New Insulation:

One month does not prove anything much, but my first post-insulation project usage for October shows that my Oct 2013 usage was 1326 "some unit" and the Oct 2014 usage was only 973.  It is promising, but weather in one month can be different one year to the next.  I'll wait to see the next few bills.

But it does look good.

2.  The framed raised garden beds are progressing.  3 of 6 completed and the boards for the 4th are all cut.  Now that I have the process of building them routinely, the 4th will be easier than the first.  And I am set to buy the lumber for the 5th and( last) 6th  any day the weather is "OK".

3.  I'm continuing to accumulate a pile of donatable items in the basement.  Its not the "usual stuff".  Today I cleaned out the top shelf of the pantry.  Anyone have  a bamboo multi-layer chinese steamer?  I do, and I haven't used it in 20 years.  Onto the pile it goes.  I hope the Salvation Army knows what it is.  LOL!  I keep holding off calling Salvation Army for a pickup because I keep finding new stuff to add to the pile.  I wonder what they will do with a 4" lens refraction telescope, for example.  But that's their problem/good luck.

4.  I'm loving the new trash pickup!  I got rid of 12 bags of kitty litter last Friday and 10 today.  They say they don't accept "lumber", but I have a barrelful of scrap ends, and so far as I can tell watching them mechanically lift and dump the dedicated container they provided, they can't see what is in it.  I can keep cutting the trash lumber into 6" pieces and put them in bags all month until is is all gone.  It sure will be nice to not have to drive to the landfill this winter!  And I have a lot more junk to get rid of.  I'll fit it it into the dedicated Evergreen container even if I need a sledgehammer to break it up.  And I'm not trashing any recyclable or compostable stuff.

5.  Last night was the first hard freeze here.  I dug up 4 Basil plants to try to keep them growing inside on the south window.  Picked the last tomatoes too.  A few were at orange, so they might ripen.  For the others, I will look up "fried green tomatoes".

6.  Got out my 3 window box planters tonight.  I can get some fancy mesclun lettuce from them over the winter,  I have just enough potting soil left from last Spring to fill them.

7.  The lowering sun this time of year is now blasting my eyes through the kitchen window.  I found a tension rod to fit across the window and a valance to hang just low enough to prevent the glare as I make my lunch.  28 years and I'm finally getting around to doing that!  I had a choice of 2 valances.  One white lacey and one red.  I chose the red; white lace isn't quite my style.  Red doesn't fit the white wall and black appliance colors, but who cares.  The cats won't complain.  I've been considering having the kitchen tiled in various shades of 4" green and painting the rest of the kitchen celery.  Maybe I'll hang a little label on the red valance "annoying red dissonance".  LOL! 

Actually, I like red/green/black as a color scheme.  My living room is hunter green, the TV room (traditionally the dining room) is dark red, and all the other stuff is black except for the medium wood furniture.  Oh well, I never expected to be displayed in "House Beautiful".  I like what I like.

8.  Next indoor project is to arrange the planting area.  Everything since Spring has just been piled into the grow-light shelves.  Since growing season starts indoors here in 2 months, I better get started on that soon.  Or I'll need to do it fast the day I want to start planting.

Friday, October 31, 2014

Garden Enclosure Again

Got back to work on the framed beds.  Bought twelve 2"x8"x8' pressure-treated boards yesterday morning and cut up half of them in the afternoon.  Half because I bought boards for 2 beds and decided to do them one at a time.

First, I discovered why the first set of boards I bought a few weeks ago for the first 2 beds were hard to get squared in construction.  I had the store staff cut them on their huge fancy saw.  Silly me!  I assumed the boards were the lengths the labels said (like 8' long).  The length didnt matter for the long sides of the beds, but it did for the widths because I simply said "ct them in half". 

"Half" isn't a measurement...

Only after constructing the first 2 beds did I realize that all the boards were not equal.  Not exactly a functional disaster for a garden bed, but it vaguely offended me.  I should have been forewarned by the very surly male store person who was talking to the female cashiers when I made him do some work.

So this time I simply took all the boards home to cut myself.  It was a revelation!  The boards varied in length from barely 8' to 8' 1"!!!  End the ends were NOT square by as much as 1/4" over the widt.  No WONDER I had had so much trouble getting the first set to match up square!

I have a radial saw to cut long boards to length easily.  I have a good table saw too, but you can't slide an 8' board on it.  Radial saws work best for that.  So first, I measured a board and found it was long and not square at the end.

I have it next to an 8' workbench at the same level height, so I can handle 10' long boards.  The radial saw is great for long boards because the saw moves, not the long boards.  I bought it when I built the fence because I had to cut about 1500 long boards (yes 1500) for that project.  It paid for itself just for that and I've probably cut almost as many more since then.

But back to the odd lengths and unsquareness of the boards...  I first shaved 1/4" off one end of each, then stacked them to the side.  When all were done, I clamped down a board at 8' from the saw blade (as a positive "stop"" and cut them to exact length.  Perfect length and all square ends!

Two of the 8' boards were WAY heavier than the others (I could barely lift them), so I kept them aside to cut into the smaller widths for the bed ends of 3'.  Like the longer boards, I shaved off the ends to get them squared.

Nothing ever works out as planned.  I set up another positive stop (meaning a clamped board away from the saw blade an exact repeatable distance).  And clamped the board against the saw fence so that there could be NO errors.

There was an error on the very first one.  I screamed in frustration!!!  How could it have been wrong?  Oops, the edges of preservative treated lumber are not "perfectly" straight along the long edges.  I had chosen the straightest ones I could find, but flat straight ones vary along their length.  So, as I kept adjusting the clamping to get them as straight as possible, the board slipped away 1/4 inch from the positive stop...

You can't win sometimes!  So this bed isn't 8' long; it is 7' 11 and 3/4" long.  *sigh*  It why I don't try to build furniture.  I'm cursed with minor errors.  OK, in the garden framed beds, it doesn't really matter much.  But it still ticks me off!

So, this early afternoon, I went out to construct the 3rd bed.  I have the digging routine down pat.  The yard is sloped, so I have to dig a trench for each bed to make it level.  I set the lower end of the long boards on a brick and raise it until it is level.  Then I dig down the upper end by that much.  It works.  Then I level the end board and clamp the long boards to it.

Making the end board fit even with the long boards, I drive in three 3" screws on each side, then raise the other narrow end up onto a board to keep them even.  Drive three 3" screws into each side there.  Then remove the support boards and settle the completed frame into the shallow trench.

If it isn't level, I lift the frame and push dirt under it until it is level.  Not usually required, but I did have to once.  Then I make sure the frame is really square.  You do that by measuring both opposite corners.  When I tap them a bit so the opposite dimensions are the same, I know it is really square.

It started to rain slightly after I got the first layer of frame for the 3rd frame in place this afternoon, so I had to stop and put all the tools away.  But at least that was done.  Putting the 2nd layer of boards on the top of the 1st level is always easy.  You just match the tops to the bottoms.


I cut a scrap board into two 2' pieces to space the beds apart for walkable/wheelbarrowable paths.  The upper left is the bottom of newer box...

But the rain stopped.  I didn't want to haul all the tools out of the shed in case the rain started again, but I did have time to haul all the boards for the 4th bed out of the trailer and into the garage.  At least I know how to do the cutting better than the first time, LOL!

That will be tomorrow's start.

Tuesday, October 28, 2014

Garden Enclosure

Back On Track!  Sometimes, when I get most frustrated about a project, I back off and think.  There is almost always a solution to any simple problem.  I found a solution to the problem I most recently posted about on the subject.

The problems were having to build framed beds on unlevel ground, keeping 2 layers of boards even and connected, and making the paths wide enough to get around all the beds in an enclosed area.

Sometimes the solutions are pathetically obvious in hindsight, sometimes the solutions are less obvious.

The biggest problem with my original design is that I did not take the thickness of the boards.  2x8 boards are 1.5" thick.  Not much, but after 3 beds with boards on both sides, that adds up.  Each framed bed takes 3" and 3 beds is almost a foot.

So instead of all the framed beds being 4' wide, the center one is 3'.  That gives me 2' paths and 3" to mess up in.

Then I realized that having 7' long beds meant that the center pole support would be in the middle of a path.  ARGH!  So, the center beds will be 8' and 6' instead of 7' and 7'.  The ceter support pole will be exactly on the side of the 8' framed bed.

The last problem is that the yard is unlevel.  I don't want to make the beds be unlevel, s I need to adjust the board frames so they ARE level.  But at one end, that puts the frame above ground.  I decided to slip a 1" board at the lower end on the first beds.  That's a bad fix.  The RIGHT way to do it is to bury a 2"x4" board at the lower level til it "just reaches ground level and set the new frames on top of that.  If that isn't clear, don't worry it works.  I had done that on another project 20 years ago and forgotten.  I "reinvented the wheel" so to speak.  Anyway, it will work.

So I am back on the project.

Tomorrow, I go to Home Depot and buy twelve 2"x8"x8' pressure-treated boards.  I had planned to do that today, but I ended up raking fallen trees debris off my roof. and them sweeping the debris off the deck. 

But I know how to complete my garden enclosure project now, and that's the main thing.

Wednesday, October 22, 2014

Garden Enclosure, Again

Some projects just go WRONG.  And you don't realize until you are about half done.  I thought the major work would be to build the enclosure and tearing apart the old rotting frame beds would be easy.

I'm an idiot!  PPPPPPPTTTTT..............

I wish it was April again and I was just starting this.  I would do it SO differently! But I wanted to save all the good soil by moving it from the old beds to the new beds as I built them.  Seemed logical at the time, but Bad Decision.  Happens a lot.

I had a friend who decided to almost double the size of his house by having half of it demolished and then added to.  It went horribly!  He could have had the whole house demolished and rebuilt so much easier and at about the same cost faster.  Ruined a year of his life and cost me our friendship (I mentioned the renovator who built my toolshed and did some additions elsewhere). 

Don't EVER make major recommendations to friends...  He blamed me for the disaster and I wasn't sympathetic enough but that's another story (which I will tell someday soon).

But back to the garden.  I SHOULD have just busted out all the old framed beds from end to end last April, disposed of all the old wood, and spread the soil and used my rototiller to level the whole *#%@ area.  I didn't and I regret it now. 

Part of the problem is that my lot slopes from back to front and from the center to the sides.  Nothing is level here.  It isn't obvious by just looking, but even an 8' long bed is 4" higher at one end than the other.

I have 2 of the 6 beds built.  It was hard work.  I had the original beds because the soil in the last sunny areas is all rock and clay.  I should have remembered that when I planned to replace them. 

If I was starting the project again today, I would just take out all the existing rotting boards at the same time and roto-till the entire area to level it all at once.  Why not do that now?...

Because of a silly piece of twine.  It outlines the whole new enclosure area.  Silly, but I didn't want to undo the careful twine outline of the new bed.  I can be very talented and very stupid at the same time.  No laws prevent it..

But clearly, the way to go is to disassemble the 2 beds I built already (which in spite of my digging are unlevel and unsquare.  Save the wood.  Rototill the entire area and rake it flat as a pancake, THEN easily build the new framed beds on the leveled ground and add new soil.  

And THEN build the squirrel and groundhog proof chicken wire enclosure.  

My tomatoes MAY only cost me $10 each for several years...

I'm doing this because it is basically my "Last Hurrah" of gardening.  In a few years (I'm 64) I won't be able to take on this kind of project.  The new garden beds will basically last me my future years until I can't garden any more.  So it is to rebuild them now or never.

And I will do it myself, or there is no point to it.

Saturday, September 20, 2014

Garden Enclosure

I'm back at the 20'x20' garden enclosure project.  And while my initial goal was to maximize the framed bed area and minimize lumber purchases, I've concluded that I need to make some changes.

First, the framed beds were planned to be three 16'x4' beds.  And two 8" wide boards high per bed.  Second, my plan was to use only 2 of the 3 planned beds each year and let 1 go fallow (and solarized with a clear plastic cover) each year.  But even a 2" thick board will bend out over 16', so that meant annoying stakes for reinforcement.

And, well, a 2"x8"x16' board is really hard to handle.  And keeping 1/3 the growing space fallow/solarized each year seems wasteful.  So instead of those 3 framed beds, I'm building six beds 4'x7', two 8" boards high .  That means I can build all the framed beds using 2"x8"x8' boards, which I can haul home in my 8' trailer and I can actually carry those boards.  With 6 beds instead of 3, I can keep 1 bed fallow and solarized each year with less growing-space loss, walk around them easier, and build them easier.  I lose 24 square feet growing area (the 2' between the beds), but I gain 28 sq ft not being fallow each year, so its a wash.

I drew some pictures, but I just can't get the scanner function on the printer to work today (again)...   The first plan had three 16'x4' beds side by side.  The new plan has six 4'x7' beds in a 2x3 grid.  I had to draw rectangles in Word On Mac, print it out, take a picture of the printout, and upload the picture.  I'm just having a bad month with programs.

But here it is and you BETTER appreciate the effort to show it!!!  LOL!
 I spent about 5 hours fighting over several days with the usual programs to draw/scan/display, with no luck.  But it only took 2 minutes to draw it in Word, 1 to print it, 1 to take a camera picture of the printed page, and 3 minutes to get it to a small jpeg file.  Sometimes indirect ways are easier.

I need to reteach myself a lot of the programs; I don't use them enough.  And I suspect I better clean up my Mac.  It's running slower and even a Mac can get clutterred.

Anyway, I went out to dig the first of 9 holes to set pipes into to construct the enclosed garden (safe from squirrels, groundhogs, rabbits, etc).  After I dug down 4" in the 1st spot, I hit rock.  And I don't mean little baseball-sized ones.  I dug a 2' hole around that rock and couldn't find the edge.  So I tried the next spot where I wanted to set in a pipe.  Same problem.  I even tried breaking the rock up with repeated blows to it with a 5' beveled "breaker bar".  And nothing broke.  I caused no damage to the rock at all.

You never know what is under your ground until you start digging into it!  In my case, I knew from some experience that my property is a silt plain draining to a swamp.  There are pockets of pure sand, some of pure clay, and lots of hand-sized round rocks.  I didn't know about the 2'+ rocks...

I think a geologist would conclude my property used to be a river path, with large rocks just under the surface that silted over with sand and clay millenia ago. 

I can't dig those up, I can't use an auger to drill through them, I can't ignore them.

Well, wait, I CAN ignore them!  The purpose of digging the holes around the garden-to-be is merely to set the upright PVC pipes in place.  So what if I build a base of PVC pipes ON the ground instead of INTO the ground?

Instead of burying pipes in the ground, I'll make a frame of pipes on the ground with attachment connections sticking up.  And I can attach the ground level PVC pipes to the ground firmly with 2' rebar rods.

Newest problen solved...  I assume I will discover other problems before the structure is completed, but nothing that can't be overcome.  Well, solving the problems is half the fun.

The initial plan was to assemble the upright pipes and then assemble the beds after.  The plan NOW is to assemble the first 2 raised beds to establish one edge of the new layout, fill them with soil, then disassemble the other old framed beds, and clear THAT area for new construction and move the remaining soil from the older beds to the new ones as I move along.

I know this is hard to imagine without pictures.  I'll be taking many as the project continues.  Promise.

But at least I am getting started on it again and solving the problems I didn't expect.


Friday, September 12, 2014

The Insulation Project

Home insulation work is messy!  Its sure not like having a plumber come in replace a faucet, LOL!  First, I had to take everything out of the attic and move everything away from most of the basement walls.  That was bad enough.  But then the contractor went to work...

The attic wasn't bad.  They only had to add a duct from a bathroom exhaust fan to the outside, add baffles against the roof edge to direct fresh air in toward the roof ridge vent, spray a foam sealant along all the edges, joists, and around all the pipes that came up through.  Then blow 13" of fiberglass insulation around levelly.  Oh, and they added a removable insulation cover over the attic staircase opening.

The messy work was in the basement, both inside and out.


They used more foam sealant around all the edges.  And to properly fill the wall cavities, they had to drill holes in the paneling.  Mostly, they could do that above the suspended ceiling tiles I installed.  You can see the wooden plug they tapped in afterwards.
But along one wall they had to seal the top edge and then drill access holes below the ceiling tile.  My fault, because of the way I attached the framing studs.  They could have lined up the holes better (see the row of plugs?) but I was watching someone else at the time the holes were drilled.  Well, I can stain them to blend in better, and it IS just a workshop.  Its not like they did that in the living area.
Here's a picture of an unplugged hole showing the pulverized newspaper filling.  Yeah, those newspapers you recycle come back to you sometimes.  Some of that insulation may even be MY old newspapers!
Then they went to work on the outside of the basement.  The front of the house hangs over the foundation 2'.  Which looks rather nice and adds some living space above, but is terrible for insulating.  The only insulation that was there was 1/2" plywood sheathing.  No wonder the initial energy auditor's infra-red camera showed the entire front side of the living area of the house as being  hot!  A better builder would have insulated that.  So these guys did!  They removed the vinyl soffit and sprayed foam insulation into all the edges.
Then they drilled holes in the plywood sheathing, and blew it full of pulverized newspaper and plugged the holes.   Then, of course, replaced all the soffit panels.
It was a bit messy...
They were about to vacuum it all up afterwards, but I told them not to.  Its untreated newspaper, so it is just fine as mulch.  And I KNEW they would thrash that vacuum hose all around through my plants.  So I just swept it gently off the plants with a broom after they left.

I wish I had had this done right after I moved in.  But the electrical company only started advising users of how THEIR usage compared to their neighbors last year.  Until then, I had no reason to think my usage was any different from my neighbors.  Seriously, have you ever visited a neighbor to compare electric bills?  Maybe you should!

Besides, when I started getting notices about my electrical usage from the supplier, I assumed it was because I was retired and home all day.  I was using hot water more often, opening doors to go in and out all day,  cooking more meals at home, watching TV, having lights on, etc.

I did a back-of-the-envelope calculation today based on the expected reduction in my electrical bill.  I'm estimating that the poor-quality job the builder did has cost me about $25,000 (allowing that electricity used to be a lot cheaper) and will save me about $1,000 per year (so the payback is 3-4 years).  And more in the future as energy costs rise...

If your electrical company has a subsidized insulation improvement program, take advantage of it!  My initial subsidized energy audit cost only $100 (and they gave me $100 worth of compact fluorescent bulbs so it was really free).  The company that partnered with the electrical supplier had an A rating on Angieslist, and guaranteed a 20% reduction in outside air leakage (I got 41%).

Give it some thought.

Adventures In Driving

 Last month, my cable box partially died, so they sent a replacement.  But they wanted the old one back anyway.  The store in town only hand...