I replaced an old refrigerator in 2000. Mainly, I was tired of the fridge section on the bottom (I reach into the veggie tray a lot and the bending over was getting really tiring), and the door opened the wrong way. Laugh, but I didn't know doors could be reversed at the time...
Well, right after the new one was installed, I learned the door stayed open unless deliberately closed because it was mis-leveled. I could adjust the levels. No problem. Right!
I ended up detaching a wheel and having the whole thing fall on my hand (10 years ago). I escaped serious injury, but ended up with a front corner on a block of wood. There it sat for 10 years. I kept meaning to have a repair service fix it properly, but I let it go.
Well, last year, the cooling started to fail. I kept moving the control knob to more cooling. Two weeks ago, I reached the maximum cooling setting. I'm not stupid, I knew that meant it was running less and less eficiently, probably due to dust bunnies around the cooling tubes behind the fridge. But I could pull it out to clean it because of the missing wheel. I even found my owners manual and wrote down the repair telephone number to have the wheel replaces and the unit checked next Monday..
I waited a week too long. The fridge failed last night! This morning the fridge temperature was 60F. The freezer is working just fine, which saved me about $50 in frozen foods. I know it stayed cold because I keep an ice cube in a small sealed container. I've done that for years, and it is a good trick. If you are ever away and the power fails then returns, you will know because the ice cube melts then refreezes flat. My ice cube was still a cube.
Fortunately, the old refridgerator is still working and down in the basement. I moved everything I could to it, but there was a lot of stuff I couldn't feel safe about. All stuff like mayonaise, salad dressings, and raw meat had to be trashed. And I through out some stuff that was probably safe to keep (mustard, ketchup, tartar sauce). Why take any chances for cheap stuff?
The old fridge warmed up in the time it took to fill it with the sodas and veggies and fruits and pickles from the upstairs fridge. It took hours to cool down below 40F. I suppose I can't even trust the milk I bought today. So it goes tomorrow. I guess I put too much volume at 60F in the old fridge for it to cool it all down quickly enough.
The aggravating part is that the soonest brand name repair appointment I can get is next Thursday. Another generic repair place might be able to come out Tuesday, but I won't know til Monday. I won't blame them for that because they keep appointment slots open for people who have refrigerated medications to deal with. Those they take immediately. That actually says good things for them.
But I may be dealing with awkward cooking arrangements for almost a week. Blah...
At least I'll get the front wheel replaced so that I can pull the refridgerator out every few months and clean the coolant tubes... But it serves me right for not dealing with this last year!
Showing posts with label Indoors. Show all posts
Showing posts with label Indoors. Show all posts
Saturday, July 31, 2010
Wednesday, April 21, 2010
Update
Well, with the weather turning unseasonably cool and wet, I haven't put the tomato seedlings in the new framed bed. I'll wait a few days.
At the same time, I suddenly got it in my mind to renovate the 2 ponds... The small preformed one had 3 goldfish, but they died. I decided to pull all the potted lilies and sweet flag out. Ack, the roots filled the entire pond! No wonder the fish died. It took a day to chop the roots apart into pieces I could pull out!
The larger pond (10' diameter and 2' deep) has a liner that developed holes 2 years ago. I had avoided replacing the liner because it was covered with heavy rocks. When I put them in place 15 years ago, I could lift them. Now I can't. But I put everything onto the effort yesterday and rolled every one out of the way at least off the liner top. I'll detail each project as I can and take pictures, but it looks like crummy cold wet weather through the weekend. May be a few days.
Just wanted to let you all know I am still here and working on projects, just having weather delays...
Just to help, here are my tomato seedlings and a few flats of annual flowers I'm growing from seed.
 They are a bit tall because they don't fit under the grow lights anymore. but that's OK because I plant them deep (for those who don't know, tomatoes develop roots from all buried stem). And next weekend is the normal time to put them out around here. I just got excited because the weather was unusually warm last week and I thought it was going to stay that way.
There are flats of annuals too.


 Simple stuff like marigolds, forget-me-nots, impatiens, carnations, etc to fill in holes in the perennial beds while I think about them this season.
I've realized I had too many spots of just a few perennials, and I want to have more of the ones that do well here. I mean, instead of having a few square feet of a dozen different plants, I want 100 square feet each of a few good ones.
And while I have ordered some additional perennials of the ones that are doing well, I've left spots for annuals this year while I make a final evaluation.
At the same time, I suddenly got it in my mind to renovate the 2 ponds... The small preformed one had 3 goldfish, but they died. I decided to pull all the potted lilies and sweet flag out. Ack, the roots filled the entire pond! No wonder the fish died. It took a day to chop the roots apart into pieces I could pull out!
The larger pond (10' diameter and 2' deep) has a liner that developed holes 2 years ago. I had avoided replacing the liner because it was covered with heavy rocks. When I put them in place 15 years ago, I could lift them. Now I can't. But I put everything onto the effort yesterday and rolled every one out of the way at least off the liner top. I'll detail each project as I can and take pictures, but it looks like crummy cold wet weather through the weekend. May be a few days.
Just wanted to let you all know I am still here and working on projects, just having weather delays...
Just to help, here are my tomato seedlings and a few flats of annual flowers I'm growing from seed.

There are flats of annuals too.


I've realized I had too many spots of just a few perennials, and I want to have more of the ones that do well here. I mean, instead of having a few square feet of a dozen different plants, I want 100 square feet each of a few good ones.
And while I have ordered some additional perennials of the ones that are doing well, I've left spots for annuals this year while I make a final evaluation.
Monday, April 12, 2010
The "Project" We All Hate
Income Tax Preparation Day - Who loves it? I could have done it earlier, but at least I didn't put it off to the very last day, like some people do.
I've used software for it the past 3 years. It isn't really any faster, but it sure is EASIER! And it saves money. And writing! The last is because I have to make an effort these days to write legibly. The "easier" part is that the software imports all the basic data from the previous year's file (you do get to review and change it) AND you just answer "interview" type questions and the software puts the answers in the correct places on the tax form. It also provides a lot of examples of the items to be included on each tax form line.
I especially like that the software does both Federal AND State forms (the Maryland tax form is worse than the Federal one).
Printing out the forms is wonderful. I was able to print out all the backup forms and worksheets for my files, so everything is well-documented.
The "saving money" part is most appreciated. The first year, I did the taxes by hand and then compared that to my software-provided return. I saved about $600 with the software! Not any sleazy tricks, just things I didn't understand or hadn't known about before. I was very careful to research the savings the first year, but they were indeed legitimate. Mostly, those were details of reportable stock and dividend exclusions. I can discuss a lot of subjects knowledgeably, but financial terminology drives me crazy!
I have even learned (too late) about credits I could have applied in the past that I knew nothing about.
The "it isn't really any faster... Actual preparation is faster, but it does take time to buy and download the software, save and print the forms and backup worksheets, and answer some of the questions you automatically know don't apply. From start to finish, it took exactly 3 hours, 2 beers, and 1 pack of cigarettes. About the same as "before software". But so much easier. And I am more confident the submission is valid and accurate.
The software cost $60 (Federal and State), but it was well worth it. Next year, I'll try to remember to do it in March! LOL!
Tuesday, March 9, 2010
Seed Starting Success
Well, the seeds are doing well this year. Partly because I have been making extra efforts to provide each flat with the best conditions for them.
One flat was all cole crops. The cabbage, chinese cabbage, broccoli, pak choi, and raddicchio are all up (100% germination!) and I move them to the strongest sunlight each day and give them grow-light bulb light for several hours in the evening. Best seedlings of those I've had in years!
Another 2 flats are bell peppers and tomatoes. Those haven't emerged yet but are in the guest room at 70F and should emerge very soon. When they do, they will get all the natural sunlight plus artificial light they can stand.
The flowers are more demanding. The salvia and impatiens and wave petunias need "strong but not direct sunlight" so I move then around a lot. They need up to 3 weeks of this, so I will stay on it. I was relaxed about them last year and had no success, so I am giving them lots of attention this year. Fortunately, the deck glass doors are south-facing and get maximum sunlight at this time of year. Yet there is plenty of space that is ambient-bright not not "direct sunlight".
If that doesn't work this year, I will give up on all the seeds that "no cover and bright indirect sunlight"...


Doing my best this year with these "light-exposed seeds"...
Sunday, February 28, 2010
Starting the Garden!
It is time to plant the first few seeds indoors. That is usually the best single day of the season (well, maybe eating the 1st ripe tomato is, too). So I took my seed tray out of the fridge, opened the index card tray of which seeds to plant (more on that later), and went to open my seed list. Hmm, the seed list isn't there in the seed tray. So I looked around at likely spots. Couldn't find it...
OK, I should explain my system... Several years ago, I got tired of trying to remember when I should plant seeds of each crop. I sat down and thought about a system for such stuff. The 1st thing I decided was that knowing when each type of seed should be planted depended on the average last frost date (AKFD). 8 weeks before ALFD, 4 weeks, plus-two weeks, etc. And I needed a quick reference for how deep, what kind of light, germination time, etc.
ALFD was easy to determine (April 20 here). So I took a calendar and marked the Saturdays plus or minus from the ALFD. Two weeks before ALFD is -2; four weeks after is +4, etc.
Then I bought index cards and dividers. I marked all the dividers with - or + week numbers (-12 through +12). Then I designed a card template suitable for all crops. The top line names the crop and the - or + weeks from ALFD. The next line says what action is required ("plant seed inside", "transplant to larger pot", "transplant outside", plant seed outside", etc.
Notes on the further lines mention unique requirements regarding fertilizer, transplant depth, spacing, etc. For example, there are individual cards for initial tomato seeds planted inside, (-8 weeks) inside transplant (-4 weeks), and outside transplant (+2 weeks) all based on ALFD. So on each weekend, I look at the marked calendar to see the - or + week number, open my index card box, and take out all the cards with that number. Then I now exactly what I have to do for the day...

The other half of my system is my seed storage method. Years ago, I found medical specimen vials for sale cheap. They are about the size of your index finger. I marked them all with indelible marker numbers. I placed each type of seed in individual vials and made a list of the vial #, seed type, variety, and year. Then I made a wooden holder for them. I just took a piece or pegboard and used it to mark spots, then drilled holes in plywood that fit the vials. I glued a bottom on the plywood and now I have a permanent holder for all the seed vials!

There is even space in the tray for my index card box and all the seed packets (for detailed information should I need it). I keep the seed vial list in the index card box. The seed list is done in Excel (easy columns, and it is also stored on the computer. When I buy new seeds, I merely write the changes on the list in red ink and change it on the Excel file each season.
So, why did I have a problem this year? Because I didn't follow through on the Excel file changes... I got many new seeds last year and this year. I made the manual changes to the list. I put the changed list on the computer table to update the Excel file.
And didn't do it...
I make notes on scrap paper all the time. Any piece of paper around the computer may have bits on information on several subjects. I go through them from time to time and throw away the ones I no longer need.
So there I was, with no updated seed list in the index box, in my gardening notebook, nor sitting around the computer. But I couldn't find the hand-written changes of vials identifications! I felt sick... Yes, I can tell corn seeds from bean seeds, but I can't tell among 5 varieties of lettuce or 5 varieties of tomatoes or 5 varieties of peppers, etc.
I searched the house from top to bottom. I'm not the most organized person. I write notes on scrap paper, on the backs of stuff I print out, on old envelopes. But still, I had checked all my piles of scrap paper, the index card box, the gardening notebook, etc. I had run out of spots. I even checked under the fridge vegetable crisper in case the list had fallen over the side.
So I checked the piles again. At the very bottom of the pile on the floor next to the computer, I noticed the list of this year's seed order. And when I turned it over,,, The LIST! Oh, I was, I was SO RELIEVED!!!
I think that was the single deepest breath I have taken in months!
I immediately updated it on Excel with a few seeds I bought locally, and printed out 3 copies. One for the seed tray, one for the index card box, and one for my gardening notebook!
At least now, I am ready to plant the -8 week seeds this evening and know which all my seeds are...
WHEW!
Tuesday, February 16, 2010
Winter Windowsill Lettuce

Actually, it is a nice combo of romaine, head, leaf, mesclun, and cress. And when I pick them by leaves, more grow! It's nice to have stuff growing that costs $7 a pound... And I can pick whichever I want each day.
Sunday, October 11, 2009
The Heat Pump Works!
OK. It seems like the heat pump guys finally got the thermostat to communicate with the heat pump. It wasn't easy, though.
At first, they insisted on trying their standard thermostat with their standard heat pump for 3 days in a row and it didn't work. The 4th day, the same repair guy arrived with a 2nd repair guy who claimed to have had these problems before and solved them. I was getting pretty tired of all the failed attempts and told them that they either fixed the problem or haul the unit away, reimburse me the whole cost, and I would call another company. Not to my surprise, that seemed to have an effect...
1. I had looked up the Ruud brand of heat pumps on the internet last night and they are not the best. Well, I had heard of them for years and thought they were good. I only chose them because it was so hot in July when the York unit failed, because York said "2 days" and Ruud said "1 hour". At the time, I was desperate; it was 95 in the house!
2. I hoped they (Ruud) would take the unit away so I could change my mind and get a Trane.
3. I didn't think that a different thermostat would solve the problem.
Well, damn, they seem to have fixed the problem with a different brand of thermostat! And while I an not a thermostat expert, I listen carefully and learn well...
We know we see integer degrees on our thermostats. We see 71 or 72 or whatever. It seems that thermostats don't actually function in those terms. They can measure full degrees in full whole numbers (71, 72) or half numbers (71.5) and that is promammable. They thought that might be the problem for over an hour. IOW, the problem might be that that the thermostat was reading full degrees when it should be reading half degrees (something about both heating and cooling reading the same units that caused the problem). But changing that didn't solve the problem anyway.
Finally, they just hooked a different brand thermostat in and it worked perfectly right from the start!
Can you believe that? They fought with a thermostat they knew they were having troubles with and that wouldn't work for three days (they had tried 4 new thermostats). Sure, they wasted their time at it, but they wasted MY TIME, too. The time while they worked and the time I waited. I figure I spent 20 hours this week either waiting for them to arrive or watching them while they were here.
The good news is, that after 3 days, the system seems to be working properly, I have gotten used to the thermostat controls, and the whole house breaker has not tripped once (isn't that curious). That whole house breaker box problem started when the heat pump went bad and ended the day it was fixed (so far). That the heat pump guys say it couldn't be their fault means nothing to me. I'll take coincidence on this matter.
I am quite certain that, somewhere, there are people with the bad combination of the particular thermostat with the particular heat pump from this company who DON'T know their heat pump shouldn't be running all the time and wondering why their electric bill is high.
When I suggested to the repair guys that they should have the company backtrack these situations, they just laughed while walking out the door. A case of "not their problem", I suppose).
Well, mine is fixed... Maybe I should only care about that. But I don't... I think I will email the Jiffy company (the installers) and raise the issue.
Wednesday, October 7, 2009
Electrical Troubles - Part 2
The adventure continues! The heat pump is still not working right. It seemed to be working correctly yesterday when the repair guy left, but that was because the conditions that we now realize trigger the problem didn't occur again until nighttime. This morning I took detailed notes.
The heat pump is set on the "heat" setting (yes, "heat pumps" cool also). I set it at 71 F degrees. When the temperature drops 2 degrees, it starts heating again. By design, hen it reaches 71, it stops and waits for the house to cool 2 degrees again. It takes about 15 minutes to raise the heat to 71 again.
The problem with my unit is that, for reasons unknown, as soon as the heat cycle warms the house to 71, the cooling cycle kicks on and cools the house down. When it reaches the 2 degrees below the setting (71), the heat cycle kicks in again. Endless loop, forcing the unit to operate constantly.
So the repair guy was back again today and worked 2 1/2 hours trying to fix the problem. He replaced the thermostat twice (new units, not "used"), rewired the entire installed heat pump, and the same problem occurs. He swears he has used the same thermostat with the same heat pump many times without problems.
The evil thermostat (with the lid up to show the controls):

Late in the effort, another repair guy called him saying he HAS had problems with those thermostats and that heat pump. So tomorrow, they are BOTH coming out (with a different type of thermostat) and attempt to solve the problem.
I bet a different thermostat doesn't solve the problem. I think there is something internally wrong with the heat pump itself and that they are going to have to replace the whole unit!
And I'll bet that some of their customers have the same problem I do and don't realize it is a problem. They just get used to having the heat pump running all the time and wonder why their electric bill is so high!
I'm glad I'm retired. If I was having to take time off work for this nonsense, I'd be getting seriously upset.
.
Tuesday, October 6, 2009
Electrical Troubles
Grr! On July 28 this year, my heat pump failed. It was SO hot in the house! I called a couple of repair places, but they said "two days". I was dismayed. I found a listing that said "24 hour service, no additional charge". Great. I called and they were there in an hour! Their conclusion was that the unit had been hit by an electrical charge, the compressor was fried, and there was probably damage to other circuits that they couldn't test without a working compressor (which would cost about 1/2 the cost of replacing the whole unit. They could do the replacement the next morning.
Well, there HAD been a tremendous lightening crash directly overhead the night before. I jumped 3 feet, and all the cats were puffed up like big tribbles! So there was some logic to their conclusion. The replacement cost was about what I guessed, and I know the Ruud brand. I accepted.
Sure enough, they arrived in mid-morning and completed the replacement in 2 hours. Everything worked immediately, and they even converted the battery-powered thermostat to AC "as a favor". That may or not have been a mistake, but it seemed like such a minor thing at the time.
Some odd things followed. My oven clock suddenly started gaining 15 minutes per hour, and my M/V turntable turned at a different speed (I know because I heat my morning green tea water 1:30 minutes every time and for years it stopped in exactly the same position). Suddenly it didn't, and randomly positioned. Trivial, but weird.
Fast-forward to Oct 1st last week. I turned on the heat cycle for the first time, and it worked fine. 4 times in the next 5 days, the main house circuit breaker tripped. The 1st time, I assumed it was the whole neighborhood. But going outside, I realized it was only my house! I found the main breaker tripped and reset it. The next 3 times it was really annoying. I had my power company out Saturday morning to check their incoming line. They found no problems and suggested the main breaker on my end had to be replaced.
Saturday, Sunday, and Monday, I noticed that my heat pump (on "heat") was running continuously. And then I discovered that sometimes it was putting out warm air and sometimes cool air. Without ever seeming to turn off in between. Weird (and possibly expensive).
But when the main breaker (whole circuit box) tripped while I was taking a shower and covered with lather, I was compelled to act. Well, you shower in the dark if you want. ;) I called an electrician this morning (and he arrived in an hour!). After 30 minutes of diagnostics on the circuit box, he couldn't find any problem with it. I mentioned the heat pump problem. He wouldn't try to repair it himself, but he said it appeared to be locked on A/C but also intermittently producing emergency resistance heat. He left saying he would try to find a main breaker replacement part (it's old) and call with a price. But he said I needed to call the heat pump company because it wasn't working properly.
So I did, and they arrived after 3 hours (these fast response times are amazing). The service guy checked the inside unit, outside unit, and found some wiring oddities which he fixed. When he reset the thermostat, he was surprised that the problem remained. He spent more diagnosing the system to no avail, then went and checked the thermostat. He used some different instruments and said it wasn't working right. He went and rewired the heat pump as it was originally, then tested the thermostat again. Same problem. I agreed to have the thermostat replaced. He said converting it to AC was a mistake and changed it back to battery power.
Without him changing any wiring or parts afterwords, the new thermostat made everything work perfectly. However, he pointed out that nothing in the entire heat pump system should have been able to trip the main house breaker switch! In other words, the maximum surge draw of the heat pump even with problems is only 26 amps and I had 60 to spare (plus I had not been drawing half the capacity at any time). So basically, he said the heat pump was fixed but he couldn't think of any connection between that problem and the main breaker tripping.
So I still wait for the main power breaker to trip again at any time... If the first electrician calls with a reasonable cost of replacing the main breaker, I will just have it done. Getting caught in pitch black with soap in your eyes is not much fun, after all...
Why don't I ever have any "normal" problems? Everything that I can't fix myself is admittedly "weird" to the professionals who come. Maybe I just fix the routine problems. Or maybe it's just "mean ETs". LOL!
Saturday, September 12, 2009
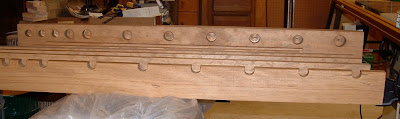
Fishing Rod Rack Project, Completed
I decided to give the rod rack 2 coats of polyurathane. I couldn't do all surfaces each day, so it took 4 days. It's not that it will get much wear and tear, but in the garage it will be exposed to a lot of humidity changes and there isn't anything in the construction that will allow much natural warp shifting.
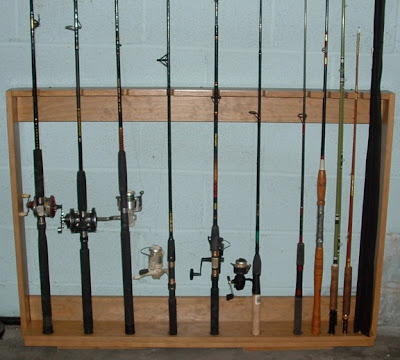
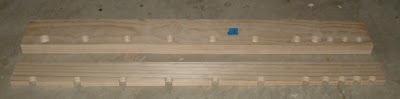
So here are the final pictures:


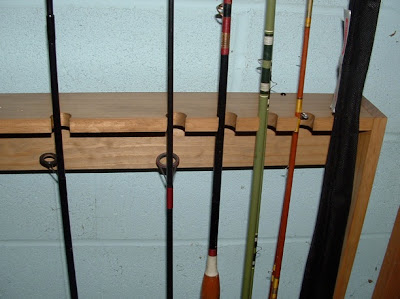
Construction Notes: If I had it to do over again, I would have made the 3/4 holes on the top shelf smaller. The opening only needs to be large enough to accept the upper part of the rod. Also, I would make the base holes a bit larger (or at a slight angle). A couple of the base holes were a bit tight.
Fishing Equipment Notes: Anyone looking at the actual rods will notice I have 3 bait-casting rods, 4 spin-casting rods, and 3 fly-casting rods. From the left, the first 3 are for casting baits and large weights into tidal waters, the second 3 are for casting different weight lures in freshwater, and the last 3 are fly rods. 1 of those is a short rod for barrel loop casts in shrubby conditions, 1 is for for casting heavy bass flies and popping bugs, and the one in the cover is my "good real fly rod" for trout. The one spinning rod without a reel (7th from left) is just kind of lonely and waiting for a new reel. The short stubby rod (8th from left) is a "Chesapeake Bay" rod for dropping bait from a boat straight down. I've never caught a fish with it, but I keep it around just in case it is "the right one for some trip". LOL!
If anyone has a question about the construction (or anything else), just leave a comment...
Next project: Movable PVC frame tent for the boat.
So here are the final pictures:


Construction Notes: If I had it to do over again, I would have made the 3/4 holes on the top shelf smaller. The opening only needs to be large enough to accept the upper part of the rod. Also, I would make the base holes a bit larger (or at a slight angle). A couple of the base holes were a bit tight.
Fishing Equipment Notes: Anyone looking at the actual rods will notice I have 3 bait-casting rods, 4 spin-casting rods, and 3 fly-casting rods. From the left, the first 3 are for casting baits and large weights into tidal waters, the second 3 are for casting different weight lures in freshwater, and the last 3 are fly rods. 1 of those is a short rod for barrel loop casts in shrubby conditions, 1 is for for casting heavy bass flies and popping bugs, and the one in the cover is my "good real fly rod" for trout. The one spinning rod without a reel (7th from left) is just kind of lonely and waiting for a new reel. The short stubby rod (8th from left) is a "Chesapeake Bay" rod for dropping bait from a boat straight down. I've never caught a fish with it, but I keep it around just in case it is "the right one for some trip". LOL!
If anyone has a question about the construction (or anything else), just leave a comment...
Next project: Movable PVC frame tent for the boat.
Tuesday, September 8, 2009
Fishing Rod Rack Project, Part 6
I took a few days off from the project (fishing, errands, shopping, TV) but got back to it yesterday. It was "glue and screw" time. I took the time to very carefully align all the corners square and flush.
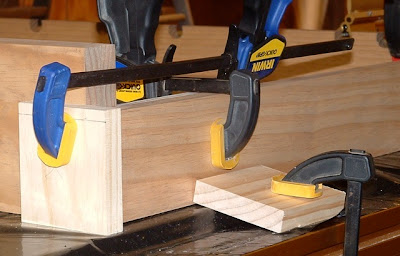

Since I was using mostly 1 x 4" boards and had many places where I was screwing through the wide edge into endgrain, I made a small drilling jig. Nothing fancy, just a piece of scrap from 1 board. I drilled pilot holes centered halfway of the thickness and set 3/4" from the ends. You can see it in the 1st picture (where I was using it as a clamping block). It really made it easy to drill pilot holes evenly spaced, straight, and right in the center of the boards.
I did half of the basic frame yesterday and let it dry overnight, using a framing square to keep it, well, "square".
Today, I glued and screwed the other half, plus attached the 2 cross braces. When that was done, I prepared to cut (to fit) and attach the 2 vertical braces.
OOPS! I had estimated the 2 pieces to be 23" (and had a 46 1/2" board for the purpose. Guess what? The space to be braced was actually 23 1/2" on each side. I was 1/2" short. I HATE "nominal sizes"! Why can't a 1 x 4" board actually be 1 x 4"?
Fortunately, with all the corners being connected in 3 directions, and glued and screwed on all the edges, it was solid as a rock. So here it is, ready to be polyurathaned tomorrow.

I'll post the "finished" picture when the polyurathane is dry and I have the rack in place with the rods on it...
Thursday, September 3, 2009
Fishing Rod Rack Project, Part 5
Yee Hah! I got half the sides stained early today and did the other sides stained this evening (fruitwood stain). I have to say that brushing on stain with scraps of old white tee shirts works great! It goes on so smooth and evenly. I wear cheap disposable latex gloves, so there isn't even any stain on my skin.
I did one full side, one long edge, and one short edge on each board this morning, and all the other edges this evening. I'll be putting on at least one coat of polyurathane tomorrow. Might do 2 coats.
I did one full side, one long edge, and one short edge on each board this morning, and all the other edges this evening. I'll be putting on at least one coat of polyurathane tomorrow. Might do 2 coats.


Tuesday, September 1, 2009
Fishing Rod Rack Project, Part 4
OK, today I remade the rod shelf. First, I clamped it to the base and transferred the centerpoints with a square.
Drilled the slots on the upper shelf, and set it back on the base to check for errors.

It all looks good. I had to eyeball it a little, even with the square. But they all matched up within 1/8", so that's fine.
After I was satisfied that almost all the cutting was done ((2 side pieces need to be fitted into place at the end, I gave all the pieces a thorough sanding. The boards were quite smooth, but as I learned from a previous project, there is a slight film that makes for uneven staining. I went to a 150 grit. With the random orbital sander, that does a nice job for a garage rack. If it was for in-the-house furniture, I would go to 240 and maybe even 320. But there is a limit to how smooth you can sand softwood anyway.

Tomorrow, I'll dry-fit the pieces together, drill pilot screw holes, and tape the areas to be left unstained for glueup. Then, stain the pieces. Next day, I'll give it 1 coat of polyurathene. After that, it's "glue, screw, and done"!

Drilled the slots on the upper shelf, and set it back on the base to check for errors.

It all looks good. I had to eyeball it a little, even with the square. But they all matched up within 1/8", so that's fine.

After I was satisfied that almost all the cutting was done ((2 side pieces need to be fitted into place at the end, I gave all the pieces a thorough sanding. The boards were quite smooth, but as I learned from a previous project, there is a slight film that makes for uneven staining. I went to a 150 grit. With the random orbital sander, that does a nice job for a garage rack. If it was for in-the-house furniture, I would go to 240 and maybe even 320. But there is a limit to how smooth you can sand softwood anyway.

Tomorrow, I'll dry-fit the pieces together, drill pilot screw holes, and tape the areas to be left unstained for glueup. Then, stain the pieces. Next day, I'll give it 1 coat of polyurathene. After that, it's "glue, screw, and done"!
Monday, August 31, 2009
Fishing Rod Rack Project, Part 3
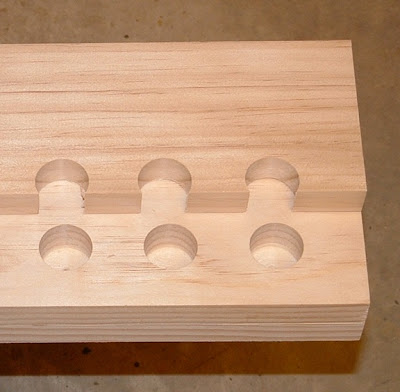
Today, I set about making holes in the base (F) and slots in the upper shelf (E) for the rods to rest in. After 2 hours of careful work, the only thing I can say is *#>&@*
Translated, that means "OOPS". It happens to me in every project. I do something that seems right but that has a flaw and/or I mismeasure something. On this project, I managed to do both at the same time...
The base has holes halfway through for the butt end on the rods. Some are fat, some medium, and some thin. So I decided to drill them to fit. I put paper tape on the base (so I could mark on it) and measured out the centerpoints. Then to be absolutely sure the shelf slots would match the base holes, I put the boards edge to edge and used a square to mark the shelf slots.
I drilled the holes in the base. The forstner bits are great for large flat holes. It looked great! Then I drilled half-holes in the upper shelf.
I was very careful about that. I used a sacrificial board underneath (because they were through-holes) to prevent tearout. I drilled a test hole in a piece of scrap board. I got some tearout anyway. Well that's the bottom side, so I decided to live with it.
That's part of the *#>&@*< feeling. Because of the way I transferred the base centerpoints to the shelf, the bottom of the shelf as I drilled it would actually be the top side when assembled!
So, when I put the cleancut side of the shelf "up", this is what I saw.
When I switched it so the holes matched up, the tearout side was "up".
And then I noticed that one of the shelf holes was 1/4" offset!

ARGGGGH! I am NOT a happy camper right now. Luckily, I have another 4" board. I'll remake the shelf tomorrow. This time, I'll know to put the shelf board ON TOP OF the base, not NEXT TO it when I transfer the centerpoints...
Translated, that means "OOPS". It happens to me in every project. I do something that seems right but that has a flaw and/or I mismeasure something. On this project, I managed to do both at the same time...
The base has holes halfway through for the butt end on the rods. Some are fat, some medium, and some thin. So I decided to drill them to fit. I put paper tape on the base (so I could mark on it) and measured out the centerpoints. Then to be absolutely sure the shelf slots would match the base holes, I put the boards edge to edge and used a square to mark the shelf slots.
I drilled the holes in the base. The forstner bits are great for large flat holes. It looked great! Then I drilled half-holes in the upper shelf.
I was very careful about that. I used a sacrificial board underneath (because they were through-holes) to prevent tearout. I drilled a test hole in a piece of scrap board. I got some tearout anyway. Well that's the bottom side, so I decided to live with it.
That's part of the *#>&@*< feeling. Because of the way I transferred the base centerpoints to the shelf, the bottom of the shelf as I drilled it would actually be the top side when assembled!
So, when I put the cleancut side of the shelf "up", this is what I saw.

When I switched it so the holes matched up, the tearout side was "up".

And then I noticed that one of the shelf holes was 1/4" offset!

ARGGGGH! I am NOT a happy camper right now. Luckily, I have another 4" board. I'll remake the shelf tomorrow. This time, I'll know to put the shelf board ON TOP OF the base, not NEXT TO it when I transfer the centerpoints...
Sunday, August 30, 2009
Fishing Rod Rack Project, Part 2
OK! The base glued together well and only needed a little scraping on the edges for minor glue squeezeout. I used a finishing sander for good measure.
The first thing to do today was to make the cross boards EXACTLY the same lengths. I trimmed one end of the base board (F) on the table saw, then cut it 46". I used that to mark the lengths of boards A, B, and E. I tried to figure out a way to set up a "stop" on the miter gauge, but the fence can only get 30" from the table saw blade and the miter gauge isn't long enough on the other side of the blade to set up one there.
I could have set up a stop on the radial arm saw bench, but it seems to be about 1/4 degree out of square and I can't seem to adjust it any better than that. Oh well, it is good for rough deck and fence work, if not for cabinetry.
So I trimmed the pieces to size as best I could. When I stacked them all together even at one end, they were within 1/64" at the other. I clamped the stack together and power sanded the difference smooth. They ended up perfect.
I trimmed the sides (D) to 33" and am ready to start putting the frame together (Boards A, B, D and D).
I also need to rout slots into board E and drill 1 1/4" holes with forstner bits 1" deep into board F. But it is time for dinner, and I like to have wine with dinner, so there won't be any more woodworking tonight!
The first thing to do today was to make the cross boards EXACTLY the same lengths. I trimmed one end of the base board (F) on the table saw, then cut it 46". I used that to mark the lengths of boards A, B, and E. I tried to figure out a way to set up a "stop" on the miter gauge, but the fence can only get 30" from the table saw blade and the miter gauge isn't long enough on the other side of the blade to set up one there.
I could have set up a stop on the radial arm saw bench, but it seems to be about 1/4 degree out of square and I can't seem to adjust it any better than that. Oh well, it is good for rough deck and fence work, if not for cabinetry.
So I trimmed the pieces to size as best I could. When I stacked them all together even at one end, they were within 1/64" at the other. I clamped the stack together and power sanded the difference smooth. They ended up perfect.
I trimmed the sides (D) to 33" and am ready to start putting the frame together (Boards A, B, D and D).

I also need to rout slots into board E and drill 1 1/4" holes with forstner bits 1" deep into board F. But it is time for dinner, and I like to have wine with dinner, so there won't be any more woodworking tonight!
Saturday, August 29, 2009
Fishing Rod Rack Project
FISHING ROD RACK
After having my fishing rods leaning against the garage wall for years, and having them all fall over whenever one got bumped, I decided I needed a rod rack. I looked at some for purchase but I didn't like any of them (all were either too cute, way too fancy, or held too few rods). Besides, why buy when you can build?
So I sat down to design one. My 1st design had all the rods standing straight up through holes, but I realized they would all lean slightly in different angles. Functional, but aesthetically unpleasing...
So I tried again. This time, I decided to have them set in holes in the base and lean into slots in a higher shelf. That would have them all at a consistent angle. It took a while to find a height for the upper shelf where no ferrules would be in the way. And I reworked the design a couple of times to make sure the construction was solid.
So here is what I came up with (double-click the picture for enlargement):
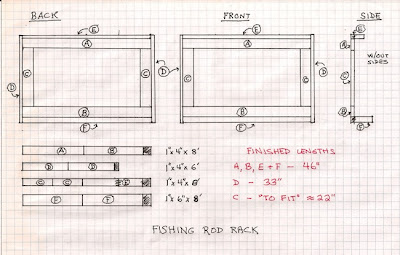
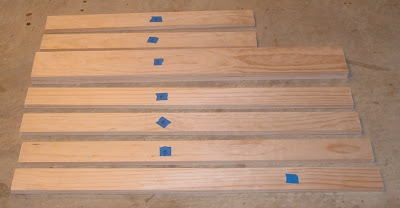
I was surprised to notice that the front and back views are identical. I was also trying to use boards I already had, so the 2" base is actually two 1" boards glued together.
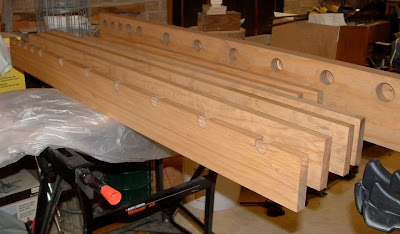
So I laid out my boards:
Most of the boards needed to be cut approximately in half. That was too long for my table saw (because of the Incra Fence), but my old radial saw has plenty of room. Since there is at least 2" of waste on each board, I could cut them all oversize (the radial arm saw does not seem to cut as squarely as the table saw).
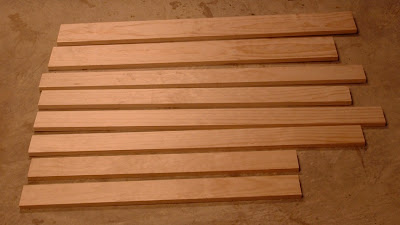
Boards A, B, E, and F have to all be exactly the same length, so I glued up the 2 boards for F (the base) and left it until tomorrow.
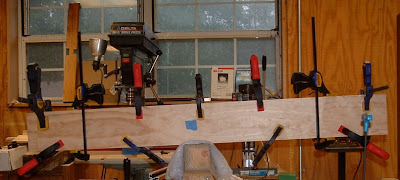
You can never have too many clamps. LOL!
After having my fishing rods leaning against the garage wall for years, and having them all fall over whenever one got bumped, I decided I needed a rod rack. I looked at some for purchase but I didn't like any of them (all were either too cute, way too fancy, or held too few rods). Besides, why buy when you can build?
So I sat down to design one. My 1st design had all the rods standing straight up through holes, but I realized they would all lean slightly in different angles. Functional, but aesthetically unpleasing...
So I tried again. This time, I decided to have them set in holes in the base and lean into slots in a higher shelf. That would have them all at a consistent angle. It took a while to find a height for the upper shelf where no ferrules would be in the way. And I reworked the design a couple of times to make sure the construction was solid.
So here is what I came up with (double-click the picture for enlargement):

I was surprised to notice that the front and back views are identical. I was also trying to use boards I already had, so the 2" base is actually two 1" boards glued together.
So I laid out my boards:

Most of the boards needed to be cut approximately in half. That was too long for my table saw (because of the Incra Fence), but my old radial saw has plenty of room. Since there is at least 2" of waste on each board, I could cut them all oversize (the radial arm saw does not seem to cut as squarely as the table saw).

Boards A, B, E, and F have to all be exactly the same length, so I glued up the 2 boards for F (the base) and left it until tomorrow.

You can never have too many clamps. LOL!
Tuesday, July 7, 2009
Furniture Rearrangement!
I decided I can't live with the Big Screen TV in the living room. I had the old regular TV in the dining room where I could see it from the kitchen while I was preparing food. But the guidelines said I would see the new HD TV best from at least 8' away and that required the living room. So I had it installed there on a good solid TV table.
A year later I just can't stand it. I am LISTENING to more TV than I actually watch, so that needs to change. I measured how far away it would be if I moved it and sat there for a few hours. It looks just fine. So I am going to move it to the dining room. (very carefully)
Of course, there is furniture that has to be moved. The first thing that had to be moved was the upright bar. That's a neat piece of work my Dad made decades ago. Basically, its a 30" door built into a frame 8" deep and 38" wide. It has glass shelves and a fold out bar shelf 10" wide for mixing drinks on. It is a real wonder of construction. From the back, it is a nightmare of boards and pieces of scrap plywood, but it is as solid a a rock. Typical engineer construction. The outside surfaces are are highly varnished pine and oak. Visitors marvel when they see it. I love it!
But it was where I needed to move chairs to watch the TV, so it needed to be moved. It is "solid" because it is very heavy. I can't even lift it up an inch, for example. I'm not the strongest guy, but I'm not weak either. Moving it takes 2 guys minimum. So I had to think about where to move it and how to move it by myself.
I have lived alone for 40 years, so I've gotten used to figuring out how to move large awkward heavy objects by myself. I decided to put it in the guest bedroom. First, I had to figure out if I could even get it into that room. Obviously, I couldn't just carry it there (it must weigh 200 pounds). And at 7' tall, I couldn't get it through any doors upright. It had to be moved on it's side.
I tried to visualize moving it on the side through the house and into the guest bedroom. I decided I needed a piece of something the same height to practice. I looked through the house for something that length. I could have cut an 8' pine stud to 7', but I kept looking around. I finally realized I had a 7' fishing rod.
I took that upstairs and carefully manuvered it through the rooms, hallways, into bedrooms, etc until I was certain that there was sufficient manuvering room. By about an inch! Then there was the carpet to consider in the guest room. The bar door is flush with the bottom of the frame. The frame would sink into the carpet and prevent the door from opening. The entire weight of the frame sits on the 2 outside ends. I cut two 5"x8"pieces of wood to sit the frame on to lift it enough for the door to open easily.
So, how to actually move it? I had a 2' square wheeled support I made years ago. After taking out all the various bar glassware out (wine glasses of several types, beer glasses, steins, etc), I detached the bar from the wall leaving the door open 90 degrees for surrort. It will fall down if not attached to the wall into a stud. From there I "walked it around carefully until I could pull it over on a corner to lay it down on it's side of the wheeled support. It was heavy, but I was careful.
I managed to keep it from tipping over as I wheeled it out of the dining room, into the living room, and slowly into the hallway. Near the guest room, I realized I had it oriented backwards, so I had to push it back ito the living room and slowly turn it around. Then back through the hallway!
To get it into the guest bedroom, I needed to angle it into the master bedroom then into the guest bedroom. It wouldn't make the turns. Not because of the length of the bar, but because the wheeled suooprt was too wide. I stopped and had a beer.
Well, I had some small 3-caster support things. Not very supportive, but they were narrow. It took 30 minutes to get the bar off the large wheeled support and onto the smaller 3 caster supports. The hard part was getting the large wheeled support out from under the bar. I could lift one end AND remove the large wheeled support at the same time. I finally tied twine to the support, looped it around a foot, and yanked one foot while lifting the end of the bar. It took many tries.
That wasn't the end of the problems. The bar kept wanting to fall sideways when I moved it on the narrow casters. And they slipped out several times as they were pushed and pulled from the wood hallway to the carpeted bedrooms.
But I did manage it eventually. I had the bar in the room and the back to the wall. I was finally able to rise the bar upright. I had to open the door to prevent it from falling forward. But then, the door had to be open so that I could drive a couple of screws throuth the back panel and into the wall studs to hold it in place anyway.
There were, of course, some problems I hadn't accounted for. There was an elecrical outlet I didn't want to block, there was a closet door molding I couldn't be up against because it is not plumb, and there was only a few inches of distance to the fully opened door. Fortunately, it turned out that I could expose the entire electric outlet inside the bar by moving it 3" from the closet molding and that left enough space for the room door to open fully. But knowing how awkward access to the electrical outlet was, I put a short extention cord out one side just over the baseboard cutout in the bar.
I had used a stud finder on the walls before I started, so I knew where to attach the bar's back boards to the walls. I missed one somehow, but I got one spot on, so the bar will stay in place. I even pulled on it a bit roughly just to be sure.
So I made dinner and had a whole bottle of wine in celebration! Afterwards, I cleaned all the glass shelves (very carefully) and interior wood and replaced all the glassware. I am quite pleased.
Pictures...


Next, I dare try to move the heavy Flat Screen TV and table myself!
Sunday, July 5, 2009
New End Table Plans
Here are the tables I plan to build.

There will be some changes. The basic end table will be built exactly as designed. The "sofa" table will be built to the width and length, the same height as the end table. That is because I want an "end table" that is narrow to fit between an easy chair and a wall. The third table will be a smaller version of the standard end table to serve as a plant stand. I may actually make 2 of those, I just haven't decided yet.
The tops of the tables are made from Baltic Birch furniture grade plywood, and there is considerable waste from the 2' x 4' sheets. I need to sit down and see if there is enough leftovers for the size plant stand tops I need. The plant stands have to have enough spread between the legs to be sturdy enough to prevent the cats from knocking them over. I am considering making the plant stand tops round, but I might make the square just for consistency of design.
I might have to angle the plant stand legs outward or attach them to a larger plywood base for stability. I might build the coffee table, but I'm not sure where I would put it. As I don't have a sofa, I'm not sure where I would use it. I might build one taller to use as an eating surface. I like to watch science&nature TV while eating, and TV trays are wobbly.
Saturday, July 4, 2009
Happy 4th of July

I'm just laying back today and cooking a couple chickens in the smoker... As usual, I read the Declaration of Independence out loud on the deck, and thought about my uncles who fought in WWII. It is good to remember these things.
I did reassemble the table for temporary use, found a good design for a new one, and made a list of the wood I need for it. Three tables actually. One end table, one skinny wall-side table, and one small one as a plant stand. At least I will have some matching furniture!
Making some progress on clearing the vine-overgrown framed garden beds. Will try to post on that tomorrow! I need to dump the pictures into the computer and crop them, etc. But not now; the chicken is ready and I'm starving!
But before I go, I want to say "Let freedom spread. Let it spread. Let freedom ring through the valleys and to spread from every mountainside, from every shore, from every field, from every hill and trench, from the cemetaries of wars to the memorials to the fallen, to the homes, to the bed of the last soldier veteran".
May it rest in all our hearts every day.
I honor and salute you who have fallen in the service of the nation...
Tuesday, June 30, 2009
Refinish Ocassional Table Project -2
Well, I took the table downstairs and examined it carefully.

It doesn't really look as good as I thought.
When I disassembled it, I discovered that there were some broken boards glued back together. Perhaps someone fell on it decades ago. I couldn't tell from picking up the whole thing, but the individual pieces are extremely light. Some off the receded screw-holes and plagged, and I don't want to damage drills removing the plugs. It appears to be pine that was painted, then stained in some way that appeared to leave a hardwood grain, then varnished (or shellacked - I can't tell). The unfinished wood (under the connections) is even a bit punky. The whole thing is butt-jointed which is not very solid.
It's no family heirloom...

So, I looked through some of my woodworking magazines and found a couple I like. One is even designed so that the top appears to be floating above the frame. I'll decide which one I like best, follow the exact design for 2 regular size end tables and scale it down smaller for 1 as a matching plant stand, get the wood (oak), and go from there. Well, I DID want to build all my own furniture eventually anyway. Might as well start now...
But not this week. I think I will turn my attention back to the garden. There are still 3 framed beds overgrown with vines. It will be better to tackle those now, rather than wait until the heat of late July and August. The temperatures are forecast to stay in the low-mid 80s for a week, and that won't last for long.
Subscribe to:
Posts (Atom)
Landscaping, Part 3
So I got to the point where I wanted to put edging around the trees and shrubs in the front yard. The point was to prevent lawn grass from ...
