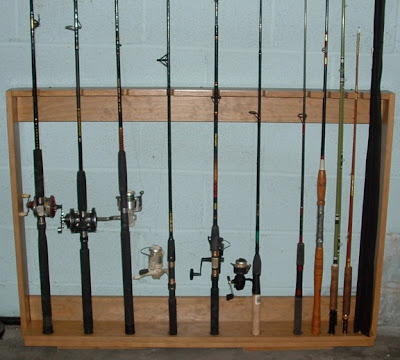
So here are the final pictures:


Construction Notes: If I had it to do over again, I would have made the 3/4 holes on the top shelf smaller. The opening only needs to be large enough to accept the upper part of the rod. Also, I would make the base holes a bit larger (or at a slight angle). A couple of the base holes were a bit tight.
Fishing Equipment Notes: Anyone looking at the actual rods will notice I have 3 bait-casting rods, 4 spin-casting rods, and 3 fly-casting rods. From the left, the first 3 are for casting baits and large weights into tidal waters, the second 3 are for casting different weight lures in freshwater, and the last 3 are fly rods. 1 of those is a short rod for barrel loop casts in shrubby conditions, 1 is for for casting heavy bass flies and popping bugs, and the one in the cover is my "good real fly rod" for trout. The one spinning rod without a reel (7th from left) is just kind of lonely and waiting for a new reel. The short stubby rod (8th from left) is a "Chesapeake Bay" rod for dropping bait from a boat straight down. I've never caught a fish with it, but I keep it around just in case it is "the right one for some trip". LOL!
If anyone has a question about the construction (or anything else), just leave a comment...
Next project: Movable PVC frame tent for the boat.
1 comment:
Thank you Cavebear - I've followed this closely. Ayla wants to start fishing and we are about to get her a rod and it is about time I got mine out and Dad wants to leave some here for when he visits and stuffed in the closet just won't work. This is fine work.
Scott
Post a Comment