Sunday, December 20, 2009

SNOW!

Well, we got our first big SURPRISE snowstorm of many year the past few days.  Not 5 days ago, the forecasters were saying they didn't see any snow through New Year's day.  Then they suddenly predicted 4", then 8", then 12", then 20"!
I got 14" out in the middle of the driveway, which is about my most accurate place to measure.  Some nearby places did get 20", so I guess I was lucky.


I got up early this morning, deciding to buy a snowblower.  Consumer Reports magazine had an article rating them in October.  I googled my local stores for the "Best Buy" recommendations, but of course, none of them had those models.  My one gripe with Consumer Reports magazine is that it is nearly impossible to ever find the exact models they give the best ratings to.

But then the sad truth hit me!  First, I had to shovel the driveway anyway to get the car out.  Second, most stores were closed because of the snow.  Third, any snowblowers available tomorrow weren't going to be on sale, even if the lesser ones were available.

So I accepted reality.  The driveway had to be shoveled before I could contemplate any further decisions.  Reality sucks!  But I got out my heavy socks, pulled on my knee-high rubber boots, pulled the "serious" (Carhartt) winter coat out of the closet, and set about shoveling the snow.

The driveway is 60' long.  I did almost 1/2 and decided to stop for a rest.  I had taken some pictures and decided to load them onto the computer, and I make it a point not to over-exert myself (the hospitals call the day after a major snowstorm "heart-attack day").


When I went back outside, a neighborhood teenage boy walked by and asked if I wanted to have him finish the job.  I said no, but quickly changed my mind.  When he said he would finish the job for $20 I said YES YES YES! (in my head)  but "well...  OK" out loud.  He didn't have his own snow shovel, but I have a good one (real metal, teflon coated).  He didn't have gloves, so I lent him a pair of mine.  It was worth it just not to have to deal with the dreaded snow plow ridge at the end of the driveway!


I told him it didn't have to be edge to edge, just more than the width of the car.  And because the driveway is at an angle to the house (because of a poorly placed storm drain), I stomped out the edges for him.  And he went to work.  Not to make fun, but his technique was horrible.  Clearly, he had little experience shovelling snow.  I gave him some slight advice (like, you really can't lift 15" of snow at once because it won't stay on the shovel, so take it off the top first.  I know about snow.  I grew up in Massachussetts and as the eldest child, I did all the snow shoveling, as I have all my years.

I helped him out when snow started sticking to the shovel.  Even teflon-coated shovels will start to keep snow when they get cold enough.  The trick is to bang the snow off and hit it with a silicon spray.  He did his best and was about near the end of the driveway (that dreaded snow plow ridge) when a neighbor (whom I do not know) came by with an ATV with a snow blade attached.  He blew out the snow plow ridge in 5 minutes!  What a cool machine...  I would love to have one, but I would settle for a snowblower!  When he finished, he just drove to the next driveway.  The only thing I could do was salute as he left.  I wish I had pictures, but the camera card was full.

Meanwhile, the neighbor kid was widening the driveway (relieved by not having to fight with the snow plow ridge).  Finally, it was done.

When I could tell it was wide enough for the car, I offerred him another $10 to do my 12' sidewalk and front steps.  Again, his technique was awful.  He was trying to do it from the bottom up and tossing snow where he would have to shovel it again.  I showed him that it was easier to turn the shovel over and scrape it "downhill".  When he did that, it went very quickly.  He got that done in about 20 minutes.


After he left, I widened the driveway by another 2 feet, but that only took 10 minutes.  After all, he had done what I asked of him and I was grateful to be spared the endless bending to scoop out most of the snow.

I'm still deciding whether to buy a snowblower.  I'm thinking a 2 stage, multiple speed model with electric start and recoil rope backup.  And I'm thinking Ariens for the quality, but CR magazine rated a Craftsman a "Best Buy".  Any advice will be appreciated.  I'll probably wait until the end of winter when they go on sale.  For use next time.

Then I went to do the deck.  I usually shovel out a path for the cats.  I did that.  I discovered that I had more raised decked nails than I realized.  As soon as the snow melts, it is HAMMER time!  But I did get it shoveled.

They enjoyed that, but you will have to go to my cat blog for that story.  The snow on the deck was almost 21" though.


Sunday, December 13, 2009

Boat Canopy Again

Well, I waited too long.  I need to assemble it in halves in the garage (for the outside access) and assemble the 2 parts outside on the spot.  It is now too cold!  I am going to bundle up all the cut PVC and set it aside until Spring.  There were just too many questions about constructing it that made me hesitate in warmer weather, and then too many things that distracted me from the project the past month.

Next week will be cold but dry, so, as soon as the insides of the boat dry out and I can clean the leaves out of it, etc, I will simply put ropes over the seats bow to stern and across an tie a tarp down over it for the Winter.  Too labor-intensive for daily use, but worth it for the season.  I think other boaters call that "winter shrink-wrapping".

At least that frees me to pursue the other inside projects I have been putting off while dithering about the stupid boat canopy.  The pedestal dictionary stand, the end tables, and flooring the other half of the attic (though it does get cold up there in Winter, so I'm not positive). 

I put plywood on half the attic floors years ago, but the other half had wires running over the joists.  I cut notches in the joists for one sheet of plywood, butdecided that seemed structurally unsound.  It suddenly occurred to me last week that I could glue spacers/supports between the wires and simply raise the plywood up a 1/2 inch.  I am usually quite creative, but in this case, quite stupid!  The solution was obvious in hindsight.

I think I will set up a Betta (Siamese Fighting Fish) breeding tank.  I have a new tan male with unusual darker spots on the fins, and I've never seen that before.  And since I have a tan female showing signs of eggs, why not?  I've raised them before (decades ago).

I think I will do the Bettas first, to get them on their way.  I need to make a multi-compartment insert to place in a aquarium for the newborns.  Even males a few weeks old will attack each other, and fin damage never heals perfectly so they need to be separated real early.

Then the dictionary stand.  I am really ready for that.  I want to work with wood again!  All that PVC stuff really threw me out of my comfort zone for months.  Not that I am a great woodworker, but at least I understand the stuff!

And gardening season actually starts in 1 month!

Back on track, ever optimistic, and ready to go back to what I know...

Sunday, December 6, 2009

Busy, Busy, Busy...

Sorry I haven't been doing projects lately.  I've really been distracted. Raking out leaves from the patio, pulling early winter weeds from the flowerbeds, doing the Thanksgiving Dinner thing, cleaning pots for next year, arguing with people on the Richard Dawkins website (WAY too much time spent doing that). 

Ayla (a cat) is in heat again.  It's really sad.  She has been spayed twice and neither operation worked.  She demands a lot of attention.

The rain gutters that I cleaned only a few months ago overflowed yesterday in a storm and the overflow gets into the basement.  I have screens covering the gutters and made sure the downspouts are clear, so I can't figure out the problem.  I was going to take another look at them today, but it started to snow unexpectedly.

I've been cleaning out my file cabinet.  That takes a lot of time and I'm not done yet.  And because of that, I am trying to re-write my Will.  Not an easy task.  And I am trying to search through old letters from my parents to find the information they have sent about their instructions about elder care and funerals.  I should have kept notes along the way, but I didn't.  Now I have to try to catch up.

A neighbor is having an addition put on the house.  The nailing starts at 8 AM every morning.  I normally don't go to bed until 2 or 3 AM, so I am not getting much sleep.

I've also been cleaning the basement.  Way too much stuff left out and to the point where I couldn't find anything.  Cleaning was needed.

And the car needed attention.  Not maintenance (I'm good about that), but cleaning.  I should have cleaned it when the weather was better, but I didn't.  I spent almost a whole day doing that.

And then there were the holiday cards to make.  I don't buy mine, I make them on the computer.  And it isn't easy.  The 2 programs I have to do that suck!  One only permits installed clip art and that got boring real fast.  The other allows imports but not "French-Fold" (twice-folded) cards.  So I figured out how to create French-folds in Excel.  It's not easy.  Half the text and pictures have to be rotated, I can't delete the boxes around the text half the time, and changing the text colors is nearly impossible.  I am a bit inept at that stuff.  Took my 2 days to create 1 birthday card, 25 Winter Holiday cat cards and 15 Winter Holiday people cards (my cats have more friends than I do).  But I did it and that's done with.

And there was a LOT of garden cleaning to do.  I cut down 90% of the tall perennial flower stalks last week, pulled up all the old tomato plants before that,

So, basically, I've been busy with stuff that was not "photo-interesting".

I'll try to get back at the boat canopy and other projects soon.

Monday, November 23, 2009

Boat Canopy - Yet Agin, Part 3

Drat, forgot to get the PVC cement!  I had a can, but discovered it was rock solid.  Well, it was 10 years old...  I tossed it.  But I meant to get new cement yesterday and forgot.  I need to build the top of the base first, and that involves some combinations of fittings, so they need to be cemented and carefully aligned first.  Can't do anything useful until that is done!

For my design, I have to put a 45 degree elbow into a 5-way cross piece exactly perpendicular, then cement in a bushing that changes the 1.25" PVC to .5" PVC.  I think I want to make a jig to assure the correct angle...  Perhaps clamping the 5 way into a bench clamp and having an upright to mark exactly 90 degrees.  Or I could screw some blocks into cheap plywood horizontally.  I'll have to look at both.

I can't decide how long the arch pieces will be until I have the top of the base cemented.  The base is 7'.  So the best arch top might be between 8' and 9'.  But I want to see it physically before I start cutting the top .5' PVC pipe.

May be a couple days before I get around to that.  The lawn is covered with leaves again, the boat is full of leaves,  and I have more spent flowers to cut down for the year...

Friday, November 20, 2009

The Boat Canopy - Yet Again, Part 2

Well, I've hesitated cutting the PVC pipe. I've never used a reciprocating saw, and I've never cut PVC where accuracy was important.


Today, I took saw in hand and went at it! Of course, as I mentioned previously, I set up clamps and a sort of jig. I clamped 2 portable workbenchs so that there was a spot exactky the 5" distance I needed to cut. Then I moved the pipe so I could cut it straight (really easily with the reciprocating saw's guides).


I cut the 1st pipe and checked the measurement... Perfect 5'. I did the other 12 pipes the same way. I got some off by 1/8th", but generally, worked quite well. The slight difference won't make any difference (I'll match side by side pieces to match).


So now I have all my 1.25" pipes cut to the 5' and 7' lengths I need. I'll construct the bottom part 1st. Then I can try out a few roof arch lengths to see how to cut the tops pieces.

The reciprocating saw worked GREAT!  I found one sawblade at the Home Depot marked for PVC (marked as "8/12").  But they were sold in packs of 10, and I sure didn't need that many.   Individual blades were not marked for PVC.  But the 10 pack was 8/12 so I bought a single 8/12 Rigid blade.  That's the one to use.  Cuts through like a hot knife in soft butter, no casting of PVC dust at low speeds, and a nice clean cut!  The DeWalt saw gave a good square cut with almost no vibration.  I was utterly pleased!  No hint of melt, and the burrs rubbed off by hand (I"ll run a file inside and out anyway).

.

Wednesday, November 18, 2009

Boat Canopy Project Started

Well, I discovered something interesting about PVC pipes. They AREN'T all exactly 10'. Most were, but some others were exactly 10' 1/4". Not 10' 1/8", or anything else. Just one or the other. That's weird.

So I separated them by length today. I have 13 lengths that I need to cut exactly to 5" (for 26 5' pieces). I need 6 lengths to cut to 7'. So the ones that are too long get cut to 7'. That leaves me 3 "too long" pieces I'll have to trim a 1/4" off, but that's not too bad.

These are the exact 10' lengths:

(Picture would be inserted here if it were possible. Imagine a nice row of identical lengths of PVC pipes). GRRR!

I'm just glad I checked them before doing the cutting.

These are the longer ones. No, they aren't THAT longer. I just didn't line them up against the wall for this picture.

(Picture lengths of identical 1/4" too long PVC pipes than the one benchmark exact 10" length). GRRR!

I sure hope blogspot.com fixes this problem soon! Not being able to show pictures is VERY frustrating...


I made a sort of jig today.

I used my 2 Workmate benches to hold the 10' pipes. I clamped a board across them to make the outside edges exactly 5' and locked the benches together so they can't "drift" apart while the saw rattles them. That way, I can use the benches to measure 5 exactly'. Cool! It works like a stop block.


The distance from the far edges is exactly 5" so I can mark the pipes to cut them. And they are clamped together by a board so they can't change the distance.

I love setting things up to help in the production... That in itself is half the fun of making things.

Sunday, November 15, 2009

No Photos?

Suddenly, I don't have icons for adding photos to the blog. Is it just me, or something happening across blogger.com? This is really annoying. I didn't change anything.

Saturday, November 14, 2009

The Boat Canopy - Yet Again

I'll admit it.  I have all the pipes and fitting for the boat canopy design.  I'm just a bit afraid to start making it!  It suddenly feels a bit more complicated than I expected.  It's one thing to design something, but another to actually build it.

The first thing that struck me was how to cut dozens of 1.25" PVC pipes into the pieces I needed.  I have a pipe cutter that you turn around on the pipe and keep tightening.  But doing that for dozens of cuts seemed daunting.  I considered the radial saw, the tablesaw, a hacksaw, and a jigsaw.  All seemed problematic.  I googled a lot of PVC discussion sites and the evaluations of the various cutting methods all had supporters and detractors.  Serious power tools not only toss up a lot of nasty PVC dust, but can make bad cuts, and even spray splinters that get into the skin.  Low-powered tool like a jigsaw are slow and tend not to make square cuts.  Manual saws are s-l-o-w...

I decided a reciprocating saw was the best choice.  So I pulled out my never-used reciprocating saw.  It had only 1 saws blade on the kit, designed for metal.  And I had read some reports that said those blades melted the PVC edges and left hard blobs.

So I went to the net to find reciprocating saw blades designed for PVC.  Go ahead and search for yourself.  They are mentioned often, but never specified!  It was a maddening search.  There is basically "metal", "wood", and "multipurpose".   I was so frustrated!

I went to Home Depot yesterday and looked at reciprocating saw blades.  The hardware/tool clerk (manager?) helped.  He pointed out that all the blades fit all the saws.  That helped, I thought I need the same brand as my DeWalt saw.  Then he noticed that there were little graphics on the blades that showed what they were designed to cut.  One had a picture of PVC pipe.  But that was a pack of 10 blades and I sure didn't need THAT many.  He had to go help another customer.  But then I noticed that the teeth description on the PVC blade was "8/12".

So I looked at the individual blades and found others that were "8/12".  It seems to be a pattern of varying teeth.  I bought one!  Yay...

I have a few old pieces of PVC pipe and I will try the blade on one in the next couple of days.  If it works well, I will start cutting Boat Canopy PVC soon.

I've been thinking on how to cut pieces accurately.  I need a bunch of 1.25" pipes at 7', a bunch of 1.25" pipes at 5', a bunch of .5" pipes at 5" and a bunch of /5" pipes at 2.5'.  I think I will have to set up stop blocks on my workbench and use the far end to mark the cut points.  Then I can set the PVC pipes in a pair of Workmate benches set 1/4" part to guide the reciprocating saw in a straight cut.

Assembling all the pieces is going to drive me nuts...

On the other hand, I'm going to be thrilled after I get it all finished.

I'll sure be glad to go back to working with wood when this project is completed!

Friday, November 13, 2009

Oops, Been Away...

I can't believe I haven't posted for 3 weeks!  I've been busy, just not with stuff worth taking pictures of.

I planted 400 crocus bulbs.  200 at a friend's place, 200 in my yard.

My parents visited.  That took 3 days of attention and cooking, and 2 days before to clean house and 1 day of downtime afterwards!  I had to watch Science TV for 2 days to get over having to listen to Fox News while they were here...  (Shudder)

I cleared out all the dead tomato vines.  Carefully.  There were disease problems and I tried hard not to leave any vine debris behind.  After I collected all the debris on the lawn and bagged it for disposal. I stacked all the cages far away from the garden.  I don't think fungal diseases do well on rusty metal exposed to cold Winter temperatures.

I raked all the leaves out onto the lawn.  That's right, ONTO the lawn.  I shred them with the mower until there is nothing left but leaf dust among the grass.  It really works well!  Free fertilizer and organic bulk for the soil.  My surface soil was clay when I moved here; now I have 6" of topsoil.  You don't get that by applying commercial fertilizer...

I chopped down most of the spent flowers.  That was quite an effort.  I have a lot of asters, coneflowers, monarda, sedums, etc that are 3' tall.  I had to haul a lot of flowerstalks to the slow compost pile.   And I made sure to leave the seedheads sticking up in the compost pile so the birds can get at them.

The tricky thing was the thistle seedheads I discovered.  They were hidden among the asters.  I cut one and a few seeds fell off.  So I covered the rest with plastic bags and taped them shut, THEN cut them.  I sure don't want those damn things next year.

Related weed subject:  Bindweed.  I was after them ferociously all year.  I don't think a single one got more than a few inches long before I pulled them up.  I know they are perennial and have deep roots, but if they can't grow above soil for long, they will die.

It has been raining for almost 4 days.  Leftover from Tropical Storm Ida.  That has kept me inside.

My cat LC had her annual shots and exam.  But I didn't have a stool sample.  With 3 cats, it can be hard to tell who's is who's.  I closed LC in the guest bedroom Friday (with food, water, and a litterbox of course).  No luck.  Tried it Sunday.  No luck.  LC really likes to "do her business" outside.  I finally had to leave her there Tuesday and Wednesday until I got a poop sample!    I went to the vet Thursday morning, but they were closed.  I had to wait til Friday.  Doing shopping and errands with cat scat in a plastic bag in the front seat is not my favorite thing to do.

But I got it delivered earlier today and the results were negative (she is as clean of scat-identifyable problems).  For multiple cats who like to be outside a lot, that was great news.  And, as LC is approaching 17 years, she might be expected to have some problems.  None there, anyway. 

So things are going well and I have been active.  I should learn to post about things even when I don't have pictures to show!

Back on track tomorrow, I hope.

Sunday, October 18, 2009

Boat Canopy Design - Again!

Finally, I think I got it right. I became concerned about "snow-load", so I decided to add two additional long secondary ridge poles to the top for stability. Fortunately the extra .5" tees (H) and crosses (I) parts were available locally!

Here is the final design.  Enlarge the pictures (click or double-click), cuz not all shows at normal view.

The rear view above doesn't mean much except that the sides are straight up and the top is arched.  The top view shows the connections (identified by letters) of the arched roof (much stronger than angled roofs).


This shows the side view and the quantities of pipes and fittings required (by letter and shape of fitting).  I'm doing that for those who are not familiar with the available fittings (as I was not when I started this project).

I am working out the order of construction.  I think it best to construct the top first.  You want to make sure to get all the cross-pieces square to each other, so constructing it on a flat surface like a garage floor or patio is probably best.  If you construct it on a nice flat basement floor, you probably won't be able to get it out... ;)

Since the top (with the cross-braces connecting the arches) is self sturdy, it seems easier to construct the bottom later, as a good top will automatically lead to a solid straight base.

OK, off to work out the order of construction...

Monday, October 12, 2009

PVC Parts Arrived Today!

Hurray! The specialty parts from Creative Shelters arrived today. This is the stuff for the "boatport" (movable carport for a boat) I want to construct. I feel like I've been on "hold" all week waiting for the stuff!

And I've been re-considering the design. I still need all the parts I ordered, I just want to add 2 more side poles on the top for improved rigidity (locally-available fittings). I'm probably "over-engineering" this (something my friends say I am notorious for), but better safe than sorry (and nothing I build ever falls apart). I heard on the radio yesterday that my area is forecast to have a harsher than usual Winter and I am concerned about snow load. So while the roof was going to be arched with a single ridge pole, I am adding 2 halfway down. It will be clearer when I take pictures.

The first thing I'm going to do is lay out all the fittings on the garage floor to make sure I have what I need. Second thing is to confirm the amount of PVC pipe I need. I haven't bought that yet. I need the trailer to haul the 10' pipes in, and it was full of brush until earlier today.

Then, I think I should build the fittings. That sounds odd, but I have a lot of places where I need to connect 2 fittings with a short bit of pipe (like a 45 degree elbow to a cross piece or tee) to make a customized single fitting. They don't make 5-way fittings with a 45 degree elbow and a "1.25 to .75 inch" bushing attached, LOL! I have a strange design that may be quite useful to others when I am done.

When the roof is constructed, THEN I'll know exactly what size the support structure needs to be. The roof is much more complex than the bottom. Well, I'd hate to build the support structure first and then try to fit the top on badly...

Note: I have no business relationship with Creative Shelters other than "customer". I just found them to be a good retail online place to get all the odd parts I needed for this project.

Sunday, October 11, 2009

The Heat Pump Works!

OK. It seems like the heat pump guys finally got the thermostat to communicate with the heat pump. It wasn't easy, though.

At first, they insisted on trying their standard thermostat with their standard heat pump for 3 days in a row and it didn't work. The 4th day, the same repair guy arrived with a 2nd repair guy who claimed to have had these problems before and solved them. I was getting pretty tired of all the failed attempts and told them that they either fixed the problem or haul the unit away, reimburse me the whole cost, and I would call another company. Not to my surprise, that seemed to have an effect...

1. I had looked up the Ruud brand of heat pumps on the internet last night and they are not the best. Well, I had heard of them for years and thought they were good. I only chose them because it was so hot in July when the York unit failed, because York said "2 days" and Ruud said "1 hour". At the time, I was desperate; it was 95 in the house!

2. I hoped they (Ruud) would take the unit away so I could change my mind and get a Trane.

3. I didn't think that a different thermostat would solve the problem.

Well, damn, they seem to have fixed the problem with a different brand of thermostat! And while I an not a thermostat expert, I listen carefully and learn well...

We know we see integer degrees on our thermostats. We see 71 or 72 or whatever. It seems that thermostats don't actually function in those terms. They can measure full degrees in full whole numbers (71, 72) or half numbers (71.5) and that is promammable. They thought that might be the problem for over an hour. IOW, the problem might be that that the thermostat was reading full degrees when it should be reading half degrees (something about both heating and cooling reading the same units that caused the problem). But changing that didn't solve the problem anyway.

Finally, they just hooked a different brand thermostat in and it worked perfectly right from the start!

Can you believe that? They fought with a thermostat they knew they were having troubles with and that wouldn't work for three days (they had tried 4 new thermostats). Sure, they wasted their time at it, but they wasted MY TIME, too. The time while they worked and the time I waited. I figure I spent 20 hours this week either waiting for them to arrive or watching them while they were here.

The good news is, that after 3 days, the system seems to be working properly, I have gotten used to the thermostat controls, and the whole house breaker has not tripped once (isn't that curious). That whole house breaker box problem started when the heat pump went bad and ended the day it was fixed (so far). That the heat pump guys say it couldn't be their fault means nothing to me. I'll take coincidence on this matter.

I am quite certain that, somewhere, there are people with the bad combination of the particular thermostat with the particular heat pump from this company who DON'T know their heat pump shouldn't be running all the time and wondering why their electric bill is high.

When I suggested to the repair guys that they should have the company backtrack these situations, they just laughed while walking out the door. A case of "not their problem", I suppose).

Well, mine is fixed... Maybe I should only care about that. But I don't... I think I will email the Jiffy company (the installers) and raise the issue.

Wednesday, October 7, 2009

Electrical Troubles - Part 2

The adventure continues! The heat pump is still not working right. It seemed to be working correctly yesterday when the repair guy left, but that was because the conditions that we now realize trigger the problem didn't occur again until nighttime. This morning I took detailed notes.

The heat pump is set on the "heat" setting (yes, "heat pumps" cool also). I set it at 71 F degrees. When the temperature drops 2 degrees, it starts heating again. By design, hen it reaches 71, it stops and waits for the house to cool 2 degrees again. It takes about 15 minutes to raise the heat to 71 again.

The problem with my unit is that, for reasons unknown, as soon as the heat cycle warms the house to 71, the cooling cycle kicks on and cools the house down. When it reaches the 2 degrees below the setting (71), the heat cycle kicks in again. Endless loop, forcing the unit to operate constantly.

So the repair guy was back again today and worked 2 1/2 hours trying to fix the problem. He replaced the thermostat twice (new units, not "used"), rewired the entire installed heat pump, and the same problem occurs. He swears he has used the same thermostat with the same heat pump many times without problems.

The evil thermostat (with the lid up to show the controls):


Late in the effort, another repair guy called him saying he HAS had problems with those thermostats and that heat pump. So tomorrow, they are BOTH coming out (with a different type of thermostat) and attempt to solve the problem.

I bet a different thermostat doesn't solve the problem. I think there is something internally wrong with the heat pump itself and that they are going to have to replace the whole unit!

And I'll bet that some of their customers have the same problem I do and don't realize it is a problem. They just get used to having the heat pump running all the time and wonder why their electric bill is so high!

I'm glad I'm retired. If I was having to take time off work for this nonsense, I'd be getting seriously upset.

.

Tuesday, October 6, 2009

Electrical Troubles

Grr! On July 28 this year, my heat pump failed. It was SO hot in the house! I called a couple of repair places, but they said "two days". I was dismayed. I found a listing that said "24 hour service, no additional charge". Great. I called and they were there in an hour! Their conclusion was that the unit had been hit by an electrical charge, the compressor was fried, and there was probably damage to other circuits that they couldn't test without a working compressor (which would cost about 1/2 the cost of replacing the whole unit. They could do the replacement the next morning.

Well, there HAD been a tremendous lightening crash directly overhead the night before. I jumped 3 feet, and all the cats were puffed up like big tribbles! So there was some logic to their conclusion. The replacement cost was about what I guessed, and I know the Ruud brand. I accepted.

Sure enough, they arrived in mid-morning and completed the replacement in 2 hours. Everything worked immediately, and they even converted the battery-powered thermostat to AC "as a favor". That may or not have been a mistake, but it seemed like such a minor thing at the time.

Some odd things followed. My oven clock suddenly started gaining 15 minutes per hour, and my M/V turntable turned at a different speed (I know because I heat my morning green tea water 1:30 minutes every time and for years it stopped in exactly the same position). Suddenly it didn't, and randomly positioned. Trivial, but weird.

Fast-forward to Oct 1st last week. I turned on the heat cycle for the first time, and it worked fine. 4 times in the next 5 days, the main house circuit breaker tripped. The 1st time, I assumed it was the whole neighborhood. But going outside, I realized it was only my house! I found the main breaker tripped and reset it. The next 3 times it was really annoying. I had my power company out Saturday morning to check their incoming line. They found no problems and suggested the main breaker on my end had to be replaced.

Saturday, Sunday, and Monday, I noticed that my heat pump (on "heat") was running continuously. And then I discovered that sometimes it was putting out warm air and sometimes cool air. Without ever seeming to turn off in between. Weird (and possibly expensive).

But when the main breaker (whole circuit box) tripped while I was taking a shower and covered with lather, I was compelled to act. Well, you shower in the dark if you want. ;) I called an electrician this morning (and he arrived in an hour!). After 30 minutes of diagnostics on the circuit box, he couldn't find any problem with it. I mentioned the heat pump problem. He wouldn't try to repair it himself, but he said it appeared to be locked on A/C but also intermittently producing emergency resistance heat. He left saying he would try to find a main breaker replacement part (it's old) and call with a price. But he said I needed to call the heat pump company because it wasn't working properly.

So I did, and they arrived after 3 hours (these fast response times are amazing). The service guy checked the inside unit, outside unit, and found some wiring oddities which he fixed. When he reset the thermostat, he was surprised that the problem remained. He spent more diagnosing the system to no avail, then went and checked the thermostat. He used some different instruments and said it wasn't working right. He went and rewired the heat pump as it was originally, then tested the thermostat again. Same problem. I agreed to have the thermostat replaced. He said converting it to AC was a mistake and changed it back to battery power.

Without him changing any wiring or parts afterwords, the new thermostat made everything work perfectly. However, he pointed out that nothing in the entire heat pump system should have been able to trip the main house breaker switch! In other words, the maximum surge draw of the heat pump even with problems is only 26 amps and I had 60 to spare (plus I had not been drawing half the capacity at any time). So basically, he said the heat pump was fixed but he couldn't think of any connection between that problem and the main breaker tripping.

So I still wait for the main power breaker to trip again at any time... If the first electrician calls with a reasonable cost of replacing the main breaker, I will just have it done. Getting caught in pitch black with soap in your eyes is not much fun, after all...

Why don't I ever have any "normal" problems? Everything that I can't fix myself is admittedly "weird" to the professionals who come. Maybe I just fix the routine problems. Or maybe it's just "mean ETs". LOL!

Saturday, October 3, 2009

Boat Canopy Design

I think I have it figured out now. I needed basic frame strength (cubes) plus top support (arches with a ridgepole) for shedding rain and snow. And a sturdy cover.

Got them all figured out now!

The canopy is designed to be separate from the boat. I park the boat and just pull the canopy over it. No trying to back it into a small shelter in the dark. Making the canopy as small and unintrusive as possible.

The base is made of 1.25" PVC pipe. The bottom of the base is like a sled; only a crosspiece at the back bottom. Above the boat, there are crosspieces for rigidity and strength. Those crosspieces above the boat are 6" higher than the highest part of the boat for safe clearance.

The top of the canopy frame is made from .5" PVC pipe and fittings so it can be bent into an arch. Arches are strong and so can be made from easily bendable smaller PVC pipe. And I have an idea that will help support the tarp cover that I will mention later.

The design:


Dimensions of this canopy vary by boat. I need 5' high crosspieces at the top of the base to clear my 54" pedestal seats above ground. As they say, "Your requirements may vary".

Mine will be 20' long and 7' wide and about 7' tall. The 20' length will protect the boat and trailer (the trailer spare tire, winch, and hitch will last longer when sheltered). Adjust yours as needed. It's the fittings that are the tricky part unless you don't care if the structure is 10" tall!

And finding the fittings is the hardest part. I've spent weeks searching local and internet sources for all the right fittings. Rule #1: No one offers them all! So this design is one that offers one internet source for "odd fittings" and the rest really are locally available. Indeed, the design was forced by what I could get locally and from only one internet source.

The base is made of 2 parallel pipes with one cross piece at the back. This is because the whole structure is designed to be pulled over the boat and trailer wherever it is parked. The uprights from the bottom pipes and the crosspieces above the boat will make it a rigid structure.

At the point above the boat, the structure changes from 1.25" PVC pipe to .5" PVC pipe. And that's where it changes from squares to arches.

The tops of the base have 45 degree elbows (with a reducing bushing) in them. The top of the arch will have .5" cross pieces aligned as a ridgepole. From each crosspiece there will be a half arch .5" pipe into the reducing bushing.

The frame top will be covered with plastic snow fence for support of the tarp cover (and I am ordering a 12' x 20" heavy duty UV resistant tarp for only $42). The snow fence and tarp will be firmly attached to the PVC frame, not the trailer, so no boat attachments will be required. I will, however, put an eyebolt through the PVC frame on each side to attach it to the boat with a bungee cord. The boat is simply an anchor in this case. That way, it can't be blown off by wind.

My material list (letters relate to the above diagram):

A. .5" Cross - 3 each
B. 1.25" Tee - 6 each
C. 1.25" 5 Way - 6 each
D. 1.25" 3 Way - 2 each
E. Caps (not needed) - Forget that one unless you can't find some parts and need a cap for a part with an extra outlet)
F. .5" Tee - 2 each
G. 1.25" 90 degree Elbow - 2 each
H. 1.25" 4 Way - 4 each

C and H also require a 45 degree Elbow and a 1.25" to .5" Bushing - 10 each

And I think I need thirteen 10' 1.25" PVC pipes and six 10' .5" PVC pipes.

If anyone detects an error in design, please let me know ASAP!

I've bought all the fittings I can locally and ordered the other parts online (Creative Shelters). When everything arrives, I'll figure out what order to assemble the parts in, and report on that later.

I will, of course, take many pictures during construction! You can't believe how relieved I am to have finally solved the design issues. It was quite a challenge, as PVC fittings are limited in both design and availability! I could have easily done it with a 45 degree roof, but that was just too tall. I had a vision of a better way and I found it! The design aspect was half the "fun"... You wouldn't believe how many sheets of graph paper I used just getting THIS far. LOL!

When it is completed, I will probably rewrite the whole post for better clarity and add pictures, but this is the best I can do until I've actually built the thing.

Friday, October 2, 2009

AHAH, The Boat Canopy Problem Solved.

I've figured it out! Using available parts...

1. I didn't like the straight up sides and 45 degree roof because it was too tall.
2. I didn't like hoop supports because there was no top ridgepole connecting them and that was weak.
3. I didn't the gable design because it was too wide at the bottom.
4. I didn't like the tee design, because while it gave me a lower roof angle, the front an back were weird and it required way too many cuts and connectors.

So it FINALLY hit me like a cold wet fist in the dark of an alley (oh wait, that's a detective story). Seriously, I suddenly realized I could build a straight up frame to the height of the boat and THEN put in hoops on top into 45 degree elbows. I haven't seen THAT on any website. I'm sure someone has done that somewhere, but I haven't seen it anywhere.

So 1.25" pipe uprights on a sled base (no ground level cross-supports), 45 degree elbows on top with cross supports above the boat, and then 3/4" hoops over those. The 3/4" pipe will just stay in the 1.25" slip connections by torque! I'll use some solvent in there too. And my good idea is that the hoops won't just go from side to side unsupported, they will go into cross pieces ("Xs") as "half hoops" and the Xs will connect to a ridgepole!

That brings the height down to about 6', only 2' higher than the boat. And to give the top greater strength, I will attach plastic snow fence over it to support the poly tarp!

Yee Hah!

I have to rush off to sketch it on graph paper and list the parts and pipes I need! And its all available locally! I knew I would figure it out eventually...

Friday, September 25, 2009

The Stupid Boat Cover Again

Some advice requested...

I have several boat cover ideas in mind, and some have good points and bad ones. And since I have been diagramming many for days without success, I need some help. Traditional boat covers just dont work well on this jon boat. Rain pools in the cover and has to be bailed out. There just isn't any cover that fights right because of some minor modifications. And the expensive covers don't last more that a few years.

Idea #1 is a PVC frame with a tarp cover that I can just pull over the boat when I park it. The advantage is that, once built, it is really easy to use. But it is annoyingly hard to find the right pvc parts locally or online retail to build it.

Idea #2 is stretching ropes across a high stand in the center of the boat. Bungee cords and the height in the center would mean that rain should run off easily. But that would require some detailed arranging of the cover every time I used the boat. And it still requires a cover and I'm not sure how to fit it. I have problems fiting a cover because I have seats and a front motor attachment that are above the surface of the boat.

Idea #3 is a bit extreme. Park the boat in the garage and leave the car outside. Well, the car is actually a bit more weatherproof than the boat. Never let it be said I am not considering all options... LOL!

Idea #4 is to just cover the boat in black sheet plastic weighed down by bricks and cinder blocks. I have a HUGE roll of 12' wide black plastic. Its a possibility and no harm if it gets some holes poked in it (duct tape to the rescue). If it only lasts 2 years, so what? There's lots more of that on the roll.

Any suggestions? Other ideas? My ears and mind are open...

Thursday, September 24, 2009

OK, Time For A Little Humor...

Life is not all projects...

Consequences of retirement:

1. Getting up at 10am is "early".
2. You learn more about your pet's daily life then you even imagined.
3. It IS possible to eat all day long.
4. Beer: "Breakfast of ex-champions".
5. Late-night Nickeldeon cartoons are great. I can't live without 'Robot Chicken'.
6. It is harder to relate to Dilbert comic strips.
7. Neighbors who mow their lawns at 10am should be arrested.
8. Never shopping at Walmart on a weekend.
9. Dr and vet appointments at 2:30 on a Thursday are great!
10. "Manyana"...
11. Spending an hour preparing dinner is not a waste of time.
12. "Inflation-adjusted annuity for life"...
13. Not sharing air with flu-ridden carpool members.
14. Watching birds at the feeders for an hour.
15. No "justifying your job" during office reorganizations.
16. And no "annual performance reviews" either.
17. And no office cafeteria food, for that matter.
18. Great movie on at 3am? No problem.
19. Going fishing on a Tuesday. Or Wednesday. Or Thursday.
20. Zinfandel with lunch!
21. Golf or fishing?
22. No kids at movie theaters.
23. My cats don't remember a time when I wasn't "there all day".
24. Making real bread.
25. Remembering truly long, boring meetings and ROTFLMAO!
26. Forgetting Excel...
27. Using a Mac and not that damn Windows computer I had to have for "compatibility".
28. No longer faking "working" on telework days.
29. Getting emails from frustrated former co-workers.
30. And just replying to them about the joy of tending to the tomatoes...

I'll leave it at that... ;)

Wednesday, September 23, 2009

The PVC Learning Continues - Part 2

This is becoming maddening. The manufacturers make all sorts of PVC fittings, but no one sells them locally. I have checked out all retailers within 15 miles and they have only the most limited selection.

The parts I want are available wholesale, but I don't qualify for that.

I don't want to have to buy a box of 20 when I need 5 items.

I went to 5 stores today. The last one was "the store that had everything". It didn't! They didn't even know what a "street 60 elbow" was! Well after weeks of researching, I do. I am SO PISSED!

The consequence is that I have to design the structure with what is available. That ticks me off royally, but it's my only option. Back to the drawing board...

Tuesday, September 22, 2009

The PVC Learning Continues...

LOL! It seems I misunderstood "slip". Slip connections won't fit into each other, but they do fit into pipes. That helps. And it means I don't have to worry about "hubs"!

But still, I went back to Home Depot and Lowe's and they just don't have complete selections in any size. I am going to a plumbing specialist store tomorrow. The Home Depot Plumbing Manager suggested one locally. I certainly didn't know about the place.

The local HD and Lowe's have basic parts and I wrote down the prices of the parts they do stock (and to indicate what parts they stock). But I'll be fair about it, if the specialty plumbing store offers competitive prices (within 10% of the HD and Lowe's cost) for the basic parts, I will reward them for the selection by buying all parts there.

Wow, this project is taking so much more time for the design and supply, it is weird. I normally work in wood, so the design is the hard part and the supplies are easy!

I can't wait to get this one done because the parts are so annoying to obtain!

Sunday, September 20, 2009

No Project Day

Well, maybe call it "Project Relax". I simply had a good relaxing day today.

First, I went fishing with my best friend Jeffrey. On the way to the fishing place, we stopped at a farmers market. There is lots of crap merchandise there, but still some Amish stands. We bought pickles and relishes from them, and we found a small basket of tomatoes to split between us. There are a few stands with tools and we saw some very strange ones. I wish I had remembered to bring my camera. Some tools were really THAT weird.

We got to the "lake" (a reservoir actually - no one outside of Maryland would call it a lake). Maryland is one of the few states that actually has no natural lakes. But we like to fish there.

We were out on the water at 4 pm. Fishing 10 minutes later. We were using only top water flies and bass bugs. The wind was light, the water was still, the temp was 75 degrees F, the light was partly cloudy... A perfect day to be out fishing. We didn't catch a thing (the previous time, we caught a bass and 3 panfish, so there ARE fish there). But we had strikes and nibbles, so there was some excitement.

Fly fishing for bass is not productive, but we enjoyed it. The lake (it is actually also a State Park) closes at sunset, so we were on our way home after only 3 hours.

As we returned home, we stopped at Home Depot (a big box hardware store if you don't know of it) and looked for some stuff. Jeffrey wanted special cleaning product (which we didn't find), but he found knee pads. I found some neoprene gloves and nylon strap tie-downs for the boat. My old ones weren't holding any more.

After Jeffrey left for home, I made a great dinner. Filet Mignon, baked potato, steamed broccoli, and tomato salad. With wine (Zinfandel)...

Watched some great TV afterward, (Miracle Planet for 3 hours, and finally my favorite animation - Kim Possible - at 1:30 am). Next time, back to projects! I finally cleared out another framed garden box a yesterday! No more weeds, poison ivy, or day lilies left there! And it took an hour to finally dig out the sapling that was deep in that bed. I had to dig down 2 feet in a 2 ft circle to finally get it up. But it was worth the effort!

More about that next time...

Wednesday, September 16, 2009

Boat Canopy

I am so tired of buying $200 boat covers that pool water no matter how tight I tie them, rip at the corners and only last 2 years anyway! So, I got it in my mind to simply build a tentlike cover of standard black plastic sheet on a PVC pipe frame that could just be slid over the boat like a movable carport. I have spent 4 days learning all sorts of things about PVC fittings and is is very complicated. I found sites that had designs for structures, I found sites that sold connectors, and I found sites that sold kits.

Nowhere did I find a site that actually explained what all the fitting choices meant! There are "slip fittings", "hub fittings", "fipt fittings", "sanitary fittings", "street fittings", "furniture grade", "utility grade", "gray", "white", schedule 40", schedule 80", etc, etc, etc.

But I did figure it all out eventually. Indeed, I now know more about PVC pipe fittings than I ever wanted to! Add in the fact that the manufacturers don't want to sell to individuals and the local retailers carry limited selections, and it gets really hard to design what you want.

Just as examples (as best I have figured it out): "Slip" means the end fits inside a hub. "Hub" means there is a larger flange for a slip. "fipt" means that the pipe fitting screws on. "Sanitary fitting" means that the angles go out in a curve. "Schedule" means the amount of pressure the pipes can withstand. "Gray" is more UV resistant than "white". "Street" means that one end has a hub and the other end is a slip. Arggh!

Building a box frame from PVC pipe is not tricky or expensive. Its the FITTINGS and COUPLINGS of any form that deviates from that that are. I designed a first one easily. All I needed were some "4 way 60 degree angles". But no one makes those.

And even when I figured out a design that used standard manufacturer fittings, I discovered that no local stores sold all of them (individually or collectively). Some manufacturers will sell individual fittings "by the box" to individuals. Great, I need 3 on something, and the box holds 20!

As long as I am ranting on this, I will complain about local "big box" retailer websites. They are totally unorganized. You would think they would list their PVC fittings either by pipe size (1 inch, 2 inch) or by type (90 degree elbows, tee fittings, etc). No, they are totally random. You have to search through hundreds of items to find the one you want. And they don't list half the fittings that I know are in the store! That's BAD website organization...

The "kit" sellers are the worst. They offer plans for various constructions, but mention that you have to buy all the pipe separately. In other words, all they are selling are the connectors. And they get 3 times the price for those. LOL! Its like finding a shed "kit" and discovering that all they are selling you is a design and nails...

I'll work the design out tomorrow with what is available locally retail...

Saturday, September 12, 2009

Fishing Rod Rack Project, Completed

I decided to give the rod rack 2 coats of polyurathane. I couldn't do all surfaces each day, so it took 4 days. It's not that it will get much wear and tear, but in the garage it will be exposed to a lot of humidity changes and there isn't anything in the construction that will allow much natural warp shifting.

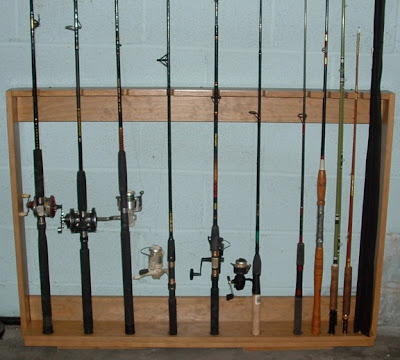
So here are the final pictures:


Construction Notes: If I had it to do over again, I would have made the 3/4 holes on the top shelf smaller. The opening only needs to be large enough to accept the upper part of the rod. Also, I would make the base holes a bit larger (or at a slight angle). A couple of the base holes were a bit tight.

Fishing Equipment Notes: Anyone looking at the actual rods will notice I have 3 bait-casting rods, 4 spin-casting rods, and 3 fly-casting rods. From the left, the first 3 are for casting baits and large weights into tidal waters, the second 3 are for casting different weight lures in freshwater, and the last 3 are fly rods. 1 of those is a short rod for barrel loop casts in shrubby conditions, 1 is for for casting heavy bass flies and popping bugs, and the one in the cover is my "good real fly rod" for trout. The one spinning rod without a reel (7th from left) is just kind of lonely and waiting for a new reel. The short stubby rod (8th from left) is a "Chesapeake Bay" rod for dropping bait from a boat straight down. I've never caught a fish with it, but I keep it around just in case it is "the right one for some trip". LOL!

If anyone has a question about the construction (or anything else), just leave a comment...

Next project: Movable PVC frame tent for the boat.

Tuesday, September 8, 2009

Fishing Rod Rack Project, Part 6

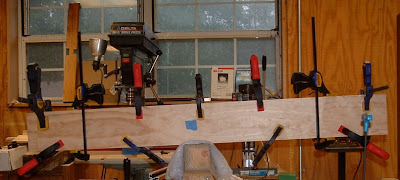
I took a few days off from the project (fishing, errands, shopping, TV) but got back to it yesterday. It was "glue and screw" time. I took the time to very carefully align all the corners square and flush.


Since I was using mostly 1 x 4" boards and had many places where I was screwing through the wide edge into endgrain, I made a small drilling jig. Nothing fancy, just a piece of scrap from 1 board. I drilled pilot holes centered halfway of the thickness and set 3/4" from the ends. You can see it in the 1st picture (where I was using it as a clamping block). It really made it easy to drill pilot holes evenly spaced, straight, and right in the center of the boards.

I did half of the basic frame yesterday and let it dry overnight, using a framing square to keep it, well, "square".

Today, I glued and screwed the other half, plus attached the 2 cross braces. When that was done, I prepared to cut (to fit) and attach the 2 vertical braces.

OOPS! I had estimated the 2 pieces to be 23" (and had a 46 1/2" board for the purpose. Guess what? The space to be braced was actually 23 1/2" on each side. I was 1/2" short. I HATE "nominal sizes"! Why can't a 1 x 4" board actually be 1 x 4"?

Fortunately, with all the corners being connected in 3 directions, and glued and screwed on all the edges, it was solid as a rock. So here it is, ready to be polyurathaned tomorrow.


I'll post the "finished" picture when the polyurathane is dry and I have the rack in place with the rods on it...

Thursday, September 3, 2009

Fishing Rod Rack Project, Part 5

Yee Hah! I got half the sides stained early today and did the other sides stained this evening (fruitwood stain). I have to say that brushing on stain with scraps of old white tee shirts works great! It goes on so smooth and evenly. I wear cheap disposable latex gloves, so there isn't even any stain on my skin.

I did one full side, one long edge, and one short edge on each board this morning, and all the other edges this evening. I'll be putting on at least one coat of polyurathane tomorrow. Might do 2 coats.


Tuesday, September 1, 2009

Fishing Rod Rack Project, Part 4

OK, today I remade the rod shelf. First, I clamped it to the base and transferred the centerpoints with a square.


Drilled the slots on the upper shelf, and set it back on the base to check for errors.


It all looks good. I had to eyeball it a little, even with the square. But they all matched up within 1/8", so that's fine.


After I was satisfied that almost all the cutting was done ((2 side pieces need to be fitted into place at the end, I gave all the pieces a thorough sanding. The boards were quite smooth, but as I learned from a previous project, there is a slight film that makes for uneven staining. I went to a 150 grit. With the random orbital sander, that does a nice job for a garage rack. If it was for in-the-house furniture, I would go to 240 and maybe even 320. But there is a limit to how smooth you can sand softwood anyway.


Tomorrow, I'll dry-fit the pieces together, drill pilot screw holes, and tape the areas to be left unstained for glueup. Then, stain the pieces. Next day, I'll give it 1 coat of polyurathene. After that, it's "glue, screw, and done"!

Monday, August 31, 2009

Fishing Rod Rack Project, Part 3

Today, I set about making holes in the base (F) and slots in the upper shelf (E) for the rods to rest in. After 2 hours of careful work, the only thing I can say is *#>&@*
Translated, that means "OOPS". It happens to me in every project. I do something that seems right but that has a flaw and/or I mismeasure something. On this project, I managed to do both at the same time...

The base has holes halfway through for the butt end on the rods. Some are fat, some medium, and some thin. So I decided to drill them to fit. I put paper tape on the base (so I could mark on it) and measured out the centerpoints. Then to be absolutely sure the shelf slots would match the base holes, I put the boards edge to edge and used a square to mark the shelf slots.

I drilled the holes in the base. The forstner bits are great for large flat holes. It looked great! Then I drilled half-holes in the upper shelf.

I was very careful about that. I used a sacrificial board underneath (because they were through-holes) to prevent tearout. I drilled a test hole in a piece of scrap board. I got some tearout anyway. Well that's the bottom side, so I decided to live with it.

That's part of the *#>&@*< feeling. Because of the way I transferred the base centerpoints to the shelf, the bottom of the shelf as I drilled it would actually be the top side when assembled!

So, when I put the cleancut side of the shelf "up", this is what I saw.


When I switched it so the holes matched up, the tearout side was "up".


And then I noticed that one of the shelf holes was 1/4" offset!


ARGGGGH! I am NOT a happy camper right now. Luckily, I have another 4" board. I'll remake the shelf tomorrow. This time, I'll know to put the shelf board ON TOP OF the base, not NEXT TO it when I transfer the centerpoints...

Sunday, August 30, 2009

Fishing Rod Rack Project, Part 2

OK! The base glued together well and only needed a little scraping on the edges for minor glue squeezeout. I used a finishing sander for good measure.

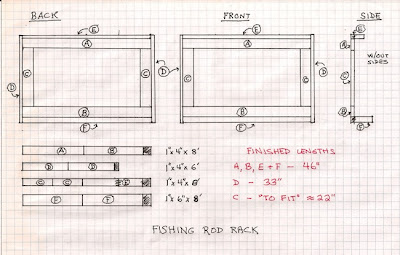
The first thing to do today was to make the cross boards EXACTLY the same lengths. I trimmed one end of the base board (F) on the table saw, then cut it 46". I used that to mark the lengths of boards A, B, and E. I tried to figure out a way to set up a "stop" on the miter gauge, but the fence can only get 30" from the table saw blade and the miter gauge isn't long enough on the other side of the blade to set up one there.

I could have set up a stop on the radial arm saw bench, but it seems to be about 1/4 degree out of square and I can't seem to adjust it any better than that. Oh well, it is good for rough deck and fence work, if not for cabinetry.

So I trimmed the pieces to size as best I could. When I stacked them all together even at one end, they were within 1/64" at the other. I clamped the stack together and power sanded the difference smooth. They ended up perfect.

I trimmed the sides (D) to 33" and am ready to start putting the frame together (Boards A, B, D and D).


I also need to rout slots into board E and drill 1 1/4" holes with forstner bits 1" deep into board F. But it is time for dinner, and I like to have wine with dinner, so there won't be any more woodworking tonight!

Saturday, August 29, 2009

Fishing Rod Rack Project

FISHING ROD RACK

After having my fishing rods leaning against the garage wall for years, and having them all fall over whenever one got bumped, I decided I needed a rod rack. I looked at some for purchase but I didn't like any of them (all were either too cute, way too fancy, or held too few rods). Besides, why buy when you can build?

So I sat down to design one. My 1st design had all the rods standing straight up through holes, but I realized they would all lean slightly in different angles. Functional, but aesthetically unpleasing...

So I tried again. This time, I decided to have them set in holes in the base and lean into slots in a higher shelf. That would have them all at a consistent angle. It took a while to find a height for the upper shelf where no ferrules would be in the way. And I reworked the design a couple of times to make sure the construction was solid.

So here is what I came up with (double-click the picture for enlargement):


I was surprised to notice that the front and back views are identical. I was also trying to use boards I already had, so the 2" base is actually two 1" boards glued together.

So I laid out my boards:


Most of the boards needed to be cut approximately in half. That was too long for my table saw (because of the Incra Fence), but my old radial saw has plenty of room. Since there is at least 2" of waste on each board, I could cut them all oversize (the radial arm saw does not seem to cut as squarely as the table saw).


Boards A, B, E, and F have to all be exactly the same length, so I glued up the 2 boards for F (the base) and left it until tomorrow.


You can never have too many clamps. LOL!

Monday, August 17, 2009

Poison Ivy Update

Most of the poison ivy I sprayed last week is dying nicely. But that damn big shrubby one over the fence is reluctant to die. I'll have to give it another spraying (or two). But it is supposed to rain later today, so I'll have to wait.

That tall weed with the purple berries I couldn't remember the name of is "Pokeweed". It isn't the worst weed around here, but it is very large so it stands out. And it is hard to dig up because it has a large swollen root about a foot deep.

The worst one I have is mock strawberry. It grows EVERYWHERE. It isn't hard to kill individually because it depends on a surface stem-knot, but when there are 1,000s it is a real pain. And the birds love the fruits so there is always a new supply of them scatterred everywhere. They get into the thick groundcovers so well that they are nearly impossible to pick out.

I had to finally dig out a large area of ground-cover sedums and dianthus becuase I simply could not get all the mock strawberries out and they just kept growing back (I was able to carefully pick a dozen sedum clean of the "mocks" and replant them. They are spreading again well.

Among the poison ivy, the mock strawberry, the honeysuckle, and the pokeweed, I could go crazy. At least I don't have kudzu!

Friday, August 14, 2009

Lack of Rain

The Weather Channel predicted 30-50% chance of thunderstorms EVERY day this past week. I got 1/4" once! So I spent the day watering the garden, flowerbeds, and even some small trees. I realize a 30-50% chance isn't a promise (they do their best), but I should have gotten more than 1/4" once...

On the other hand, it was a nice day (82F) so it was nice to be outside with the cats. It could have been 97F and humid like a few days ago...

We are almost through the "dog days" so things will cool down and rain a bit more often soon. I shouldn't complain. We had no day over 100F and not only did the lawn soil not dry up and crack open, the grass even stayed (mostly) green! It's not often I have to mow the lawn in August.

By the way, "dog days" has nothing to do with our canine friends panting in the heat. The term comes from the fact that the constellation Canis Major (Big Dog) rises just ahead of the sun at this time of year. So our ancestors in the Northern Hemisphere knew that the hottest days were arriving in mid July. It was once thought that Sirius, the brightest star in the sky, was so bright that it added heat to the day. Well, good thought, but it is just the tilt of the Earth in the Northern half...

The corn failed though. 3' high and it tasselled. 4" ears that may or may not kernel out. I guess I still don't have enough sunlight for corn. At least the tomatoes, cukes and beans are doing well. From 8 tomato plants, I am getting several ripe fruits per day. I am losing many to Blossom End Rot (something I usually only have on the 1st few fruits of the year). I don't know why that is a problem this year. I added plenty of compost to the soil, and I gave them foliar spray several times. I even added saved eggshells for the calcium.

Thursday, August 13, 2009

Another Front Landscape Box Update

The Caladiums are really taking off! I was worried about them at first, because they seemed to be coming up so thinly. I thought most of them weren't going to grow. The 1st few emerged July 10th like nervous mice.

But look at it NOW!


And there are still more just emerging!

It's nice when some project you are unsure about works out well...

Tuesday, August 11, 2009

Fishing Boat Renovation

I have a 16' jon boat. It's 16 years old, but in good shape. But I got tired of replacing the rotting plywood floors every few years. So this Spring, I bought plate aluminum, attached good outdoor carpet to the aluminum, added some additional support under it, and mounted swivel seats.


But the current project was the trailer, which is the same age. I hadn't used it in 3 years, the tires were sitting a muddy spot all that time, the spare wheel bolts were rusted onto the frame, and the coupler was so rusted I had to stomp on it to get the latch to shut. I tried to repack the axles with fresh grease, but the grease fitting was so corroded I couldn't even attach it.

So THIS project was to take the trailer to a trailer store and say "FIX IT"! Sometimes you have to turn a project over to experienced people with specialized tools. For example, they admitted they had to use some serious equipment to break the old bearing buddies loose...

They put on a new coupler, new tires (the rims were OK), a new spare rim&tire (the tire was dry-rotted, cleaned out all the old grease, replaced the seals, repacked the grease, and put on new "bearing buddie". I even bought a keyed trailer coupler lock. I was tired of having to get my reading glasses and a flashlight out to open the lock in the dark when I got home.


I'm ready to go fishing! Now, if the weather would just cool down a bit...

Sunday, August 9, 2009

Poison Ivy

I have a perpetual problem with poison ivy, so yesterday was "Seek & Destroy Day". Most of it comes in from the neighbors' yards (4 of 5 sides of me - I have a home plate shaped yard with 2 back neighbors). I have mentioned this problem to all 4 neighbors, but they say they just avoid those patches. So it gradually creeps through my fence and spreads when I'm not looking. Two of the neighbors had poison ivy vines that matured and produce berries, so I get some individual plants growing in the middle of the yard (half of my back yard is semi-wild). I even get some under the deck. How a berry gets under the deck is beyond me...

So I mixed up some Brush-B-Gon and went on patrol. I had to carry the 2 gallon sprayer by hand because there is a slow drip I need to fix. I have a shoulder strap, but it dripped on me that way. My left arm is still sore!

Well, I must have sprayed 100 individual (small) plants, counting neighbor's plants for as far as I could spray through the fence. I was surprised to realize that what I thought was a neighbor's shrub was actually poison ivy! I covered it thoroughly!

I am always careful to choose a calm day and stand upwind from the spot I am spraying. And BTW, if you smoke, this is a good time to do it. The smoke alerts me to any slight shift in wind direction (and therefore spray drift). More than once I have suddenly had to back away from a spot quickly because of a mild wind shift.

I also make it a point to hose down my garden area afterwards, just in case of drift. And I keep the cats inside the whole day after. I wear disposable latex gloves, too.

As long as I had extra spray. I took the opportunity to knock off some plant I had too many of and I can never remember the name of. It has large leaves, purple berries, grows to about 6' high, has a weak stalk, and has a large swollen root (corm, rhizome, whatever). It is easy to break it, but the root seems immortal. Fortunately, it dies quickly when sprayed.

Having some still left over, I sprayed my driveway because I'm tired of mowing it. I should explain... The driveway is asphault, is 23 years old and I have never resurfaced it. There were a few spots where grass established itself in cracks a few years ago, but this year it seems to have really exploded.

I think I will replace it with concrete soon. But for now, just killing the grass would be nice.

Inauguration Day Yesterday

                                 MOURNING IN AMERICA Obviously, I was not thrilled with Trump's election.  But worse, it filled the TV f...