Showing posts with label Hostas. Show all posts

Friday, October 28, 2022

Flashback Friday

I use Flashback Friday to show old events on Mark's Mews.  So why not here as well?

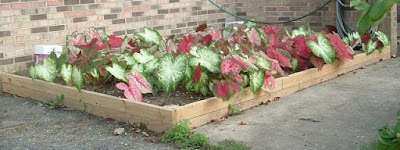
I had built 2 landscaping boxes on either side of the front steps. Back in 2009, I had Caladiums on the left and fancy Hostas on the right.  They were gorgeous.  


OK, that year.  Neighbors commented on them.  Then the deer found them...  Hostas are deer-candy.  I have moved most to the backyard where the deer don't try to enter.  They didn't like the Caladiums so much, but Caladiums aren't hardy here.  If you don't dig them up and store the bulbs properly, they are gone.  I didn't get around to that.  I might buy more next Spring for planting elsewhere.

So I converted the Caladium bed to Snow-On-The-Mountain.  I got some from my parents in New Hampshire and deer don't eat them.  They multiplied rapidly and that was good.

Bishop's Weed Mountain Ground Cover

But some sprouts went all green and took over.  I'm still fighting to pull those up and get the bed all the variegated type.  But the green ones are hard to kill.  I think I'll have to just dig up the variegated ones and pot them, pulling out any green sprouts.  Then smother the bed over Winter and try to replant next Spring.

I'll put paper over the bed (that stuff used for packing in shipping boxes).  I have a lot of it.  I'll poke holes in it and set the variegated pots in those.  Should give them a better chance to re-establish.

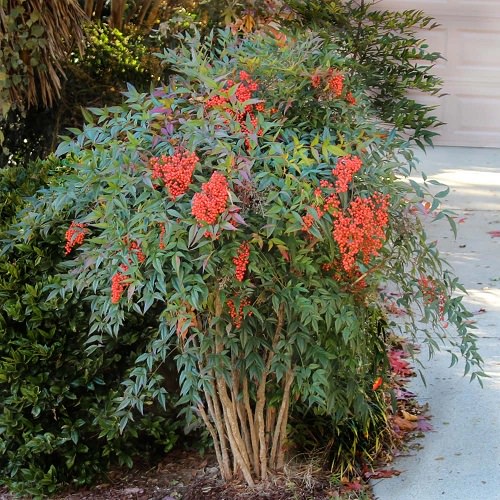
I have 3 dozen Nandina shrubs growing and need to decide where to plant them.  Saved the seeds 3 years ago and they are a foot tall now.  They takes months to germinate.  Deer won't touch them, which is good, and they are evergreen with bright red berries in Winter.  

Mine stay about 4' tall and 3' wide.  I think the edge of the drainage easement would be a good place.  They have strong deep roots (I tried to dig one up once) and would resist occasional drainage flooding.  And since they are evergreen, they make a good yard border.

Nandina Plant Varieties 4

A lot of Nandina and Hollies would be interesting...


Tuesday, April 19, 2022

Flowerbeds Part 5

The current view.   The late white daffodils.

Close up...
The edging specimen daffodils.  Separates the lawn from the perennial flowerbeds.
Some lucky tulips that the voles haven't found (yet).
Top shot of the same showing the neat dark centers.
Some tulips planted in mesh cages are still blooming nicely.
A 2nd patch.
I am thrilled about these.  They are a perennial flower called 'Maltese Cross'.  I planted a dozen of them in a temporary space and they all seemed to have died late last Summer.  Seriously, they just died back and disappeared.  But here they are growing early and healthy!
More of the species daffodils (they were on sale cheap).  They love it here.  I planted one per foot several years ago and look at them multiplying now!  I originally had the edging filled with crocuses, but crocuses are mole-candy.  But they don't eat daffodil bulbs!
Close up...
I've been renovating my flowerbeds and fence-plantings.  Some divisions I put into temporary storage hoping they would survive.  The tubs were originally for growing Yukon Gold potatoes, but since they sell them in the grocery stores now, no point to that.

So I have fancy hostas I can replant.
Autumn Joy Sedum divisions I can replant.
More Sedums...
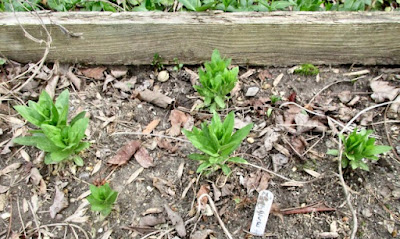
My naturally-growing hostas are emergibng too.
I'm behind, but catching up.  Sometimes, that is all you can do.


Monday, April 24, 2017

Minor Yard Work

It rained most of Saturday, was originally forecast to rain most of the afternoon yesterday (but didn't) and is forecast to rain most of today and tomorrow.  On one, we need the rain; it's been a dryish Spring.  On the other hand, I have a lot I need to do at this time of year.  So I took advantage of the rain delay to take care of some minor work, expecting that I won't get much done outside today and Tuesday.

First on the list was the remove the seedheads from the faded Spring bulbs.  Removing the seedheads prevents the plants from spending energy developing the useless seeds.  It matters more to Tulips and Hyacinths than to Daffodils, but I did most of them anyway.  There is a border of Daffodils that still have some flowers blooming, so I will wait on them.

A hedge trimmer does the job nicely.  A string trimmer works even better.  Naturally, both had weak batteries so I set them to charge.

So, noticing that the first mosquitoes of the year are out and about, I decided to set up traps.  I have a lot of cheap black plastic pots that seedlings get shipped in, so I found 4 that 1 gallon plastic bags fit onto perfectly.  If you knock down the 1st few generations of mosquitoes, it makes things better all season.  Between the 4 pots, my 5' lily pond, and a tub in the far back yard, that made 6 traps around the backyard.  Black pots work best; it looks dark and safe to the female mosquitoes.

I use Bt (Bacillus thuringiensis) in water to kill the mosquito larvae.  The stuff works great and is harmless to people, pets, and beneficial insects.  It comes in "doughnut" shape and you can break them apart according to the amount of water to treat.  The pond only needs a 1/4 of one per month; the smaller containers just need a sprinkle of a crushed 1/4.

The female mosquito finds a nice still pot of water and is happy to lay all her eggs there.  She has done her duty.  The Bt kills the larvae, so there are few adults around, so I am happy.   I marked the small pots with an orange landscaping flag so I remember where they are.  Seriously, if I don't sprinkle in some Bt into the pots each month, then I an BREEDING mosquitoes and I would be very unhappy.  So the flags help me remember them.

I moved some fancy hostas from the front yard to a spot under the deck in the backyard last week.  The deer ate most of the fancy hostas in the front the past 2 years.  The hostas survived but smaller each year.  So moving them was essential.  The deer have never jumped the 6' fence in 30 years (I would have noticed plant damage and hoofprints).  So the fancy hostas are safe there.


There are some large hostas in front that the deer never bothered, so I divided each of them in 1/4s and planted them where the fancy ones had been.  Hostas are tough and accept crude divisions well.  I like the new look too.  It brings a uniformity to the front planting near the foundation framed beds (one is 8'x12' and the other is 12'x16').  They are not massed, but individual, so they are each visible from the street.  I do the front yard to make the neighbors jealous; I don't actually spend any time there myself.  LOL!

They looked like this before being divided...
 They they looked like this in the original side after...
But don't worry, they perked right up after some watering.

So the new backyard underdeck hosta bed is planted, alternating 'June' and 'Paul's Glory' with some small ones surrounding them.  But I was 1 Paul's Glory' short.  I thought I would have wait a couple years and divide the largest one to fill the spot, but I realized I had a couple in an old hosta bed along the back fence, so I divided the largest one and moved the division to the empty spot.

Ah...  Completion of symmetry!

Friday, November 18, 2016

Getting Busy Again, Part 3

Tomorrow is  Hosta Dividing and Moving Day!  The deer have "loved" my front yard hostas too much; they have to be moved into the back yard where the deer don't go (good fence).  I have 2 spaces for them.

The first is just under the edge of the deck.  I planted coleus and impatiens there this year , but I stuck in 2 small hostas and they thrived.  So it is a good place.  I will add my fanciest hostas from the front, ('June' and "Paul's Glory' and a few 'Gold Drops').  The larger ones will go into a hosta bed I created years ago along the fence to replace some that have died and increase the number of them.  I have decided having more in the bed is better than just having a few several feet apart.  Well, the originals there didn't grow as big as I expected.

I also have a few dozen Japanese Painted Ferns.  The deer never bothered them, but I would prefer most of them among the hostas.  I love the combination.

However, there was 1 large LARGE hosta the deer never bothered.  It is 'Blue Angel".  It is HUGE!  It is 3' across and 2' high with thick bluish crinkly leaves, slug-resistant and (apparently) deer resistant.  It might get larger.  But the important thing is that each is large enough to divide into 4ths.  And I have 3 of them.  That makes for 12.

3 of the divisions went back into nearby spots a little more spread out.  Instead of 3 across (where they were overlapping), there will be 2 across and 1 centered behind.  They were covering my paver path to the hose spigot, so they needed to be moved anyway.

The good part is that  that leaves 9 divisions for the larger landscaping box to the other side of the front steps.  They will fill that box mostly and I will put some of the volunteer Japanese Painted Ferns between them.

After removing all the existing deer-loved hostas first, of course.  I will leave no plant behind.  I stuck landscaping flags in the center of every existing hosta last month, so I know where to dig even if the leaves are all gone.  I expect 90% will survive the transplanting.  Hostas are tough! 

I had 4 very common boring solid green hostas I removed before a landscaper scraped the soil off a ridge leaving it flat.  I divided each one in 1/4s and stuck them under the stairs from the deck there it is really dim light.  15 of 16 thrived!  I expect all the other hostas I divide and move will do as well.


Wednesday, July 30, 2014

Next Project, Part 2

Made some progress on framing in the area around the sunken patio wall and deck posts the past to days.  It's a bit awkward using just the deck leftovers, but I think I have them arranged so that I don't have to dig really deep trenches to set the boards into the ground.

The lower end needs a 2"x12" board and a 2"x10" board to reach the top on the cinder block wall, but the far end is almost level with the wall, so I only need a 2"x4" board.  The in-between part will have a couple of stacked boards to complete the frame and make it level on the top of the boards.  And I can attach those directly to the deck posts, so it will be very sturdy.
I had some problems figuring out how to attach the lower end boards firmly, until I thought of drilling holes down the width at both ends.  I can put a 3' remesh bar through both and pound them into the ground with a sledgehammer.  That will have the remesh bars 1' into the ground.  Plus I will use some exterior caulking cement to attach the boards to the cinder block for some extra stability.  It's not epoxy or resin, just like really thick toothpaste.  I'm not sure what that stuff is actually called, but I've used it before to attach wood and cinder block in the basement and it holds like bolts!

Drilling the holes through the width of the 12 and 10" boards took 2 hours today!  Fortunately, I have a large drill press (generic image).  With some clamps and a speed square, I was able to get most on the holes drilled straight. 

But it won't go all the way through a 12' board (8" depth only).  So I had to finish the drilling manually.  Fortunately, having the 8 inch holes drilled straight allowed me to use a manual drill for the rest.  The drilled holes allowed me to stay straight for the final work.  But I couldn't have done THAT without the extra long drill bit.

I bought a 6-piece set of extra long drill bits many years ago thinking "I'll need those some day".  They're not the best quality either.  Not titanium or even high-speed steel, but how often do you need something like those?  So they were cheap and they work well enough.  Just using a couple of the cheap drill bits a couple of times has been well worth the cost.

It took some work though!  Every inch deep, I had to pull the drill bit out and remove sawdust packed in the drill spirals.  Could I have simply turned the boards over on the drill press and drilled from both sides?  Yeah.  But experience has taught me that no matter how carefully you measure, holes drilled from 2 sides will NEVER meet in the middle.  Sad but true.  You need factory precision tools to do that.

But that part is now done.  Tomorrow, I will attach the bottom pieces by pounding rebar through the holes and gluing the ends to the cinder block.  Then it will be a lot easier to trench the long side boards and attach them to the deck posts.

Filling in the framed box will be easy.  Why?  Well, the yard is made of dirt; I can steal it from almost anywhere, LOL!  I'm going to move the front yard hostas to the new box, and hostas don't even LIKE really good soil.

One interesting thing is that the hostas will be almost at eye level when I'm out on the sunken patio.  I used to park at a city garage that had an arrangement like that, and it was really different seeing the plants that way.  It was always calming.  So I'm hoping for the same effect here.

Surprise discovery...  The new deck posts are set precisely 14' away from the house.  But the distance from the sunken patio cinder block wall varies by 6".  The cinder block wall is NOT square to the house!  Every project I do reminds me that the builder did a slipshod job in all aspects.  So the framed box is not going to be a nice rectangle. 

But it was either make the framed box a 90 degree rectangle (in which case the deck posts would have been variably farther inside the frame, or use the deck posts as the guide for the frame and the frame gets 6" narrower toward the high end.  I decided that using the deck posts as a guide made a more logical appearance.

If any of my friends ever decide to measure it, I will rap their knuckles with a ruler!  LOL!

Some notes from the first picture...  1) At the far side of the sunken patio, there are some hostas already planted.  I had one common green hosta planted near the old deck stairs for 20 years and it spread some.  I was able to divide it into 12 pieces and transplanted them there.  All seem to be recovering well in that really terrible clay soil.  Well, its what they were growing in before, so I assume they liked it. 

2) That object in the upper right is a mailbox.  Of course, I don't get my mail delivered in the back yard.  But it makes a great place to store all my various garden hose nozzles and plumbers tape*.  I have another out in the garden where I store all my small hand tools.  Great idea to keep track of small items...

* Plumbers tape is thin plastic that wraps around the threads of hoses and attachments.


 It does a great job of stopping water leaks around hose and nozzle connections.  Leaky connections?  Give it a try.  $1 at most hardware stores.


Friday, November 12, 2010

Front Landscaping Boxes 2

Today I planted half of the daffodils.  Took 3 hours and it nearly killed me.

First, the daffodils...  As I said yesterday, I selected i Early Spring bloomer and 1 Late Spring bloomer.  That was so the appearance of the boxes would change over several months but still show flowers.

The Early Spring bloom is Monal...
The Late Spring bloom is Fragrant Rose...
Between the two, it should make the front look different over the course of 8 weeks and by that time, the hostas shiould be growing out big leaves.  Yeah, I'm trying to get fancy.  Why not?

I ordered 100 each of both.  I decided to plant some in both front landscaping boxes.  One thing I have learned is that most people plant their Spring bulbs too shallowly.   Daffodils like 6-8" and if you look at the standard bulb-planter tool, they don't go that deep.  So I wanted to get them down where they really wanted to be.

I tried a post-hole-digger first, but I had too many rocks in the soil.  And I wanted to plant 2 in each hole 4" apart, and the post-hole-digger wasn't that big.  I should mention that the bulbs I received from
http://www.brentandbeckysbulbs.com/ are both large, firm, and almost always doubles!  So I had to use the spade to dig a 6"w x 8" deep trench with a flat bottom.  That took time.

But I'm getting ahead of myself.  The first thing I did was take landscaping flags and stick them all around the right landscaping box.  200 bulbs, 2 per hole, 100 flags...  I had exactly 100 orange landscape flags!

Yeah, I know they say plant 4-5 per square foot, but also 4" apart.  Daffs multiply where they are happy.  I'll spread them out 2 bulbs per spot (though remember they are all doubles) and wait.  Next year will be good; the following year will be better.

Here's where it got tricky.  First, I had to spread 100 spots around the right bed evenly but randomly.  I was thrilled to hit the last corner with the last flag.  Perfect! Nice random positions throughout the entire box!

The digging was the tricky part.  About every 18" in all directions, there were landscaping flags.  Awkward to walk through, awkward to dig around.  And worse, I needed to plant one variety in "every other flag/spot".  And how do you plant in "every other spot" when the flags are basically in triangles?

THe simple answer is that you can't.  So I tried to dig up the spots for the Monal daffs as alternately as possible until I hit 45 of them.  Then I looked at the remaining flags and chose the closest ones and finished the 50.

How did I do the planting you ask?  "Carefully"...

I used the spade to dig a trench 8" long x 3" wide x 8" deep.  I put the soil in 2 buckets with the best top soil in one and the lower worse soil in the other.  I had a small bowl of 2-5-6 slow release organic fertilizer at the side.  In each trench, I added back some of the best soil from the top and mixed some fertilizer.  Then added 2 bulbs pressed firmly in, covered them with more good top soil (as opposed to the more clayey soil 8" deep) sprinkled on a little more 2-5-6, then piled the remaining soil back ontop.

Meanwhile, between the digging, soil piling, fertilizing, planting and covering, I was having to avoid stepping on other flags, existing hostas, and previously-planted spots!  I dug up 100 rocks the size of golf balls or larger...

By the time I planted the Monal half (50 holes), I was exhausted and developing muscle cramps from the awkward positions of digging, planting, covering, bending over, etc and avoiding plants and other flags.  It took 3 hours! 

And tomorrow, I need to do it all over again to plant the Fragrant Rose daffodils. The future flowering display better be worth it!  I would show more pictures, but there is little to see in a dug-up planted, and covered hole.  LOL!  I'll show the results next Spring...

But I'm staying busy...  After THIS is done, I have 100' of flowerbed border that I want to plant with blue fescue grass 1' apart I have been raising in flats, with yellow and purple crocuses in between.  The fun never ends...

Thursday, November 11, 2010

Front Landscaping Boxes

Well, it's the time of year for transplanting and planting Spring bulbs.  I have had a right front landscaping box for many years (north side of the house).  2 years ago, I added a left box.  The right side was overgrown and I cleared it almost entirely to plant hostas.  The left side got Caladiums the first year, and then I added transplanted Snow-On-The-Mountain (SOTM) there this Spring from the right box.

THE PROBLEMS:

The results were uneven.  The Caladiums required too much maintenance (60+ soil temperature, digging up and saving for the Winter, so I gave them up).  The hostas on the right were too crowded and the SOTM were too sparse.  The SOTM on the right came from my parents' place in NH and they survive but never look happy.  They brown and curl in Summer and look horrible.  I've managed to coddle them along for 20 years and they haven't looked good in any year.  So I will just pull them next year and be done with them.  I like the way they look in Spring, but it is just asking too much of them to thrive here in MD.  The hostas only foliage in Summer and Fall.

THE PLAN:

Thin the right box hostas to stand as individual plants, move extras to the left box, and add Spring color to both boxes.  For Spring bloom, add Early and Late flowering daffodils (I have completely given up on tulips and hyacinths - they just don't last more than a few years).

THE DAFFODILS:

I examined dozens of varieties.  Most are mid-Spring bloomers.  I found 1 Early Spring and 1 Late Spring that I liked.  I wanted them to be of very different colors, so that the Spring bloom would appear to change from the street viewpoint.  More about them next time.  Today I want to show some of the hosta transplanting.

THE HOSTAS:

Here is the Summer view of the right box...
It is just TOO crowded.  And here is the dying (for the year) view...
So I was a good time to transplant..  There were rows (from the back) of 4, 5, 6, and 7.  I reduced each by 1 plant and moved a few others so they were evenly spaced at 3, 4, 5, and 7 (didn't change the smalls row in the front.  I don't want to complicate things, but 2 of the rows had alternating different varieties, so I will actually be adding a few new ones back next year.

This is what the left box looked like...
 The light green is SOTM, the medium green is moss, and the dark green are weeds.  Thoroughly unsatisfactory!  So I planted flags where I wanted the displaced hostas to go (as individual specimens).  I will say that the SOTM did spread well from 12 lonely sprigs to several dozens this year.  I am hoping they will survive under the hostas next year.  Covered in mid summer while they are browning from the heat, but showy in Spring and Fall).  The flags are where I moved some hostas to.
Again, I am short a few of specific varieties, but I will get those in Spring.  They don't look good now because they are going dormant and I clipped some dead leaves to make the digging-up easier, but next Spring they will wake up and hardly know they were moved.  Hostas are good tough plants!
Here is the thinned right bed...BTW, the green bush on the left is a mature Nandina (the only original shrub of the box remaining in place, nice and neat at 5' high an 2' wide with lovely red berries.  The one on the right is a rooted cutting from that and it should catch up in 2 years.  There is a small azalea in the back center.  I think I may replace it; it isn't recovering from being severely pruned and transplanted last year...
Now that the hostas are rearranged, I will be planting the daffodils tomorrow.  I am tired from digging and weeding today.  Tomorrow while be a lot harder...

Looking Up

 While I was outside with The Mews, I laid back and looked up.  I thought the tree branches and the clouds were kind of nice. Nothing import...