This is one on the busiest times of year for me in the yard and garden (the "Yarden"). No matter how I try to organize things, the week around the average last frost day of the year has too much to do. This year (someone hit me with a "stupid stick"), I added to it. I bought more flowers to plant.
In the past few days, I did too much and every joint and muscle is sore (I Love Ibuprofen and non-smelly muscle rub). But I think I've gotten over the hump for this year, so I have time to post about it.
First, I should say that I am not a very efficient user of time these days. Oh, in the office, I was great at it. I could multi-task with the best. Switching from scrolling through telephone call data to answering a telephone question from a regional office, to joining a quick meeting on some other subject, no problem. I was at the office and that was all I was doing. Office stuff.
Second, at home, forget it! I'm in bed 10 hours to get 7 hours sleep, I spend a lot of time preparing fresh meals, I play with the cats, I watch some TV in the evening (political commentary, baseball, documentaries). I have to fit all the yard and house work around those.
When I plant stuff outside, I am very detailed. Take planting tomato seedlings, for example. I don't just jam a trowel into the dirt and stick a rootball in there. No... I dig a hole a foot wide and deep. I put a handful of compost in the hole, add a sprinkle of crushed eggshells I saved (to reduce blossom-end rot), add sprinkle of 2-6-6 fertilizer (for stem and root growth - the compost provides the nitrogen). I add the lovingly-grown tomato seedling, add a mix of compost and topsoil, and repeat that 2x until the seedling is buried with only the top leaves showing (tomatoes will grow roots from all buried stem).
Then I form a wall around the seedling to hold water and stick a metal label in the ground with the variety name on it. Then I put in a 3' stake to hold the seedling as it grows, and go on to the next seedling. When I finish a row of tomato seedlings (3, 4, 5 whatever fits in the space). Then I cut holes in a red IRT plastic fabric that both suppresses weeds AND reflects red light upward into the tomato plants (increases yields about 10-20% - I need all the help I can get with my limited sunlight).
Then I place heavy-duty wire cages over each seedling. Forget those cheap flimsy tomato cages they sell in catalogs. Mine are made of concrete reinforcement wire mesh. The openings are 6" square, and the cages are 24" diameter and 5' tall. Each cafe is then anchored in place with a 6' metal stake pounded at least a foot deep to prevent summer storms from blowing the mature plants in the cages over.
And I'm doing all that rather bent over perched on a piece of plywood to distribute my weight so I don't compact the lovely soil around them! It takes about 20 minutes per seedling overall from start to finish and I'm in awkward positions most of the time.
That's the difference between a hobby and a business, LOL!
So, over the past few days, I planted 12 tomato seedlings - 4 hours just for that. But they are good to go for the season...
Part 2 tomorrow...
Showing posts with label Gardening. Show all posts
Showing posts with label Gardening. Show all posts
Sunday, April 16, 2017
Wednesday, December 21, 2016
Solstice And Gardening
One of my favorite days of the year! It is the most natural holiday I know. The days start getting longer. It means the next season is Spring. Spring means light, warmth, and gardening. And I am planning a lot for next year.
25 years ago, I was deeply into perennial flowers. I bought from an online place that sold 3-packs for $5 and planted a dozen here and a dozen there, etc. Some perennials aren't very long-lived; they kept dying out slowly and there would always be holes in the flowerbed. And even at 3 for $5, they aren't cheap. My flowerbed is 75'x8', so 300 perennials would cost $500 and half died out after 3 years. And perennials only flower for a few weeks.
So I switched to annuals after I retired. Annuals flower all season, they are available as seeds, and they are easy to grow. Planting each year is a bit annoying, but I have time and 40 sq ft of lighted shelves (a 5 shelf 4'x2' rack with 4 4' fixtures in the basement). Plus a 4 shelf 3'x2' stand at the southern-facing deck glass doors upstairs for germinating seeds that want warmth.
Anyway... I can grow a lot on annuals from seeds.
But I still want some more permanent plantings. I discovered "cottage garden" planting this past month. It's a combination of long-lived perennials and self-sowing annuals. And you plant stuff at random. No big patches of one flower here and another there. The idea seems to be that what thrives thrives and empty spaces self-fill.
We'll see! I am going to give it a try. Large portions of my flowerbed were flowerless last year, so most of it needed to be re-done anyway.
I have a large serious roto-tiller for work in large areas. But this will take some detailed tilling. So I bought a 10" wide electric tiller in September. My first attempts using it were dismal!
The grassy weeds wrapped around the tiller blades. 10 minutes tilling meant 10 more minutes cutting and pulling grass off the blades. I learned to use my string trimmer to cut the grass tops off and rake them away. Then use the tiller to chop up the soil. There were still roots that wrapped around the tiller blades, but easier to remove. Better than manual shovel work, anyway!
I have a catalog from a company that offers a wide variety of cottage garden plants and seeds. It is from 2011 (I keep interesting catalogs), and I have arranged to get a 2017 catalog in early January. I have some long-lived perennials that will suit a cottage garden (coneflowers, goldenrods, daylilies), and I will be ordering seeds of self-sowing annuals when the catalog arrives. I may order a few plants for which growing from seed is very complicated.
And I have 2 planting areas in the middle of the yard that I didn't do anything with this year. Nice edged areas I can mow around to control invasive flowers. I want one to be for Lysimachia ‘Firecracker". It's invasive. I tried to kill it for 2 years and it keeps coming back. So next Spring, I'm going to transplant it to a 10' edged circle and mow around it. That should stop the "invasiveness". It's annoying but lovely. Purple foliage and bright yellow flowers most of the Summer.
The 2nd edged area will be a wildflower patch. I scattered seeds from a packet I bought last Fall. The instructions said to raked the soil roughly, scatter the seeds and smooth soil over them lightly. I got a few flowers, but not many. Most are perennials that need 2 or 3 years to flower, so I will give them time.
But another old catalog I have offers high-quality seeds suited for scattering on bare ground in Winter. That's actually the way they normally grow, so I'm going to give that a try. And they offer a flowering enhancement packet for $10 to give some flowers the first year. I'm going for 2 of those.
The 3rd edged area is mostly planted already with caged tulips, caged hyacinths, and lots of daffodils. I added 2 dozen daylilies, some common and some fancy.
This year, I thought I would remember exactly where the tulips and hyacinths were. HA HA HA! Next Spring, I will mark the spots with landscaping flags so that I can plant flowers in between the spots. I want no spot to be un-planted if I can manage it. The bulbs like to stay dryish most of the year, so I need to plant Summer flowers that don't mind dry conditions. So I may plant 200 marigolds of various varieties among them. They like hot dry conditions too. The point being that I will never deliberately water that 3rd edged bed.
They will do fine with normal rainfall, I just won't add to it.
A cottage garden bed, a wildflower bed, a purple Lysimachia bed, and a Spring bulb/Summer annual bed... Should be a good view from the deck!
Friday, December 9, 2016
Spring Bulbs
I always order too many Spring bulbs. I'm overly ambitious (well, that's better than being underly-ambitious), and estimating the number needed is always tricky. So this year I had ordered bulbs to add to an existing bed. Some of the same 2 varieies I planted last year to enlarde the are, and a new variety for a 3rd section.
It turned out that the additional bulbs of the existing varieties used up all the space and I had 150 of a 3rd variety to plant. "Somewhere"...
I love daffodils! They are truly perennial. There are hillsides in Washington DC where Lady Bird Johnson had them planted in the mid 1960s! Nothing bothers them. Voles and mice won't eat them, insects don't bother them, and their spot would have to become either a swamp or a desert to kill them naturally.
But they are just combinations of yellow, orange, and white. So they can be a bit boring. I wish some geneticist would make daffodils as colorful as tulips and hyacinths. But they haven't, and some daffodils are getting better over the years. Some have fancier flowers, some have contrasting colors, some bloom earlier or later. I have to admit they are pretty good plants.
But still, I had 150 of 'Hillstar' to plant "somewhere. Where, where, where?
And it hit me. The front border of my main flowerbed has always been a problem. Nothing I put there seemed to last. My last attempt (planting alternating blocks of yellow and purple crocuses with a space left every foot for Summer annuals didn't work. The voles ate them all. And I have tried some perennials that never seemed to look right and died anyway. The soil seems fine, BTW.
AHA, space to plant the Hillstars! The planting was relatively easy. My drill auger went down easily into the soft improved soil. But still, it meant kneeling down to set the bulbs in the holes, backfilling with 50/50 topsoil and compost mix, sprinkling some 2-6-6 slow release organic fertilizer, raking over the augered-out soil across the top, and watering deeply to hydrate the bulbs so that they can slowly grow roots over the Winter before blooming in April.
I came up 8' short of the border! Darn. But I ordered another 25 and they arrived in 3 days and I got THOSE planted. Which left me with extra bulbs of Hillstar and one other from the main bed.
Before I explain what I did with those, I should mention that I had 500 crocus bulbs I never got around to planting last Fall. I intended to make wire cages to protect them from the voles. But by the time I finally made cages for tulips and hyacinths in the main bed and got them all planted last year, the ground was frozen and I was worn out digging in the bad soil (rocks, tree roots, clay). The tulips were buried in wire cages and in great soil and came up wonderfully this past Spring. I never saw a hyacinth.
Because of that, I carefully dug up one of the hyacinth cages. No easy task. But I finally cleared off the top of one and the tops are hinged with wire so I could open it. I pulled out several. They were hard and healthy, and had roots growing. Why they didn't send up shoots and flowers is a mystery to me, but I rebuyied them and will hope for blooms next Spring.
So I just set the boxes of the crocuses in the garage and left them. Last week, after most of my regular garden shut-down chores were done, I thought of those crocuses. I brought the boxes onto the tool bench. There were few leftover hyacinths. They were like paper husks, utterly dead.
But the crocus bulbs were all hard solid and no signs of mold. Well, I hate to waste living things. So I thought of what I could do to give the crocuses and leftover daffodils and chance to live.
I keep stuff. Not "hoarder keep stuff" just useful stuff. So I looked around. What I wanted to find were cat litter boxes. Something shallow to grow the crocuses in and harvest the bulbs next Fall when I found a good place.
What I realized was that I had 3 old recycling bins and 4 old storage bins I used to grow potatoes in. I used to grow Yukon Gold potatoes in them before they became readily available in the grocery store. And they were filled with rich soil!
So I wheelbarrowed all of them to my patio. The cinder block wall is a perfect height for gardening work. I dumped all the soil out into 35# kitty litter tubs (very useful as buckets), put 4" of soil back in the recycle bins, set in the extra daffodils and added 2" of soil and sprinkled 2-6-6 fertilizer on top. Added another inch of soil and crowded in crocus bulbs 2" apart. Covered THOSE with 3" of good soil and sprinkled on a slight amount of fertilizer. Added another inch on that.
I filled 7 tubs and used up 300 crocus bulbs (of 500). Watered them well. I'm hoping for a great container display in Spring and to be able to plant them someplace permanent next Fall.
I STILL have more crocuses. I will be planting them in 6" black pots just to see if they grow. I'll stick the pots in my veggie garden to give them some "normal" temperature and rain/snow.
Hope springs eternal...conditions.
Monday, July 25, 2016
Hurray!
The first tomatoes are turning reddish! It may be a week, but finally the long lack of REAL tomatoes is near an end.
Which is real good because the corn is just sitting there knee-high, the melons vines are 18" long, the cucumbers are just starting to grow up the trellis, the zucchini haven't set fruit yet, the carrots are coming up only 4" long (but with great flavor), and my recent radishes have no radish.
At least the flat italian pole beans are producing. Only a half dozen a day, but it sure beats the frozen or canned ones. And they sure taste better than the regular ones. When Dad was still here 4 years ago, he said those were the best beans he had ever eaten. And he remembers growing regular beans in a garden himself.
It may sound silly, but I go out and look at the ripening tomatoes a couple times a day. I CAN'T WAIT. I am SO tired of of supermarket tomatoes (buying the cherry ones because they sure taste better than the larger ones but not by much).
Those regular ones taste so bland because the stores have learned how to make them red without actually ripening them. Its an enzyme trick. And then they refrigerate them. What little flavoroids (technical term - really) develop in the fake ripening process are killed when they are kept below 54F. And the producers store them below 54F...
Reddening and ripening tomatoes work together on the plant, but they are actually 2 separate procceses. Tomatoes turn red in the presence on ethylene gas (which they naturally produce during ripening, but produce-sellers apply to unripe tomatoes to turn them red). Green tomatoes ship best, so they apply ethylene gas to redden them for sale.
Plant that produce fruits do it so the fruits will be eaten and (hard-to-digest) seeds pooped out by fruit-eating critters all over the place. I'm not sure if you wanted to know that, but that's why there ARE fruits. And to go a step further, that WHY we see colors well. To recognize fruits with ripe seeds in them. The PLANTS did that to let us know when to eat them. Which is WHY ripe fruits have sugar - to reward us fruit-eaters who successfully learn WHEN to eat the fruits (by color) when the (unimportant-to-us) seeds are mature. And you thought they were "just" tomatoes or cherries, etc... LOL!
The naturally ripe flavor of a tomato is a whole different thing than reddening. There are about 400 chemicals involved (internet search), but carotene and lycopene are the 2 major ones. Most of the rest involve soil minerals and a starch-to-sugar transaction that the tomato plant produces in its actual ripening stage (which is why commercial suppliers can fake the red color but not the ripe flavor).
Yeah, I know I sound going overboard about my first ripe tomatoes, but I look forward to them all Winter and Spring and half of Summer! And these are heirloom tomatoes naturally ripened with real flavor. If you haven't had one of those, you just don't know!
And now you know why...
Tuesday, June 21, 2016
Assorted Stuff
Some days, I get more work done in the house and yard than usual. I've been busy the past couple of days...
1. The door to the garden enclosure is on a slope, so it is set above the highest ground (to allow it to open). Unfortunately (in theory), that would allow Evil Squirrels to get under it. The gap is 2" at one end. So I need a barrier that doesn't block the door but blocks the gap. I decided on a way.
The door opens outwards, so a small barrier at ground level inside the door will work. But I also need to get a wheelbarrow in there so it has to be removable. And it is in ground contact, so it can't be wood that rots. Well, I have leftover pieces of the composite decking and THAT won't rot. So if I made some holder for the composite piece that could allow it to be lifted out easily, that would be perfect.
Being a woodworker of minor skill, I thought to cut a dado slot in 2 pieces of pressure treated 2"x4" wood 6" long (the width of the composite decking piece). I've done router work before and am usually successful at it. But I learned that router small pieces of wood does NOT work well. Too late, I recalled advice from a woodworker magazine that said to do the routing first on long pieces and then cut the wood to size.
Hindsight (or, in this case, hind-memory) is 20/20.
It was a disaster. Trying of router 6' pieces of wood just chewed them up badly (Don't worry, my fingers were never in danger. I may be only moderately-skilled, but I am EVER so cautious!). But that attempt failed utterly.
So I decided to BUILD a slot. A little table saw work, and I had 1"x1"strips of wood to glue to a 3" wide base |__| and the inside was the slot I needed. When the glue dried I added screws for permanence. The slot for the composite deck board is 3/16" wider than the board for easy removal. It doesn't matter if the board is a bit loose; an Evil Squirrel can't lift it.
2. The 3 areas I surrounded by edging last Fall are not working out as intended. The closest one was planted with tulips and hyacinths in wire cages to protect them from the Voracious Voles and Evil Squirrels (who consider them delicacies), and daffodils (which are toxic and unpalatable to both). But the hyacinths never came up (I suspect the 1/2" wire mesh was too small for the stems) and there weren't enough daffodils to cover the intended area.
So I have to dig up the hyacinth cages and try again this Fall, and add more daffodils. The tulips did nicely and I expect them to be around for many year. I have some tulips in places where voles and squirrels do not think to dig, and they have been blooming for 20 years.
But in the meantime, weeds are growing. Most are easy enough to pull up by the roots, but there is a clumping grass with deep roots and pulling on them just takes off the tops so they grow back. So for 2 days, I've spent an hour each day digging under the roots and prying them up. I have some impressive piles... Those will be composted after they spend a week in sealed plastic bags set in the full sun until they are as thoroughly dead as the Wicked Witch Of The East in Oz ("not only merely dead, really, most sincerely dead.”).
The poaching shovel really works well for that (a really narrow shovel). I got almost all of those dug up! The remaining weeds are kinds that can be cut off just below ground with my scuffle hoe.

3. The Evil Squirrel live cage has been set again. I didn't mind the 2 new squirrels around the birdfeeder (they can't get past the barrel baffle and the round disc baffle above it), but I saw one climbing on the garden enclosure trying to find a way in, and THAT one has got to go. I'll get it; squirrels are suckers for peanut butter.
4. The 2d edged circle is not planted. I meant to move a plant called Lymachia to there, but it is too invasive, so I am killing all of it . I thought it could be controlled in a circle I could mow around, but I've found them growing in 3 spots around the yard (1 spot 150' away from the patch) so they have to go. I'll just keep cutting them down to ground level with my hedge trimmer until the roots are exhausted. Meanwwhile, I will use the rototiller to turn over the soil in the circle and cover it in newspaper (the newspaper uses harmless soy ink). That should kill off all weeds by Fall. I think I will move the numerous Black-Eyed Susan volunteer plants from around the flowerbeds there.
5. The 3rd edging area was planted with wildflower seeds last Fall, but it is mostly weeds. I'm not sure what to do there. On the one hand, there ARE wildflowers growing, and I want those. On the other hand, 90% of the plants growing there are weeds. I might try selective weeding, but not knowing what the good plants are (that might bloom next year) I might just undo some good plants. But there are some plants I KNOW are weeds, so I think I will pull them and see what happens.
6. I'm preparing to paint the rebuilt bathroom. Have pale mossy green paint, dropclothes, rollers, etc. Have TSP (trisodium phosphate to clean the 30 year old walls, gloves for protection, sponges, etc. Ive painted every place I've ever been in (many apartments), so I know the routine.. It taking all the stuff off the walls that slows me. That mirror has sharp edges! I want to surround it with a wood frame. And I have the frames. But they are dark wood and the wood in the bathroom (towel bar, TP holder, toothbrush holder, light switch cover etc are light wood. I need to see if I can stain those dark (danish walnut). And I need to score the mirror smaller by 3" to account for the wood frame size.
7. Weeded the old flowerbeds for an hour until I came across poison ivy plants creeping in. I used to be immune to poison ivy, but 10 years ago developed a terrible rash from it. It is one of those things that don't bother you until they do. I'll need to wear heavy duty rubber gloves, have a bucket of bleach nearby and dip my trowel and gloves into it regularly. And hope I don't forget and wipe my brow.
8. Pulled up a dozen or so thorny thistles. I wore heavy leather gloves that beat the torns, so it went well. The thistles don't have deep roots, so they come up easily. But they have enough stored food to mature their seeds after being pulled up (like dandelions) so they will go in the plastic bags with the poison ivy.
9. A lot of my trees have the habit of sending out new branches from the trunks anywhere they can get sunlight. So they drop down to walking level. Since I get tired of pushing branches out of my way while I mow the lawn, I went after them yesterday. I bought a pole pruner (a limb saw on a 10' pole) a couple years ago and this is the first time I used it. It worked great! A few cuts under the branch then more cuts on the top. The undercuts prevent the falling branch from peeling off a foot of bark on the tree trunk (allowing diseases to start). Hard on the arms though. I may try my electric chain saw next time.
10. Cleaned the riding mower deck completely. The top collects dry grass clippings, the underside packs wet grass clippings on the undersurface like paper mache! It took some real scraping. Actually, I couldn't figure out how to get to the underside safely. But I have these 2"x8"x8' boards with metal ends that you can clamp to trailers and other flat surfaces. So I placed the boards on a 2' high landscaping box and drove the mower up on it.
After detaching the spark plug wires for safety, I was able to crawl under and scrape the deck clean of packed dead grass clippings. Took an hour though. That mower blade really stays in the way.
11. I left the mower on the boards last night. It occurred to me that I should sharpen the blades. But I had enough old grass on my face and it was time to feed the cats. So the blade sharpening is for tomorrow...
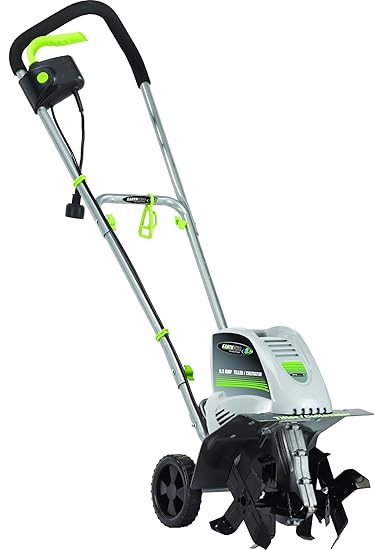
12. The edged circles are too small for using my large roto-tiller. But there are smaller electric versions. The advertised gas one is called a Mantis. But I found one with better ratings (Earthwise, with a 4.5 of 5 rating) and ordered it from Amazon. It should be perfect for the smaller spaces and I've always wanted one like that.
13. Next project is to whack down the underbrush in the far back yard. It has gotten amazingly overgrown since just removing a few trees back there 2 years ago. I have a 4-stroke gas powered Stihl whacker with a metal blade but I've resisted using it because I hate the noise (I'm really a very quiet person), and it seems vaguely dangerous, but it is time to bring it out! Serious work needs serious tools. I'll be careful with it.
1. The door to the garden enclosure is on a slope, so it is set above the highest ground (to allow it to open). Unfortunately (in theory), that would allow Evil Squirrels to get under it. The gap is 2" at one end. So I need a barrier that doesn't block the door but blocks the gap. I decided on a way.
The door opens outwards, so a small barrier at ground level inside the door will work. But I also need to get a wheelbarrow in there so it has to be removable. And it is in ground contact, so it can't be wood that rots. Well, I have leftover pieces of the composite decking and THAT won't rot. So if I made some holder for the composite piece that could allow it to be lifted out easily, that would be perfect.
Being a woodworker of minor skill, I thought to cut a dado slot in 2 pieces of pressure treated 2"x4" wood 6" long (the width of the composite decking piece). I've done router work before and am usually successful at it. But I learned that router small pieces of wood does NOT work well. Too late, I recalled advice from a woodworker magazine that said to do the routing first on long pieces and then cut the wood to size.
Hindsight (or, in this case, hind-memory) is 20/20.
It was a disaster. Trying of router 6' pieces of wood just chewed them up badly (Don't worry, my fingers were never in danger. I may be only moderately-skilled, but I am EVER so cautious!). But that attempt failed utterly.
So I decided to BUILD a slot. A little table saw work, and I had 1"x1"strips of wood to glue to a 3" wide base |__| and the inside was the slot I needed. When the glue dried I added screws for permanence. The slot for the composite deck board is 3/16" wider than the board for easy removal. It doesn't matter if the board is a bit loose; an Evil Squirrel can't lift it.
2. The 3 areas I surrounded by edging last Fall are not working out as intended. The closest one was planted with tulips and hyacinths in wire cages to protect them from the Voracious Voles and Evil Squirrels (who consider them delicacies), and daffodils (which are toxic and unpalatable to both). But the hyacinths never came up (I suspect the 1/2" wire mesh was too small for the stems) and there weren't enough daffodils to cover the intended area.
So I have to dig up the hyacinth cages and try again this Fall, and add more daffodils. The tulips did nicely and I expect them to be around for many year. I have some tulips in places where voles and squirrels do not think to dig, and they have been blooming for 20 years.
But in the meantime, weeds are growing. Most are easy enough to pull up by the roots, but there is a clumping grass with deep roots and pulling on them just takes off the tops so they grow back. So for 2 days, I've spent an hour each day digging under the roots and prying them up. I have some impressive piles... Those will be composted after they spend a week in sealed plastic bags set in the full sun until they are as thoroughly dead as the Wicked Witch Of The East in Oz ("not only merely dead, really, most sincerely dead.”).
The poaching shovel really works well for that (a really narrow shovel). I got almost all of those dug up! The remaining weeds are kinds that can be cut off just below ground with my scuffle hoe.
3. The Evil Squirrel live cage has been set again. I didn't mind the 2 new squirrels around the birdfeeder (they can't get past the barrel baffle and the round disc baffle above it), but I saw one climbing on the garden enclosure trying to find a way in, and THAT one has got to go. I'll get it; squirrels are suckers for peanut butter.
4. The 2d edged circle is not planted. I meant to move a plant called Lymachia to there, but it is too invasive, so I am killing all of it . I thought it could be controlled in a circle I could mow around, but I've found them growing in 3 spots around the yard (1 spot 150' away from the patch) so they have to go. I'll just keep cutting them down to ground level with my hedge trimmer until the roots are exhausted. Meanwwhile, I will use the rototiller to turn over the soil in the circle and cover it in newspaper (the newspaper uses harmless soy ink). That should kill off all weeds by Fall. I think I will move the numerous Black-Eyed Susan volunteer plants from around the flowerbeds there.
5. The 3rd edging area was planted with wildflower seeds last Fall, but it is mostly weeds. I'm not sure what to do there. On the one hand, there ARE wildflowers growing, and I want those. On the other hand, 90% of the plants growing there are weeds. I might try selective weeding, but not knowing what the good plants are (that might bloom next year) I might just undo some good plants. But there are some plants I KNOW are weeds, so I think I will pull them and see what happens.
6. I'm preparing to paint the rebuilt bathroom. Have pale mossy green paint, dropclothes, rollers, etc. Have TSP (trisodium phosphate to clean the 30 year old walls, gloves for protection, sponges, etc. Ive painted every place I've ever been in (many apartments), so I know the routine.. It taking all the stuff off the walls that slows me. That mirror has sharp edges! I want to surround it with a wood frame. And I have the frames. But they are dark wood and the wood in the bathroom (towel bar, TP holder, toothbrush holder, light switch cover etc are light wood. I need to see if I can stain those dark (danish walnut). And I need to score the mirror smaller by 3" to account for the wood frame size.
7. Weeded the old flowerbeds for an hour until I came across poison ivy plants creeping in. I used to be immune to poison ivy, but 10 years ago developed a terrible rash from it. It is one of those things that don't bother you until they do. I'll need to wear heavy duty rubber gloves, have a bucket of bleach nearby and dip my trowel and gloves into it regularly. And hope I don't forget and wipe my brow.
8. Pulled up a dozen or so thorny thistles. I wore heavy leather gloves that beat the torns, so it went well. The thistles don't have deep roots, so they come up easily. But they have enough stored food to mature their seeds after being pulled up (like dandelions) so they will go in the plastic bags with the poison ivy.
9. A lot of my trees have the habit of sending out new branches from the trunks anywhere they can get sunlight. So they drop down to walking level. Since I get tired of pushing branches out of my way while I mow the lawn, I went after them yesterday. I bought a pole pruner (a limb saw on a 10' pole) a couple years ago and this is the first time I used it. It worked great! A few cuts under the branch then more cuts on the top. The undercuts prevent the falling branch from peeling off a foot of bark on the tree trunk (allowing diseases to start). Hard on the arms though. I may try my electric chain saw next time.
10. Cleaned the riding mower deck completely. The top collects dry grass clippings, the underside packs wet grass clippings on the undersurface like paper mache! It took some real scraping. Actually, I couldn't figure out how to get to the underside safely. But I have these 2"x8"x8' boards with metal ends that you can clamp to trailers and other flat surfaces. So I placed the boards on a 2' high landscaping box and drove the mower up on it.
After detaching the spark plug wires for safety, I was able to crawl under and scrape the deck clean of packed dead grass clippings. Took an hour though. That mower blade really stays in the way.
11. I left the mower on the boards last night. It occurred to me that I should sharpen the blades. But I had enough old grass on my face and it was time to feed the cats. So the blade sharpening is for tomorrow...
12. The edged circles are too small for using my large roto-tiller. But there are smaller electric versions. The advertised gas one is called a Mantis. But I found one with better ratings (Earthwise, with a 4.5 of 5 rating) and ordered it from Amazon. It should be perfect for the smaller spaces and I've always wanted one like that.
13. Next project is to whack down the underbrush in the far back yard. It has gotten amazingly overgrown since just removing a few trees back there 2 years ago. I have a 4-stroke gas powered Stihl whacker with a metal blade but I've resisted using it because I hate the noise (I'm really a very quiet person), and it seems vaguely dangerous, but it is time to bring it out! Serious work needs serious tools. I'll be careful with it.
Thursday, June 16, 2016
The Veggie Garden
Things are going well with the veggies this year. The garden enclosure has made a real difference! No squirrel or groundhog as gotten at the garden, and few insect pest. Interestingly, bees and other good bugs have had no problem.
This is a Kohlrabi. It is a member of the cole family (broccoli, cabbage, etc). But it grows a swollen part in the bottom of the plant. Here, you can see the swelling that will grow. It will become about the size of a tennis ball. Cole crops were bred in various locations to produce large heads (cabbage, cauliflower), open heads (broccoli), small side heads (Brussels Sprouts), and middle swollen stems (kohlrabi).
Sometimes I try to imagine why someone decided to grow a swollen stem plant. I can't. But it is both "broccolish" and a bit sweet, so I try it every few years.
 These are some of the heirloom tomatoes. This year, I have Brandywine, Cherokee Purple, Pruden's Purple, Ponderosa Pink, and Striped German. I also have 2 hybrids of Brandywine (Garden Treasure and Garden Gem) and will see if they have the "heirloom flavor" they claim to have. All the plants are thriving; no signs of disease.
 My first successful planting of Spinach. I could have Spinach every night and as much as I like it, that's too much. Next year, I will plant half the row.
 The regular cole crops are doing well. I found caterpillars on 2 plants and killed them all. They are usually a BIG problem here, but with the garden enclosure, the cabbage moths don't find them as well. Yay!
 I have high hopes for the corn. I'm growing 2 kinds of bi-color corn this year. One early type and one late. The further back 2 rows are the late ones and the 2 front are the early ones. I will plant 2 more rows of early ones next week for succession harvesting. At the very back are cucumbers. They will grow faster than the corn, so they won't be shaded much. And corn doesn't make much shade anyway. You can't see, but there are cantaloupe melons at each end. They will grow along the ground and shade out weeds around the corn.
 Here I have Italian flat pole beans. The 1st planting only had 3 beans grow. A 2nd planting got 100% germination. I LOVE Italian flat beans. And you can see carrots growing in the corner.
 I took pictures of the Zucchini and Bell Peppers and Honeydew melon seedlings, but they didn't come out well. But they are there and growing.
Believe it or not, next week starts the Fall plantings! I have left a few empty spaces for Brussels Sprouts and Garlic. And I will continue to plant lettuces and radishes to the end of September as I harvest them in their squares.
This is a Kohlrabi. It is a member of the cole family (broccoli, cabbage, etc). But it grows a swollen part in the bottom of the plant. Here, you can see the swelling that will grow. It will become about the size of a tennis ball. Cole crops were bred in various locations to produce large heads (cabbage, cauliflower), open heads (broccoli), small side heads (Brussels Sprouts), and middle swollen stems (kohlrabi).
Sometimes I try to imagine why someone decided to grow a swollen stem plant. I can't. But it is both "broccolish" and a bit sweet, so I try it every few years.


Believe it or not, next week starts the Fall plantings! I have left a few empty spaces for Brussels Sprouts and Garlic. And I will continue to plant lettuces and radishes to the end of September as I harvest them in their squares.
Tuesday, June 14, 2016
Garden Harvest
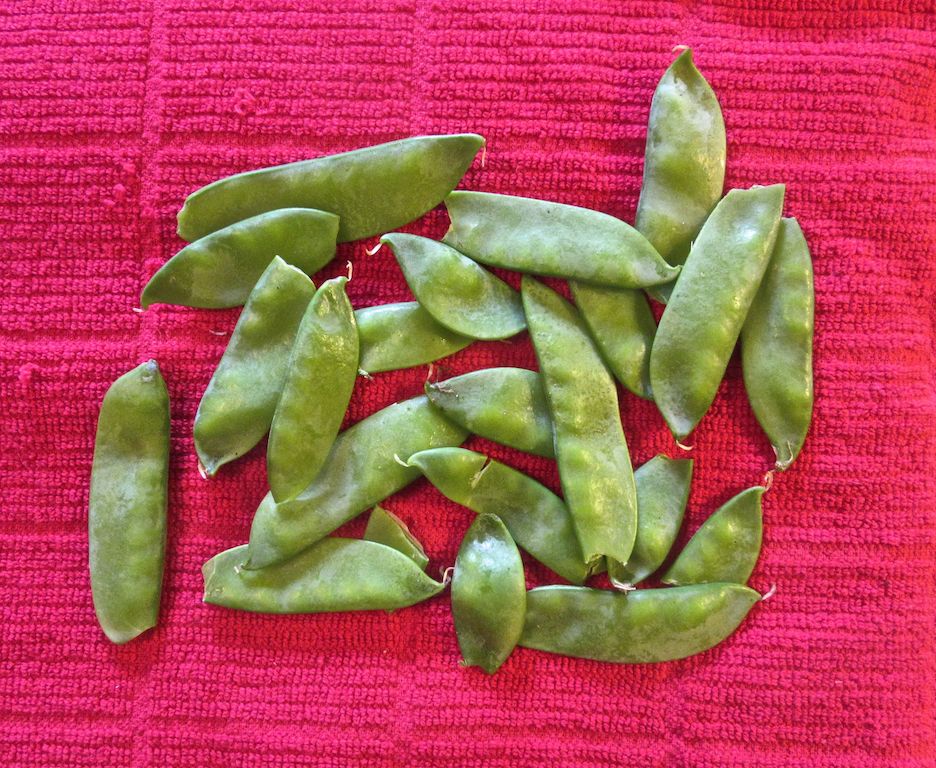
I got my first garden harvest of the year today. Radishes, Spinach, and Snow Peas! I ate the radishes before I thought to take a picture. They were outstandingly good. Both spicy and slighty sweet.
The spinach was great. I had never grown it before, reading that it was hard to grow. But I planted 6 square feet of it and nearly every seed germinated. I harvested the largest leaves recently.
Spinach is an odd crop. You cook it and it wilts away into almost nothing. A basketful of spinach is a small bowlful when cooked. But oh goodness it is tastier than anything I have bought in the bags in the grocery store!
A bit of olive oil or bacon fat in a large pot, heated moderately, spinach tossed in, covered 1 minute, tossed and cooked 2 minutes, served with a dab of butter and a dash of lemon juice and it is wonderous!
Here is the raw stuff...
 And my late-planted snow peas are fruiting! Picked while small and slim, they are so sweet and tasty! The grocery store ones are too mature; tough and with strings on the sides. Yeah, I know how to peel of the strings of mature ones (grab the lower end in one hand and press a thumbnail into it, pulling gently up toward the front). But my new ones don't have strings and taste better.
 My chinese cabbage is next to harvest. Plus more radishes.
My garden enclosure is working perfectly. No squirrel or groundhog attacks. The corn is growing great, I have tomatoes undisturbed, melons and squashes doing well, cole crops (broccoli, cauliflower, cabbage) of many kinds, and many small crops like carrots, chard, beets, carrots, etc. This is going to be a GREAT harvesting season!
I have high hopes for the tomatoes. I plant heirloom varieties because they just taste so good. So far they seem healthier than in past years. And I have 3 plants of 2 Brandywine hybrids developed by the University of Florida that were bred for flavor and disease resistance instead of shipping durability. One is a large main season tomato called Garden Treasure and one is a "salad" tomato called Garden Gem.
"Supposedly", they have an heirloom taste with good disease resistance. We'll see. This is a hard area for heirloom tomatoes. The humidity is very high in Summer, which encourages fungal diseases, and the Winters don't get cold enough to kill off soil parasites (nematodes, etc).
Meanwhile, I have the heirlooms Brandywine, Cherokee Purple, Prudens Purple, Striped German, and Ponderosa Pink. And for backup, I have a hybrid called Big Beef which is the best-tasting hybrid I know of.
And I also have my upside-down growing cherry tomato plant. I grow it out the bottom of a 5 gallon pot hanging 10" above ground. More about that some other day. I just hung it yesterday, so there isn't much to show other than a scrawny seedling confused about which way is up.
The spinach was great. I had never grown it before, reading that it was hard to grow. But I planted 6 square feet of it and nearly every seed germinated. I harvested the largest leaves recently.
Spinach is an odd crop. You cook it and it wilts away into almost nothing. A basketful of spinach is a small bowlful when cooked. But oh goodness it is tastier than anything I have bought in the bags in the grocery store!
A bit of olive oil or bacon fat in a large pot, heated moderately, spinach tossed in, covered 1 minute, tossed and cooked 2 minutes, served with a dab of butter and a dash of lemon juice and it is wonderous!
Here is the raw stuff...

My garden enclosure is working perfectly. No squirrel or groundhog attacks. The corn is growing great, I have tomatoes undisturbed, melons and squashes doing well, cole crops (broccoli, cauliflower, cabbage) of many kinds, and many small crops like carrots, chard, beets, carrots, etc. This is going to be a GREAT harvesting season!
I have high hopes for the tomatoes. I plant heirloom varieties because they just taste so good. So far they seem healthier than in past years. And I have 3 plants of 2 Brandywine hybrids developed by the University of Florida that were bred for flavor and disease resistance instead of shipping durability. One is a large main season tomato called Garden Treasure and one is a "salad" tomato called Garden Gem.
"Supposedly", they have an heirloom taste with good disease resistance. We'll see. This is a hard area for heirloom tomatoes. The humidity is very high in Summer, which encourages fungal diseases, and the Winters don't get cold enough to kill off soil parasites (nematodes, etc).
Meanwhile, I have the heirlooms Brandywine, Cherokee Purple, Prudens Purple, Striped German, and Ponderosa Pink. And for backup, I have a hybrid called Big Beef which is the best-tasting hybrid I know of.
And I also have my upside-down growing cherry tomato plant. I grow it out the bottom of a 5 gallon pot hanging 10" above ground. More about that some other day. I just hung it yesterday, so there isn't much to show other than a scrawny seedling confused about which way is up.
Sunday, April 17, 2016
Started Planting Veggies
HURRAY! Got some plants in the ground in the garden, and some seeds too. The transplants were broccoli/cauliflower/cabbage. The direct seeds were radishes, spinach, carrots, parsnips, scallions, kohlrabi, and
Finally. It seems that 1st planting day will never come. Since this year is the first for the new raised bed garden in full planting (I was late starting last year because the enclosure wasn't complete), I wasn't sure where to plant stuff. So last week was planning.
Nothing fancy, but I tend to generally use "square foot gardening". I don't do it precisely, and I have to say that 4' wide beds are a bit awkward to reach into, but I do it as a general rule. Not being sure how much space I had, I scribbled on paper for a while.
Largest stuff first. The 22" diameter tomato cages take 4 sq ft and I love heirloom tomatoes above all other garden crops. I set space for 6 cages (I have a place for 6 other cages outside the enclosure). And no, 12 tomato plants are not too many for me. Heirlooms produce fewer fruits (but are worth it).
Then comes the trellises of cucumbers and flat Italian beans, that took 11 sq feet at the ends of the beds. And a few sq ft each for 2 bush squashes (one green, one yellow).
Then I want space for melons. I love honeydew and cantaloupe melons, and I have some dwarf watermelons started. But the space they take is not for them alone. They like to grow on the ground, so there is some space for upright plants that will die before the melons grow fully. That means broccoli, cabbage, and cauliflower can be inter-planted in 2 beds where the honeydew and cantaloupe melons will grow later.
And then there is the bi-color corn. I love that stuff (sweet AND "corny"). I'm taking a chance on growing small watermelons and corn in the same bed. The idea is that the corn will grow high and the watermelons will grow low (and the watermelon won't try to climb the corn stalks).
The American Indians (especially the Iriquois) used to grow The Three Sisters. Squash on the ground to shade out the weeds, corn to grow high, and pole beans to climb the cornstalks. I've tried that a couple times and it didn't work. The bi-color corn I grow has smaller stalks and the beans overwhelm them. So the beans are separate this year. The melons want to spread out over my raised beds, but I am going to keeps the vines corralled in the raised bed with tent pegs. I hope that works.
But what about all the small crops? Well, after all the space for the stuff above was accounted for , I had about 40 sq ft left. 3 are going to radishes, 3 to carrots, 3 to parsnips, 3 to shallots, 3 to scallions, 8 to spinach, 2 to Chinese cabbage, 2 to leeks, 1 to basil, 2 to kohlrabi, 2 to beets, 5 to bell peppers, and a few flowers to attract pollinators.
And there are some places around the yard where I can plant some herbs. And some of the crops are "succession" crops, meaning I can reuse the spaces as the season goes on. Radishes can be harvested and replanted several times a year, for example, and the broccoli/cauliflower/cabbages are harvested in June and a new crop planted in July for Fall harvest.
Hoping for the best!
Thursday, March 31, 2016
Great Shopping Day
I had a long list of stuff to buy at the local DIY store. And found most.
The mailbox door broke after 30 years. Tsk, tsk! Only 30 years. But it is in good shape, so repairable. It needed a 3/16ths bolt through the 7" wide front. Was that easy to find? NO! I finally found a 12" metal rod with threads. Have to cut it down to size though. The good news is that I also found "stop nuts". Those have nylon on the inside so you don't need nuts and washers.
I got tired on wooden sawhorses that kept getting loose around the brackets. Found some adjustable metal ones with places to attach temporary boards to protect against cutting the sawhorses.
Helped 3 other customers there looking for other stuff I knew where they were. If I wanted a retirement job, I know where to go, LOL.
Found some super-magnets. (rare-earth materials) Wasn't looking for them, but I can sure use them. Those feeble refrigerator magnets aren't worth having.
Got 150 new plastic 6" plant labels. My old ones were written over too many times and exposure to U/V rays makes them brittle after a few years anyway. So, new start.
Green garden twine, stretch tape, and a small seed-sower (little clicks send one small seed at a time down a narrowing slot). Beats using a tweezer or planting several at a spot! Or straining my eyes even with reading glasses...
I keep using plastic ties

and I seem to use them a lot. Buying them a dozen at a time was driving me crazy. So, at the very bottom shelf, I found bags of 1,000. GASP! And they were the same price as 4 packs of 25! I bought a bag each of 8" and 4". Talk about volume discounts... Lifetime supply, I hope.
The funniest part was the scissors. I wasn't looking for one, but they were in front of me, so I tossed one into my cart. The basement scissors had just rubber handles and they finally broke. So the cashier picks them up and says "what are these". OK, that really threw me. Everyone knows what scissors are, right? I couldn't figure out the question.
But she meant there was no tag on them, so she couldn't ring them up. I always seem to find the item with no pricing label! I just told her to set them aside. I didn't even know where to go look for another with a label...
I can get scissors anywhere. But all in all, it was a great day shopping...
The mailbox door broke after 30 years. Tsk, tsk! Only 30 years. But it is in good shape, so repairable. It needed a 3/16ths bolt through the 7" wide front. Was that easy to find? NO! I finally found a 12" metal rod with threads. Have to cut it down to size though. The good news is that I also found "stop nuts". Those have nylon on the inside so you don't need nuts and washers.
I got tired on wooden sawhorses that kept getting loose around the brackets. Found some adjustable metal ones with places to attach temporary boards to protect against cutting the sawhorses.
Helped 3 other customers there looking for other stuff I knew where they were. If I wanted a retirement job, I know where to go, LOL.
Found some super-magnets. (rare-earth materials) Wasn't looking for them, but I can sure use them. Those feeble refrigerator magnets aren't worth having.
Got 150 new plastic 6" plant labels. My old ones were written over too many times and exposure to U/V rays makes them brittle after a few years anyway. So, new start.
Green garden twine, stretch tape, and a small seed-sower (little clicks send one small seed at a time down a narrowing slot). Beats using a tweezer or planting several at a spot! Or straining my eyes even with reading glasses...
I keep using plastic ties
and I seem to use them a lot. Buying them a dozen at a time was driving me crazy. So, at the very bottom shelf, I found bags of 1,000. GASP! And they were the same price as 4 packs of 25! I bought a bag each of 8" and 4". Talk about volume discounts... Lifetime supply, I hope.
The funniest part was the scissors. I wasn't looking for one, but they were in front of me, so I tossed one into my cart. The basement scissors had just rubber handles and they finally broke. So the cashier picks them up and says "what are these". OK, that really threw me. Everyone knows what scissors are, right? I couldn't figure out the question.
But she meant there was no tag on them, so she couldn't ring them up. I always seem to find the item with no pricing label! I just told her to set them aside. I didn't even know where to go look for another with a label...
I can get scissors anywhere. But all in all, it was a great day shopping...
Saturday, March 26, 2016
Plant Growth And New Seeds
1. I am so relieved that the new late-planted spring bulbs are coming up. Counted 110 tulips today, about 100 early daffodils, and the first few late daffodils. No hyacinths yet. Because the top of the soil was so hard, I watered the area to soften it. The Winter rains and melting snow have the ground well-moisted deep, but the surface was very dry and hard.
2. While trying to water the new spring bulbs with a sprinkler, I discovered it stuck in one position. Something else to take apart and repair.
3. And I say "something else to repair" because I had to take apart my submersible pond pump a few days ago to find why it wasn't working. Good ones cost a few $100. Turns out there is a simple rod that broke. The material is uncertain; it's a bit rough to be plastic, a bit smooth to be ceramic; maybe its resin. Anyway, it's what turns a "impeller" (think "propeller"). I gather that the difference is that the first pushes and the second pulls.
And thereby hangs a tale. The pump stopped working and I don't know anything about pond pumps. The pump didn't even have a brand name on it. But I looked at the specification plate, and saw a UL (Underwriters Laboratory) number. So, thinking the UL number might provide some information, I searched it.
WOW! The UL number actually did lead me to the pump! Not the actual manufacturer like I hoped, but to the generic model. It turns out that many companies sell the same items under their own name. But all the parts are the same!!!
And there in one listing was a replacement impeller that looked identical. Not just the broken rod (which would have been easily and more cheaply replacable) but at least the unit is WAY cheaper than a new pump. It should arrive in a couple days.
4. So why did I want the pump working? To spray liquid corn gluten all around the yard. Corn gluten stops weed seeds (and any other seeds) from germinating. Some weeds germinate in Spring, others in Fall. I try to do it in both Spring and Fall, and I have to admit that I have a LOT fewer weeds in the lawn than my neighbors who use more serious chemicals.
And a benefit is that corn gluten is 9-0-0 fertilizer. All nitrogen, which is just what your lawn needs. But back to why I wanted the pump working...
The liquid corn gluten comes in containers you just hook up to a hose and spray around the yard. Only they don't work. THEY JUST DON'T WORK. I'm not surprised. The supplier is selling the liquid corn gluten and saying it is easy to apply. They don't want to spent money on disposable applicators! So, of course, they don't work.
The product reviews are constant in the complaints about the sprayer function. So, I thought, why do it THEIR way? I poured a bottle of the stuff through a fine mesh sieve (many users complained about corn grit blocker the sprayers) into a barrel filled with water.
So (brilliant me), I would just use the submersible pond pump to spray a diluted mix all over the yard using a fan nozzle (so that I would see if the output holes where getting clogged). And then the pump didn't work!


Here's hoping the replacement impeller solves that problem. The corn gluten really DOES inhibit initial seed roots, but you only have a couple of weeks to apply it (when the forsythia are starting to bloom - the same time the weed seeds germinate).
5. Planted 6 more flats of seeds today. A flat equals 35 cells (cell = 1.5" square x 2" deep) for me - I leave one cut out for watering. This weekend was bell peppers, zinnias, and marigolds. I've given up on most perennial flowers. They don't bloom for long, most die after a few years, and I have time to grow and plant annuals. THEY bloom all season, and I love seeing all the flowers all season.
6. Cuttings of the 3' Knockout Rose and the 3' dwarf butterfly bush aren't sending out new shoots after 3 weeks in pots, but they aren't dying either, so that is encouraging. The original plants are sending out new branches, so that it good. At least if the cuttings don't root, the original plants are still doing well. Planted outside in early May, they should branch out more and I will have another chance to get cuttings to root.
Gardening/rooted shoots is fascinating. And "something for nothing" is always good. The azalea cuttings from last Fall are all doing well and are doubled in height and branches from last month.
Wednesday, March 23, 2016
I'm Thrilled!
Yes, really. When I was late planting tulips and hyacinths in wire cages I made from 1/2" wire and buried 10" deep in 2' square holes a but late (Dec-Jan), I didn't know what to expect. Same for 200 daffodils that don't need cages, so I just used a small auger to make 10" holes. I'm not a bulb expert. I know they need chilling temperatures, but I wasn't sure if that was for the bulbs to just grow or for flowers to develop.
Well, now I know part of the answer. There are tulips and daffodils emerging from the ground all over. I saw the first tulips a week ago, then there were 15, then 26, then 46, and today I counted 51 tulips. And I suddenly realized today that one type of the 2 daffodil varieties are poking up all over too. I assume the other daffodils and the hyacinths are later-emerging and will appear in a couple weeks. If some are growing, the others probably will too.
Not anything to take a picture of yet. An inch tall tulip leaf is rather insignificant, after all. But I get to watch more appear every day, so when they get large enough in one group, I'll post pics.
I planted the tulips 8 or 9 to a cage; the hyacinths 7 or 8 (they didn't divide up among the number of cages perfectly).
But even if they don't bloom this year (but have vigorous plants), it will be a success. Because they WILL bloom next year if not this one. I was mostly afraid they would just rot, being too warm this first shortened growth season.
In a few weeks, I will be transplanting purple coneflowers and daylilies there too, between the cages of spring bulbs. Maybe add some Mums for Fall color
That was in just one of the 3 new planting areas I worked on last Fall after I had that annoying english ivy, poison ivy, and wild grape covered ridge removed in September.
The larger of the 3 got spread with some "meadow-flower" mix back in November. It certainly is covered with "green", but I have no idea if anything good is growing there. It could be all weeds (and I can tell that some are), but there may be some nice self-seeding annuals and some flowering perennials there. I am encouraged because it is much greener than the last circle where I planted nothing yet.
So the difference between those 2 patches SHOULD be the meadow seeds I scatterred. I probably won't be able to tell much about that until mid summer. And if it turns out to be nothing but weeds, I will cover it in black plastic to smother the weeds and try again next Fall. And in fact, I may just grow 100s of individual plants and do the planting more deliberately. But I'll hope for success this year. A 20"x15' patch of natural meadow would be very nice.
And not just nice to look at. The beneficial insects, bees, and butterflies would love it. So would the cats! Not just because they would have tall plants to sneak around in, the think undisturbed growth would attract all the voles in the yard for them to hunt.
Speaking of bees, I saw my first honeybees of the year moving among to blooming hyacinths near the house. My yard is mostly organic (I sometimes have to get lethal with the poison ivy that invades from my neighbors' yards). But that's not where the bees and butterflies are attracted.
The 3rd circle is for the lysimachia firecracker. I love the purple foliage and yellow starry flowers, but it is too spreading for my main flowerbed. So I'm moving them to an edged circle I can mow around easily to contain them. They are related to Loosestrife, but not quite as invasive (being a domesticated hybrid, I assume). But kept to themselves, they are lovely all season long, grow thickly enough to shade out all weeds, and look impressive in masses. They don't seem to have any serious pests or diseases either.
So with the 3 patches, I will have a naturalistic meadow, a patch of 2' tall purple plants, and a patch with spring bulbs and summer/fall plants. It might be a thing of wonderful constant changes though the seasons or a visually-discordant disaster!
You will all find out about as fast as I do. The good thing is that plants can be moved or replaced or expanded.
Sunday, February 28, 2016
Gardening Season Starts
I'm more than ready to start the new gardening season. I've BEEN ready since the last one ended. I went through my saved refrigerated seeds last month and bought replacements for the ones getting too old or that had been used up last year. I emptied old soil out of planting pots. I cleaned all the pots and planting trays. I threw away the damaged ones and got new replacements out of the shed.
A little story on that. 15 years ago, I bought a nearly lifetime supply of trays and 6-packs. It made sense. At the bulk prices, more started to become almost free. I'm only 1/2 through the BIG BOXES now.
But what I didn't have was seed-starting soil. And that is slightly a technical term. It's not "potting soil" (though I have often used that in the past and it seems to work pretty well). Seed-starting soil is sterile and has no fertilizer. That helps avoid moss growth, fungal diseases (a seedling's worst enemy), and weeds. Plus, the stuff is very loose so roots grow quickly.
This year, the only seed-starting mix I could find was ridiculously expensive and even the potting soil was poor (highly-fertilized Miracle-Gro or a cheaper brand that was (I discovered last year) dyed to look better than it was and wouldn't retain any moisture.
So I decided to return to my past habits and mix my own seed-starting soil... My gardening book had a good recipe: 4 parts compost, 2 parts peat moss, 1 part vermiculite, and 1/2 part perlite. I can't tell you what vermiculite is (does "hydrous phyllosilicate mineral" tell you anything? Me neither). All I know is that it is lightweight, non-compacting, and retains water. Perlite looks like ground-up styrofoam, but it seems to be like popcorn made from volcanic ash. It is also very light and holds water.
I don't have to know that, just that those 4 items make a really good seed-starting soil. So I found all the ingredients over the weekend and set about mixing them together today. OMG! It took 4 hours. I had to sift the peat moss and compost through 2 meshed screens (when you are filling 2" planting cubes, you can't have sticks and pieces of bark in there). Then I had to mix the sifted peat moss and compost with the vermiculite and perlite.
I have to laugh. It took four 5 gallon buckets and 3 large trash cans and a small 1 gallon bucket as a scoop, a lot of lifting and dumping, and when I was done I had enough on the basement floor to fill a 5 gallon bucket to add into the finished product. I filled a 40 gallon trash barrel right to the top perfectly!
Its the best-looking seed-starting soil I've ever seen. I figure it cost $50. An equal amount of commercial product (with fertilizer I didn't want, dyes I didn't want, and less of the vermiculite and perlite I did want) would have cost almost the same ($48).
But I still have 2/3 of my raw materials leftover! So for 4 hours work, I have a better quality seed-starting soil at 1/3 the cost plus more raw material for future use. I am very pleased with my work.
Tomorrow, I plant seeds!
Wednesday, November 4, 2015
The Last Edging Circle, 2
Well, you may recall that I had a ridge leveled in my back yard, the soil moved to raise a part of the front yard and that I was creating some areas bordered with edging so I could plant stuff. And that I had become royally tired of digging trenches for the edging in the rocky soil. And because there were some large tree roots I did not want to cut which meant cutting the edging to fit on top of the roots.
So I left the last one half done for a week and did other stuff. Well, I am happy to report that I finished it today. No more digging in that soil...
There are 3 edged areas.
 The far one has perennial wildflowers mixed in with enough compost to barely cover. I have no idea what will happen there. The package of seeds did not specify which plants were, and they grow so slowly that I won't recognize any until they bloom, and there were already some small weeds growing there. I might end up nurturing 400 sq ft of weeds until next Summer when I see nothing blooming when I have to replant more carefully.
The middle smaller area is for Lychimartra Firecracker, a lovely bronze foliage plant about 24" high with lots of small yellow flowers. But it is a bit invasive and needs to be contained by itself. It has its own 200 sq ft circle so that I can mow around it!
The nearest area, also 400 sq ft will be a combination of daffodils, tulips, and hyacinths for Spring color; with transplants of purple coneflowers, black-eyed-susans, and goldenrod for Summer and Fall color. Plus I plan to add a few dwarf butterfly bushes. I may get a package of seeds of plants that attract butterflies and bees to scatter among the plants next Spring.
This last area will take some work planting. Tulips and Hyacinths don't last long here because of the voles, so I have to make cages to plant them in. The daffodils are fine without cages, being toxic. But the bulbs haven't been delivered yet, and the transplants still have green leaves so I can't move them yet.
Which means I can start on the new border of the older flowerbed (up against the fence to the left of the above picture). I originally planted the border with alternating 12" sections of yellow then purple crocuses. And 4" gaps between sections for annual Summer flowers. The voles ate most of the crocus bulbs in just a few years, so this time, I am planting them in cages. I'll still leave a 4" gap between the cages because it is nice to have Summer flowers there too and change them each year (yellow marigolds one year, dusty miller the next, orange zinnias after that, etc).
At least I don't have to install more edging there. It's already in place! And the soil there is soft and the border is the width of my spade. "Piece of cake". Right? Yeah, right...
Fortunately, the weather is forecast to stay nice into mid-November, so I may get away with all this before the first hard freeze hits. But I had better get working of those cages. Two sizes of cages actually. 8"L x 6"W x 4"H for the crocus bulb border (so I need about 50 of those). I haven't decided on the size of the cages for the tulip and hyacinth bulbs yet. I need to sit down and diagram cages what use a 3' wide roll of wire mesh efficiently.
But I have the crocus bulbs now, so they come first. The tulip cages can wait a few days... But they will look basically like this...

12-18" square, 6" high. It only needs making a wood form to bend the wire mesh over. Not that that takes no time, but it beats buying cages at $30 each!
So I left the last one half done for a week and did other stuff. Well, I am happy to report that I finished it today. No more digging in that soil...
There are 3 edged areas.

The middle smaller area is for Lychimartra Firecracker, a lovely bronze foliage plant about 24" high with lots of small yellow flowers. But it is a bit invasive and needs to be contained by itself. It has its own 200 sq ft circle so that I can mow around it!
The nearest area, also 400 sq ft will be a combination of daffodils, tulips, and hyacinths for Spring color; with transplants of purple coneflowers, black-eyed-susans, and goldenrod for Summer and Fall color. Plus I plan to add a few dwarf butterfly bushes. I may get a package of seeds of plants that attract butterflies and bees to scatter among the plants next Spring.
This last area will take some work planting. Tulips and Hyacinths don't last long here because of the voles, so I have to make cages to plant them in. The daffodils are fine without cages, being toxic. But the bulbs haven't been delivered yet, and the transplants still have green leaves so I can't move them yet.
Which means I can start on the new border of the older flowerbed (up against the fence to the left of the above picture). I originally planted the border with alternating 12" sections of yellow then purple crocuses. And 4" gaps between sections for annual Summer flowers. The voles ate most of the crocus bulbs in just a few years, so this time, I am planting them in cages. I'll still leave a 4" gap between the cages because it is nice to have Summer flowers there too and change them each year (yellow marigolds one year, dusty miller the next, orange zinnias after that, etc).
At least I don't have to install more edging there. It's already in place! And the soil there is soft and the border is the width of my spade. "Piece of cake". Right? Yeah, right...
Fortunately, the weather is forecast to stay nice into mid-November, so I may get away with all this before the first hard freeze hits. But I had better get working of those cages. Two sizes of cages actually. 8"L x 6"W x 4"H for the crocus bulb border (so I need about 50 of those). I haven't decided on the size of the cages for the tulip and hyacinth bulbs yet. I need to sit down and diagram cages what use a 3' wide roll of wire mesh efficiently.
But I have the crocus bulbs now, so they come first. The tulip cages can wait a few days... But they will look basically like this...

12-18" square, 6" high. It only needs making a wood form to bend the wire mesh over. Not that that takes no time, but it beats buying cages at $30 each!
Wednesday, October 14, 2015
Solved It
OK, so the planting timing problem was caused by my wanting to plant lots of spring-flowering bulbs where I was planting wildflowers earlier and not wanting to walk on the sprouting wildflowers. I had to think on that a while.
Solution? Walking-boards and cheap plastic tubs.
The walking boards will be some pieces of 2"x12" boards left over from the deck construction last year. With small pieces of 4"x4" scrap wood attached to the bottom, the footprint will be minimal, but allow me to walk out to the pre-dug holes for the wire cages for protecting the spring flowering tulips and hyacinths from the voles.
Each spot for the spring flowering bulbs will have a predug hole with a cheap plastic tub of the soil there. I will walk out on the supported boards, lift the tub, set the wire cage down, add an inch of soil, set the bulbs down, add the rest of the soil, walk off the board and lift the board off the wildflower sprouts.
Every problem has a solution...
Monday, October 12, 2015
Crocuses Border
While I was oredering spring floering bulbs (daffodils, tulips, hyanciths) for the new plantng areas, I also had the great idea of replanting the border to the older flowerbeds along the property line. Sure, why not? Like I had nothing else to do. I get myself in these situations where work seems easy when I'm looking at plants online and "gee, how hard could it be to do that"?
ARGHHH!
So... I used to have a border on the old flowerbed with alternating 1' sections of yellow and purple crocuses. The voles ate most of them the first year. But one section survives (for reasons I do not know). So I want to replicate the gorgeous look of the row of alternating yellow and purple crocuses, but protected from the voles.
The solution is 1/2 "galvanized steel mesh wire cages buried just under ground. OK, that requires building the cages, digging up the soil, and filling it back in. It could be a lot worse. At least THIS soil is well aged and loose, so digging it up is easy.
The real work will be making the cages. But I am pleased to say I have solved that. In design anyway. I planned the cages 8" long, 6" wide, and 4" deep. But then there was the problem of cutting the shapes out from the existing 3' width rolls of 1/2" wire mesh I bought.
Well, I started drawing out shapes of unfolded cages. You remember those IQ or SAT questions about "what is this shape unfolded"? I got those every time. Easy Peasy... So I sat down with graph paper and started laying out the shapes foldable into cages. And because the stuff is a bit expensive and I'm cheap, I kept playing with shapes until they worked out with NO wasted material.
Took an hour of updating software to get the sketch to scan, LOL! My printer/scanner drivers always seem to be out-of-date...

I'll try to clean this of on some drawing program, but it basically means that I (or you) can make twelve 8" long x 6" wide x 4" deep cages from 5' 4" of 1/2" hardware cloth. But it means I found a layout of mostly foldable parts and some few ends that need to be wired in place to make cages with NO WASTE!
And I've made a form for the bending out of scrap 2"x6"x8" wood. Its simple enough. Cut a nominal 6" wide 8" long and screw and glue supports under it. Or just screw and glue 3 stacked onto each other.
If you have questions about that, email me at cavebear2118 AT verizon DOT net.
My plan is to have an 8" cage, 4" space for an annual plant like a marigold or zinnia, then another 8" cage along the entire 75' flowerbed edge. So I'll need 75 cages for 75'. 12 cages per 5' 4" = 64' of the cage mesh, and I have 150' of it. The rest will be used up in 18"x18" cages for the tulips and hyacinths in the new areas.
It all comes together, see? :)
With apologies to The Beatles:
"And, in the end,
The flowers you grow
Are equal to the work you do... "
Or to put it another way I read once, "If you like bacon, you need to get down in the mud and keep the hogs happy". Meaning that whatever you do, you can do it poorly or well. Poorly lasts a couple years. Well, lasts a lot longer. Doing things well takes less work in the long run.
ARGHHH!
So... I used to have a border on the old flowerbed with alternating 1' sections of yellow and purple crocuses. The voles ate most of them the first year. But one section survives (for reasons I do not know). So I want to replicate the gorgeous look of the row of alternating yellow and purple crocuses, but protected from the voles.
The solution is 1/2 "galvanized steel mesh wire cages buried just under ground. OK, that requires building the cages, digging up the soil, and filling it back in. It could be a lot worse. At least THIS soil is well aged and loose, so digging it up is easy.
The real work will be making the cages. But I am pleased to say I have solved that. In design anyway. I planned the cages 8" long, 6" wide, and 4" deep. But then there was the problem of cutting the shapes out from the existing 3' width rolls of 1/2" wire mesh I bought.
Took an hour of updating software to get the sketch to scan, LOL! My printer/scanner drivers always seem to be out-of-date...

I'll try to clean this of on some drawing program, but it basically means that I (or you) can make twelve 8" long x 6" wide x 4" deep cages from 5' 4" of 1/2" hardware cloth. But it means I found a layout of mostly foldable parts and some few ends that need to be wired in place to make cages with NO WASTE!
And I've made a form for the bending out of scrap 2"x6"x8" wood. Its simple enough. Cut a nominal 6" wide 8" long and screw and glue supports under it. Or just screw and glue 3 stacked onto each other.
If you have questions about that, email me at cavebear2118 AT verizon DOT net.
My plan is to have an 8" cage, 4" space for an annual plant like a marigold or zinnia, then another 8" cage along the entire 75' flowerbed edge. So I'll need 75 cages for 75'. 12 cages per 5' 4" = 64' of the cage mesh, and I have 150' of it. The rest will be used up in 18"x18" cages for the tulips and hyacinths in the new areas.
It all comes together, see? :)
With apologies to The Beatles:
"And, in the end,
The flowers you grow
Are equal to the work you do... "
Or to put it another way I read once, "If you like bacon, you need to get down in the mud and keep the hogs happy". Meaning that whatever you do, you can do it poorly or well. Poorly lasts a couple years. Well, lasts a lot longer. Doing things well takes less work in the long run.
Tuesday, July 21, 2015
The Garden Inside
I have been planting while I built. I risked losing plants to the Evil Squirrels or Groundhogs, but I've managed to avoid them this year. I may have reduced the local population down to where they don't like getting into my space.
Which is good, because there are still gaps between the rolls of chicken wire I need to patch.
They great news is that my garden, while incomplete, is growing well.
First, I have my first main season tomato. It is a Big Beef, which is a hybrid and not my favorite, but it is still better than the store-bought ones. The heirlooms are just now fruiting and will take a couple weeks to ripen.
 I'm trying somehing in one bed based of the Three Sisters of Native America plantings. Thats growing corn, letting pole beans climb the cornstalks, and growing melons below to shade out weeds.
 I may have planted the corn late; the beans are growing faster. But I'll see what happens for this year. I can stick 8' posts in the ground between the corn plants to let the pole beans climb (and the pole beans are the flat italian kind which taste better than standard ones to my mind). The melons are honeydew.
 The heirloom tomatoes are growing unusually tall. New soil with good compost, I guess. But most have blossoms now. Below them are 2 green squash and 1 yellow squash.
 This bed has cantalope melons. I'm planting Fall crops around it. I'm off-schedule with most plantings this year because of the enclosure construction work. I should be back on schedule next year. But it is a rare opportunity for Fall crops that I usually don't get around to.
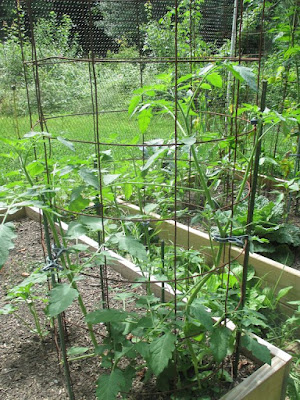 This cherry tomato was planted late. It sat in a tiny 6-pack cell for months and I had about given it up for dead and/or stunted. But after being in ground for only 2 weeks, it went from a 8" sprig to this. Talk about GROWTH! I may harvest cherry tomatoes yet...
 This is more late plantings. Broccoli, Leeks, Cabbage, and Celery. All I can get from Celery around here is leaves, but they sure are strong-tasting! Which is exactly what I want in my salads.
And I have Brussels Sprouts, Radishes, Carrots,
Which is good, because there are still gaps between the rolls of chicken wire I need to patch.
They great news is that my garden, while incomplete, is growing well.
First, I have my first main season tomato. It is a Big Beef, which is a hybrid and not my favorite, but it is still better than the store-bought ones. The heirlooms are just now fruiting and will take a couple weeks to ripen.


And I have Brussels Sprouts, Radishes, Carrots,
Saturday, May 9, 2015
A Brief Planting Interlude
With the chicken wire overhung on the PVC frames, I realized I was able to do some planting in the beds below without worrying the draping of the chicken wire would rip them up. HURRAY, I can start the garden in the new beds! I had lots of home-grown seedlings waiting to go in the ground.
Here are broccoli, celery, leeks, and bell peppers... I can't get full celery stalks here, but I prefer the leaves anyway for the stronger flavor in salads.
 And some cabbages...
 I have 9 heirloom tomatoes planted in large sturdy remesh cages. 2 Brandywines, 2 Cherokee Purple (my favorites),

1 Aunt Gerties Gold, 1 Striped German ...
 1 Prudens Purple, 1 Ponderosa Pink, and 1 Big Beef (a decent-tasting hybrid for backup)
 Tomorrow, I'll be planting seeds in the other beds. Spinach, radishes, carrots, scallions, beets, etc.
And one bed is reserved for the "3 sisters". That's corn, pole beans, and melons. The corn is a bi-color type (love bi-color corn for the combination of flavor and sweetness), the pole beans should climb the corn stalks, and the melons should cover the soil and shade out the weeds. It's an American Native pre-Columbian practice. We'll see how it works...
Here are broccoli, celery, leeks, and bell peppers... I can't get full celery stalks here, but I prefer the leaves anyway for the stronger flavor in salads.

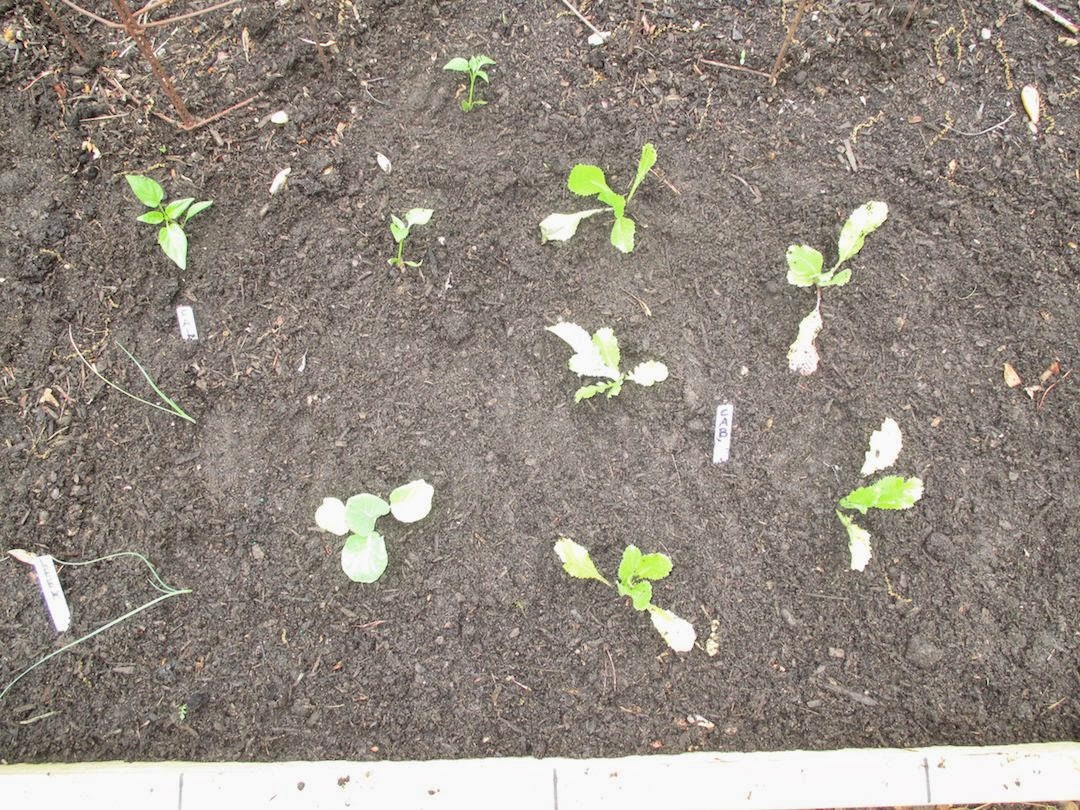


And one bed is reserved for the "3 sisters". That's corn, pole beans, and melons. The corn is a bi-color type (love bi-color corn for the combination of flavor and sweetness), the pole beans should climb the corn stalks, and the melons should cover the soil and shade out the weeds. It's an American Native pre-Columbian practice. We'll see how it works...
Sunday, April 19, 2015
The Garden Enclosure
It progresses. I discovered some real problems as I went recently. I want the top of the enclosure to be level. But the ground slopes front to back and right to left. That makes digging the holes for the frame real tricky.
I tried to measure the slope of the ground first. That got me a general idea that is dropped 1.5' in both directions, but it wasn't very exact. I suppose I could have lived with that, but my Dad was always one to point out minor flaws in anything I ever built (no matter how well built), so I have a reaction to that even though he is gone now. Old habits die hard. And there IS a point to seeking perfection in any project, Dad criticisms or not. A few extra days work means years of admiring work well done.
So I wanted to make sure that, even though the ground was sloped, the top of the frame should be level. If I had surveyor's equipment, that would have been easy. But I don't. So I thought about it a few days. With some complicated ways that seemed really awkward in reality.
As I was trying to get to sleep the previous night (and I did the construction yesterday, so that was 2 nights ago), I kept turning the problem over in my mind. It finally struck me... A water level! I would build the enclosure from the top down!!!
For those of you not familiar with the idea, water in a bucket with a long tube attached will stay at the same level as the bucket even when you move the tube around. It's not a new invention, but it was a new thought to me. I found a nice (free I hope) picture to describe it...

Well, saved me the effort of drawing and scanning it myself. And I wasn't cutting off the tops of the PVC pipes, I just dug my holes a bit deeper to make them match at the top. I marked each PVC pipe 8" down from the top and made the water level match it THERE. So the tops of all my PVC frame uprights are level.
The garden enclosure is 20' by 20' with the raised framed beds I built, that gives me 2' between each bed and 2' around the outside of them (inside the enclosure). I hope that makes sense. When I post this in a few weeks as an instructional post, I'll add diagrams.
But the point is that it finally solved my difficulties with the sloped ground. Some pictures of the general steps...
The holes dug. The digging was horrible. The basic soil in the back yard is gravel, clay, and more gravel. A post hole digger wasn't sufficient. I had to use a breaker bar. That's a 5' solid iron rod about 1.5" in diameter, with a chisel point at the bottom. It weighes 12-15 pounds. You lift it, you pound it down, you swivel it about. Its the "breaker bar 2-step dance". LOL! THEN you use the post hole digger to scoop the loosen debris out. It's great (but unwanted) exercise. Good for causing hand blisters too.
This is the lowest end of the yard. The higher end holes got to 2.5' deep
 Here are the PVC pipes sitting in the holes at one end. They may not look all in a row, but they are.
 As each one was individually set at the proper depth so that the top was level, I shoveled dirt back in and stomped it down hard. There is still some "wiggle" room to allow for attaching more pipes at the tops.
 Here is a corner, showing the connections. It's not easy, being just me to be at both ends of the pipes, but I set up ladders to hold one end of each pipe while I set the other end in tightly. I'm used to having to construct "helper" supports on projects. A 6" spring clamp atached to a ladder makes a nice "V" shape to hold the far end of a pipe temporarily...
 I initially thought it would be easiest to start at one corner and work my way around the perimeter, but it wasn't. Doing all the north/south first was easier for supporting the pipes! BTW, see the spring clamp attached to the ladder there? It was a very good "third hand".
 And a secret. The PVC pipe is too flexible for a good solid structure. Metal is better. But I couldn't find the kind of connectors I needed that fit the metal conduit pipe (unlike a site I found about building such a structure said I could). So to get the rigidity of metal conduit pipe AND the connections that fit PVC Pipe, I put metal conduit pipe into each PVC pipe!
 THAT solution took a few days thought last Winter... And metal conduit pipe is inexpensive, so that was not a concern.
I have most of the uprights and half the crossbeams in place. Took two days but it will be worth it.
Why am I doing this? Well, the squirrels and groundhogs developed a taste for my garden seedlings a few years ago and basically ruined my garden 3 years in a row. When I cover this frame with chicken wire, they won't be able to get in. And I will place bent chicken wire at the bottom to stick out 2' to prevent any tunneling. Bwa-Ha-Ha!
I will have a garden yet...
I tried to measure the slope of the ground first. That got me a general idea that is dropped 1.5' in both directions, but it wasn't very exact. I suppose I could have lived with that, but my Dad was always one to point out minor flaws in anything I ever built (no matter how well built), so I have a reaction to that even though he is gone now. Old habits die hard. And there IS a point to seeking perfection in any project, Dad criticisms or not. A few extra days work means years of admiring work well done.
So I wanted to make sure that, even though the ground was sloped, the top of the frame should be level. If I had surveyor's equipment, that would have been easy. But I don't. So I thought about it a few days. With some complicated ways that seemed really awkward in reality.
As I was trying to get to sleep the previous night (and I did the construction yesterday, so that was 2 nights ago), I kept turning the problem over in my mind. It finally struck me... A water level! I would build the enclosure from the top down!!!
For those of you not familiar with the idea, water in a bucket with a long tube attached will stay at the same level as the bucket even when you move the tube around. It's not a new invention, but it was a new thought to me. I found a nice (free I hope) picture to describe it...
Well, saved me the effort of drawing and scanning it myself. And I wasn't cutting off the tops of the PVC pipes, I just dug my holes a bit deeper to make them match at the top. I marked each PVC pipe 8" down from the top and made the water level match it THERE. So the tops of all my PVC frame uprights are level.
The garden enclosure is 20' by 20' with the raised framed beds I built, that gives me 2' between each bed and 2' around the outside of them (inside the enclosure). I hope that makes sense. When I post this in a few weeks as an instructional post, I'll add diagrams.
But the point is that it finally solved my difficulties with the sloped ground. Some pictures of the general steps...
The holes dug. The digging was horrible. The basic soil in the back yard is gravel, clay, and more gravel. A post hole digger wasn't sufficient. I had to use a breaker bar. That's a 5' solid iron rod about 1.5" in diameter, with a chisel point at the bottom. It weighes 12-15 pounds. You lift it, you pound it down, you swivel it about. Its the "breaker bar 2-step dance". LOL! THEN you use the post hole digger to scoop the loosen debris out. It's great (but unwanted) exercise. Good for causing hand blisters too.
This is the lowest end of the yard. The higher end holes got to 2.5' deep
I have most of the uprights and half the crossbeams in place. Took two days but it will be worth it.
Why am I doing this? Well, the squirrels and groundhogs developed a taste for my garden seedlings a few years ago and basically ruined my garden 3 years in a row. When I cover this frame with chicken wire, they won't be able to get in. And I will place bent chicken wire at the bottom to stick out 2' to prevent any tunneling. Bwa-Ha-Ha!
I will have a garden yet...
Saturday, April 11, 2015
The New Garden Beds
Pictures at the end...
They are finally all built and filled! I started last Fall to tear out the old 25 year old ones (and which were not my best work (being unlevel and too shallow). I bought wood to construct more and larger and taller ones. I got 5 of 6 finished before the ground froze and it was too cold to work outside.
So the first thing was to build the 6th bed, then move all the remaining good soil from the old ones. That took some time. The ground stayed frozen well after the air warmed up in March. Then I had to wait for the yard to dry enough to bring in more topsoil and compost.
I waited because there were 2 ways to do that. First (because the lawn was soft from thawing) was I could get the soil and compost from a landscape supply place in the hauling trailer, park it in the front yard at the street, bring the lawn mower with the yard trailer (3x4 feet) to the hauling trailer, shovel it full from the hauling trailer, drive it around back to the garden, and unshovel it into the beds. I've done that before and its a lot of shoveling!
Second, I could wait for the lawn to dry enough to drive the hauling trailer straight back to the garden and unshovel the load once (and right next to it). That's an iffy trick of getting between Spring rains and not wanting to wait too long to get it done.
Now, the new beds had some decent soil from the old beds, and I wanted to mix compost (a lovely black and crumbly local leaf compost called "Leaf-Gro") into the existing soil. I did that 2 weeks ago. That got most of the beds half-filled. But the last bed had little good soil and the rest had settled about 4" down.
I went back to the landscaping supply yard expecting to have to get more topsoil on one trip and then more compost on a second. But Wonder of Wonders, they had something NEW. A thoroughly mixed 50-50 blend on the Leaf-Gro and topsoil.
I examined each of the 3 carefully, crumbling handfuls, smelling it, and looking at the color. Their pure topsoil is very good stuff, the Leaf-Gro is very good stuff, and the 50-50 mix seemed to really be 50-50. To explain how I knew, I found clods in the 50-50 mix and crushed them. Half were topsoil and half were Leaf-Gro. And the color of the really sifted parts (99% of the mix) was right between them in color.
Sure beats mixing the individual parts together with a spading fork one forkful at a time over 160 square feet of beds!
I got two front-loader buckets of the mix (about 2 cubic yards or a bit over 1.5 cubic meters) according to the landscape place. I think they underestimate the front-loader; I think I got 2 cubic meters (from measuring the volume in the trailer.
But having the trailer right at the garden SURE made things easier. Sure, shoveling is tedious. But straight off the back of the trailer into a wheelbarrow once and dumping it only 10' away into the beds was shoveling it once rather than twice. And I had EXACTLY enough to fill ALL the beds to the top (the soil will settle a bit).
Pictures...
Half-done last Fall. There is JUST enough space between the beds for my wheelbarrow.
 More done last Fall. BTW, you can see how I attached the lower and upper frames. The dark wood on the inside is a 1"x6" pressure-treated board that attaches the 2 together. There is one on each long side of each bed.
 All built by this Spring.
 The tarp-covered trailer of 50-50 topsoil and compost mix. Oops, didn't get a picture with the tarp off... But you can see it was nearly filled. 5'x8' trailer filled 1.5 feet high = 60 cubic feet = 2+ cubic yards).
 Filled all the beds to top (it will settle a bit). The beds are 4' wide, 3' and 4'. With 2' between them and allowing 2' on the outsides, it is a perfect 20' square for the framed chicken wire and pipe enclosure!
 Did all the emptying/shoveling in 2 hours! And had to slather muscle-rub on my hands when I went to make dinner later when the muscle cramps started. OUCH! Its been a long un-excerising Winter... But I recover fast. Oh, and just how did I scrape the trailer so clean, you ask? Two words. Snow Shovel!
 And I have 2 trash barrels full of leftover pure Leaf-Gro compost to use on the flowerbeds!
 Now I just have to build the PVC pipe and chicken wire enclosure to protect the magnificent new garden from the Evil Squirrels, Evil Rabbits, and Evil Goundhogs.
Well, what is life without the next project? LOL! And I have plenty of them on my list...
They are finally all built and filled! I started last Fall to tear out the old 25 year old ones (and which were not my best work (being unlevel and too shallow). I bought wood to construct more and larger and taller ones. I got 5 of 6 finished before the ground froze and it was too cold to work outside.
So the first thing was to build the 6th bed, then move all the remaining good soil from the old ones. That took some time. The ground stayed frozen well after the air warmed up in March. Then I had to wait for the yard to dry enough to bring in more topsoil and compost.
I waited because there were 2 ways to do that. First (because the lawn was soft from thawing) was I could get the soil and compost from a landscape supply place in the hauling trailer, park it in the front yard at the street, bring the lawn mower with the yard trailer (3x4 feet) to the hauling trailer, shovel it full from the hauling trailer, drive it around back to the garden, and unshovel it into the beds. I've done that before and its a lot of shoveling!
Second, I could wait for the lawn to dry enough to drive the hauling trailer straight back to the garden and unshovel the load once (and right next to it). That's an iffy trick of getting between Spring rains and not wanting to wait too long to get it done.
Now, the new beds had some decent soil from the old beds, and I wanted to mix compost (a lovely black and crumbly local leaf compost called "Leaf-Gro") into the existing soil. I did that 2 weeks ago. That got most of the beds half-filled. But the last bed had little good soil and the rest had settled about 4" down.
I went back to the landscaping supply yard expecting to have to get more topsoil on one trip and then more compost on a second. But Wonder of Wonders, they had something NEW. A thoroughly mixed 50-50 blend on the Leaf-Gro and topsoil.
I examined each of the 3 carefully, crumbling handfuls, smelling it, and looking at the color. Their pure topsoil is very good stuff, the Leaf-Gro is very good stuff, and the 50-50 mix seemed to really be 50-50. To explain how I knew, I found clods in the 50-50 mix and crushed them. Half were topsoil and half were Leaf-Gro. And the color of the really sifted parts (99% of the mix) was right between them in color.
Sure beats mixing the individual parts together with a spading fork one forkful at a time over 160 square feet of beds!
I got two front-loader buckets of the mix (about 2 cubic yards or a bit over 1.5 cubic meters) according to the landscape place. I think they underestimate the front-loader; I think I got 2 cubic meters (from measuring the volume in the trailer.
But having the trailer right at the garden SURE made things easier. Sure, shoveling is tedious. But straight off the back of the trailer into a wheelbarrow once and dumping it only 10' away into the beds was shoveling it once rather than twice. And I had EXACTLY enough to fill ALL the beds to the top (the soil will settle a bit).
Pictures...
Half-done last Fall. There is JUST enough space between the beds for my wheelbarrow.
Well, what is life without the next project? LOL! And I have plenty of them on my list...
Subscribe to:
Posts (Atom)
-
 I think I have it figured out now. I needed basic frame strength (cubes) plus top support (arches with a ridgepole) for shedding rain and s...
 -
I like to plant Pansies in the Fall. I replace the dead Tomatos and deck pot flowers with them most years. Best deal I found was 12-packs ...