
Monday, October 31, 2011
Tuesday, October 25, 2011
Mulch
So I was shoveling the mulch out of the trailer. Here are pictures...
 First step. shoveling the mulch away from the back so I can remove the back of the trailer...
 Half done...
 3/4...
 The pile off the trailer...
 The mosquitos got too fierce. I had to stop. The only good thing about the skeeters this time of year is that they are slow. Still, I got 8 bites. It was that they were around my face that made it hard.
 Really, it was harder than it looks... It was close to like chopping ice off the driveway...


Monday, October 24, 2011
A Neat Trick
My most immediate outdoors project is emptying the trailerload of mulch. And I made good progress at it today (about 2/3 emptied - pictures another time). Unfortunately, the mulch is packed down by rain and weight and it has to be broken loose in chunks even using a mulching fork. That was a bit of work.
So I took a breather every 15 minutes and walked around the yard a bit, which is semi-forest and lots of field weeds. Guess what, those triangular sticky-seed plants are in full seed! I can never remember the name of the plant and I never remember what it looks like, but if they grow where you live, you know the seeds. By the time I was done with the mulch for the day, my pants were coated with 100s of them. I HATE picking those stupid seeds off. I even considered just trashing the pants (they ARE old).
But I had a thought. I have a hand vac with a rotating brush head. Spreading the pants out flat on the floor, I tried the vac. It worked beautifully. In about 3 minutes, they were completely cleaned of sticky-seeds!!!
Give it a try. Just remember not to empty the collection bag outside where the seeds will sprout... LOL!
Wednesday, October 19, 2011
Sometimes I am REALLY Dense
Recently, I posted about my frustrations in trying to repair the drip irrigation hoses. I had 4 of them mounted to a 4 gang valve on a 12" post. Two winters ago, the heavy snow broke the drip hoses off the couplings at the gang valve. I became obsessed trying to find an internal connection (like a stent, I suppose) to reattach the hoses to the couplings. I wasn't having any luck, because I needed 7/16" tubing and couldn't find that size anywhere.
One person, seybernetx, suggested standard garden hose repair kits. I dismissed the idea because, well, it wasn't a standard garden hose. Have you ever dismissed an idea because it didn't fit the way you were thinking of a problem? Yeah, me too!
Well, I was walking past the broken drip hoses today, and the old LIGHT BULB OVER THE HEAD lit up! A hose is a hose is a hose... WHY was I caring about the existing brass hose couplings? A standard hose repair kit would work just fine. I had simply assumed the drip hoses were some odd size that wouldn't work with standard hose repair kits!
Dumb, dumb, dumb, dumb, dumb, dumb, dumb, dumb, dumb, dumb, dumb, dumb, dumb, dumb!!!
The hard part is that I am usually quite resourceful about fixing things, using odd unrelated objects to make repairs... I guess this is one of the top 10 list of THINGS I FLUBBED! I even had one of the right size repair kits sitting around. It worked just fine. I just need 3 more from the hardware store tomorrow.
Thank you, seybernetx. And my cats say "hello" to your cats...
Wednesday, October 12, 2011
Outdoor Fall Projects
Well, it is raining again today. It must be the rainiest Sept/Oct I have experienced. And that has exploded the mosquito population. Even with deet on my arms and neck, they swarm around my face. They are pretty desperate. Probably because there are so many of them and so few victims outside in suburbia. Really, when I was young, all kids were outside from dawn to dusk except during school. Now, hardly a kid is outside.
And with more pets being cats, and kept indoors, less pets for the skeeters to feed on. I am considering getting my hunting garb mosquito netting headgear out... That may seem extreme, but when the skeeters are biting your face, its not!
I haven't been doing too much outside the past week. The inside of the house needed a lot of cleaning and organizing. And I have that trail-load of mulch to empty...
Project 1 - Empty the trailer of mulch.
Project 2 - Deadhead all the perennial flowers of flowerstems and hang them up for the finches to eat the seeds.
Project 3 - Deepen the drainage ditch from the patio and install real perforated drainage pipe to the downslope area.
Project 4 - Clean the patio of silt and debris.
Project 5 - Protect the patio from rain from the deck above. My idea is to put plastic on the deck and then cover it with outdoor carpet. I plan to rebuild the 20 year old deck in a year or two, so it is a temporary measure. The deck has given its expected lifetime.
Project 6 - Kill the ivy that has taken over the ridge in the backyard. Too awkward to mow, but I cant till it down and spread the soil until the ivy is all dead. The vines wrap around the tiller tines.
THAT should keep me busy for awhile! And I'll try for pictures...
Monday, October 3, 2011
Crazy Neighbors
Well, I stayed up all night playing Risk and Hearts online, and I heard a familiar scream out the window. The neighbors across the street were at it again. Usually the Fat Idiot Guy (FIG) is ranting and screaming at the woman.
Ofentimes, this results in him peeling the car backwards out of the driveway, then peeling rubber down the street out of the neigborhood. She sometimes runs in front of the car. He USED to STOP.
Its gotten worse lately and I have been very worried about her safety. And recently, there has been a child involved in the fight. FIG suddenly likes to take the infant with him in the car. Driving away recklessly.
This morning, FIG took off again. with infant, and the woman stood there screaming. I have intervened before with threats of "calling the cops". I have spoken to the renters there (there are at least 2 couples, I think). Its hard to tell.
But this time I asked the woman (18? 21?) if she needed help. She asked my to call the police. I did.
They were there in 5 minutes. Two County and two State cars. I explained that I had called on her behalf, and backed off so they could talk to her. One cop stayed aside , and I gave him a brief background on the problems of the past year.
He talked to the woman for about 20 minutes, giving her advice and explaining the limitations (FIG IS the child's father, so it isn't kidnapping). I lent her my cordless phone to call friends for a safe haven. I was amazed the phone worked outside like that, but it did.
After overhearing that she needed to file legal papers at the County Courthouse10 miles away (and knowing she had no car), I offerred to drive her there if her friends/family couldn't. I'll bring a book if asked to drive. Paperwork takes time.
But I just couldn't continue to hear her screaming in mental agony every week. Yes, maybe I should have acted more forcibly before. But it is difficult to know the dynamics of bad relationships. I have acted before in other places and been told (rather forcibly) to "BUTT OUT". But I guess I judged this one correctly.
I did not know before this that there was physical violence involved. It was all yelling and screaming before. But she had blood on her nose (interestingly, she was not aware of that). That shows how bad things can get behind closed doors.
I'm glad I called the police, I think she is going to get some legal help and it is now "on the record".
On the other hand, this FIG is a real looney tunes type. If someone bangs on my door, I will answer through the computer room window. That's safe. If it's the woman, I will drive her to a safe house or legal place of her choice. If its the FIG, well, I have a real Gladius propped by the front door and another at the top of the stairs for self-protection. He IS the kind of person who would beat down a door and attack.
Sorry to bother you all with this, but I have to write sometimes to get things straight and put disturbing events in print. Some good news. A car pulled into the driveway a few minutes ago. It wasn't FIG. It was her dad. (Well, I went out and asked) He came by to help her pack some things and bring her home for some shelter for a while. I offerred any help I could give.
*SIGH*
BTW, the cats didn't know the earthquake was coming, but they DID know the neighbor screams were going to start before I did. They went all poofed and UTB about 3 seconds before I heard the first yells. Good for them.
(Very Tired) Mark
Friday, September 30, 2011
Garden Watering Stand
I like to keep the garden watered, but it's boring. It's wasteful to use an oscillating sprinkler on the raised veggie beds because of the walkways between them, and the flowerbeds are too narrow for one. It is too boring to just stand there and water all the beds by hand. I have drip irrigation hoses, but they all broke off at the raised brass couplings under the weight of the snow 2 winters ago (haven't quite figured out how to repair them).
I had developed a rather convenient way to water them all a patch at a time using a fat hose nozzle and a spading fork. I stabbed the fork in the ground abut 10' away and nestled the fat hose nozzle (shower setting) in the fork's D handle. But that required getting the garden fork firmly in the ground at each 6' section or raised bed. Naturally, if I needed to water the beds, the lawn soil was rather hard to penetrate with the fork.
I needed a better way. My first thought was a pole with a clamp on top and a flat "X" at the bottom with spikes to "step" into the lawn. I couldn't find any parts like that, and I'm not a welder. Then I looked at my camera tripod. It looked a bit flimsy, needed some kind of attachment at the top, and I wasn't sure how waterproof it was. But a tripod seemed the way to go.
I built one using pressure treated wood and stainless steel hardware. The PT wood is 2x2"deck balusters. The tripod is designed with 1 forward and 2 back legs. It is 2 back legs to resist the backwards force of the water and the weight of the hose.
The balusters come with pointed ends. I wanted the points for the bottoms, but I wanted flat tops to attach a nozzle platform. So I cut off the tops of each of the 3 balusters. Then I cut 3" off the 2 back legs to use to widen the attachment surface. Two pieces of scrap wood added some width. It was all glued and screwed to the front leg.
 Next, I used a tapering jig on the tablesaw to cut angles for the 2 back legs to attach to the front leg. They are shorter because I used 3" to make the top attachment surfaces, but also because the front needs to be longer to create an upwards angle for the nozzle platform. That will make more sense in the last pictures. I can't give an exact angle for the cut (I really just overlayed one on the other and eyeballed the "right" spread). It looks about 30 degrees though.
 I needed to drill a hole through the 3 legs for an axle bolt. I rigged up some stops and supports on my drill press for the 2 angled back legs. The front leg just needed a spacer to account for the platform support.
 It looks like this when the bolt and nut is put through all 3 legs. This holds the legs all at the angles. But I also wanted to be able to store it easily for the winter. That meant being able to collapse it. So I took the back legs back to the drill press and lifted them up slightly to angle the holes.
 I may not be explaining that well. To store it, I wanted the 3 legs to compress flat to each other, and the lengthened hole allowed that. And so that the bolthead and wing nut (for tightening securely on a flat surface, I used a forstener bit to make an angled hole the size of the flat washers. I don't have a picture of that, but it will be obvious when/if you make one of these yourself.
Notes: 1, The washers between the legs were removed later. I realized I DIDN'T want the legs to slide easily when being set up. 2, The spacer washers below the wing nut are there because the wing nut catches on the wood before the bolt is tight. 3, Use a bolt with threads the whole length. The bolts with about 1" of threads don't have enough thread length.
 Here is the tripod in the storage position. That's what I mean by "compressing flat" and why the back legs have elongated holes.
 Here is the tripod set up, minus the hose nozzle platform on top... You can see that with the front leg longer, it creates an upwards angle.
 Here is the finished tripod. A piece of PT board is glued an screwed to the platform support on the front leg (the screws are countersunk under the wand nozzle). Copper clamp-downs hold the wand in place with pan-head exterior screws. A wand nozzle is much easier to attach than a standard nozzle. The wand, BTW, has the most uniform spray of any nozzle I have ever tried. This brand is Melcor; others may be just as good.
 To relieve hose-weight pressure on the wand, I attached an angled hose connector. I have quick-connect attachments on all my hoses and attachments.
 And here is the watering tripod in action! Adjusting the angle of the front leg easily adjusts the angle of spray.
 It's easy to move from spot to spot, stores nicely, and should last decades!
I had developed a rather convenient way to water them all a patch at a time using a fat hose nozzle and a spading fork. I stabbed the fork in the ground abut 10' away and nestled the fat hose nozzle (shower setting) in the fork's D handle. But that required getting the garden fork firmly in the ground at each 6' section or raised bed. Naturally, if I needed to water the beds, the lawn soil was rather hard to penetrate with the fork.
I needed a better way. My first thought was a pole with a clamp on top and a flat "X" at the bottom with spikes to "step" into the lawn. I couldn't find any parts like that, and I'm not a welder. Then I looked at my camera tripod. It looked a bit flimsy, needed some kind of attachment at the top, and I wasn't sure how waterproof it was. But a tripod seemed the way to go.
I built one using pressure treated wood and stainless steel hardware. The PT wood is 2x2"deck balusters. The tripod is designed with 1 forward and 2 back legs. It is 2 back legs to resist the backwards force of the water and the weight of the hose.
The balusters come with pointed ends. I wanted the points for the bottoms, but I wanted flat tops to attach a nozzle platform. So I cut off the tops of each of the 3 balusters. Then I cut 3" off the 2 back legs to use to widen the attachment surface. Two pieces of scrap wood added some width. It was all glued and screwed to the front leg.


Notes: 1, The washers between the legs were removed later. I realized I DIDN'T want the legs to slide easily when being set up. 2, The spacer washers below the wing nut are there because the wing nut catches on the wood before the bolt is tight. 3, Use a bolt with threads the whole length. The bolts with about 1" of threads don't have enough thread length.


Wednesday, September 28, 2011
Pictures Again!
I've been a bit frustrated lately, often not being able to get pictures into the posts. They would upload in the Choose Files box, but would not transfer to the post. I even posted a question on the Blogger Help forum (no replies). So, today I tried the new Blogger interface, and pictures load properly.
Hurray!
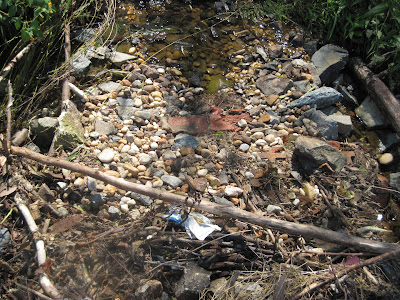
I am showing the pictures of the "Poor Old Storm Drain" to add to THIS POST today...
The overview... Yes, believe it or not there is a 4x4x4 foot brick well and heavy metal grate under there!
 At first, I tried to pull the debris off.
 Most of it was too entangled. I wasn't surprised. The last time the drain was like this, the County needed power equipment!
 But I stopped trying as soon as I saw that the brick structure was broken! You can see part of the brick wall is at an angle.

I also noticed that the metal grate on top is actually shoved OFF the brick structure! You can also see that the woody debris is packed so tightly that stones washed over the top and wouldn't fall through.
 I called County Maintenance and reported the problem. They politely took all the information, but wouldn't suggest a repair date. I'll be happy to see them out here by next Spring. That's about how long it took the last time. However, I will say that they do good work when they come.
Hurray!
I am showing the pictures of the "Poor Old Storm Drain" to add to THIS POST today...
The overview... Yes, believe it or not there is a 4x4x4 foot brick well and heavy metal grate under there!


I also noticed that the metal grate on top is actually shoved OFF the brick structure! You can also see that the woody debris is packed so tightly that stones washed over the top and wouldn't fall through.

Monday, September 19, 2011
A Redo On The Lawn
I haven't re-seeded the lawn in years and there are thin/bare spots. So before Tropical Storm Lee came through, I thought I would take advantage of the predicted rain for the week to keep new grass seed wet while it germinated.
I didn't realize how MUCH rain there would be and how HARD it would fall at times. Some of the seed I put down then has germinated - in thick separated bands. It looks like the lime markers on a football field! And all the formerly bare spots are still bare.
So much for THAT $42 worth of grass seed! So, today, I bought another bag and I re-seeded the lawn after mowing it down as short as I dared (1"). This time, I even raked the lawn roughly and collected dried crumbled grass clippings to cover the bare areas after seeding.
After seeding the lawn again, I sprinkled the dried grass clippings over the bare spots. Not thickly, just enough to give a little cover and hide them from the birds... Then I spent an hour gradually watering the seeds enough to let then soak up some moisture and start germinating.
I saved about a lb of grass seed for patching spots that don't grow this time. Its a blend of 3 Rebel tall fescue. I like fescue, but it isn't a spreading grass, so bare spots develop. I think I will get some bluegrass for the sunnier areas next time. It spreads. But the lawn is at least half shaded, so I need fescue on most of it.
Sorry no pictures again, but for some odd reason, I can't upload pictures on THIS blog. Works fine on the cat blog, and as far as I can tell, the settings are the same. I don't have any maximum picture upload issues, as all of mine are in the "free" range. And pictures that won't upload here WILL upload to the cat blog. It's driving me nuts. I posted a question on the Blogger Help Forum days ago, but have not gotten any responses. Any ideas are more than welcome!
Friday, September 16, 2011
Poor Old Storm Drain
Tropical Storm Lee finally did it in. I'm used to it getting covered with fallen branches and washed-down debris, but this time the washed-down stuff actually broke the storm drain apart. It is a brick shell covered by a heavy metal grate that sits on the bricks.
Not any more...
The back of the brick structure is batterred loose and at an angle. the top is covered with tree debris I can't pull apart. It is so tightly interwoven that stones piled up on the top.
I would show the pictures of the broken storm drain, but blogger isn't letting me upload any pictures on this blog.. I getting a bit pissed about that. Not only that, but all of a sudden, I have to sign in to each of my 2 blogs every time with full username and password. Two days ago, I could select them from a drop-down list or use a bookmark.
Subscribe to:
Posts (Atom)
-
 I think I have it figured out now. I needed basic frame strength (cubes) plus top support (arches with a ridgepole) for shedding rain and s...
 -
I like to plant Pansies in the Fall. I replace the dead Tomatos and deck pot flowers with them most years. Best deal I found was 12-packs ...