Some days are just catching up on small things.
1. I spent an hour pulling grass up from the new front yard island bed. With 3" of Fall leaves topped with 3" of compost, the weeds don't have a solid grip. But they were lots of small weeds and it took a while. Better now than when they good good roots into the soil...
2. The pole beans and cucumbers are up. But there were a few spots where a seed didn't grow. So I soaked a few replacement seeds in water for 4 hours and then planted them.
3. I can't BELIVE I forgot to plant a cherry tomato seedling with the regular ones. So I planted it 3 days ago and shaded it from the direct sunlight for 2 days. It wilted a bit the first day but is happily hydrated now.
4. I have a 2'x8' framed bed against the southern side of the house. Hottest part of the yard. I planted 2 blocks of bico9lor corn there today. One matures 2 weeks before the other, so I'll have a staggerred harvest. And I'll plant 2 more blocks in 2 weeks, for more staggerred harvest.
5. The Meadow bed is full of several dozen large bright yellow flowers, some dozen multiple flowers in reds/pinks.white, some white daisies, and some small blue flowers. The plants are listed on the packet; I will look them up so I know what they are called.
6. The Hummer/Bee/Butterfly bed is too new to have flowers. BUT, on a whim, I scatterred old veggie seeds in there too. I am harvesting the best sweetest radishes ever! And there are a few corn plants coming up. It is going to be a weird bed this year.
7. I've been growing bok choy to harvest young for stir fries. Some are old even to flower. I just discovered that the pre-flowering heads are like brocoli, only sweeter. I coukld grow them just for THAT! But I also like picking the young leaves for the stir-fries...
8. Got one major project done I meant to do last year and waited too long. And almost waited too long this year. The Spring Bulb bed has daffodils, tulips, and hyacinths. The Tulips and Hyacinths are in wire cages to protect them from the voles. But there is unused space between the wire cages and I want to plant daffodils to fill the bed (except for the tulip and hyacinth cages).
So I had to mark the spots of the tulips and hyacinths. It was a close call. The tulip leaves were still just barely visible. I thought because the tulips bloomed after the daffodils; the leaves would last longer. Nope. I had to to some careful searching to find the spots. I did.
Which led me to how to mark the spots. Well, first, I found the cardboard cutouts I used to make the cages. 12'x14". Then I had to find cardboard to cut to size to place on top of the cages (so I wouldn't auger in to them in the Fall while planting daffodils around them.
An aside... I keep things the are of similar size because they seem useful that way. A dozen liter juice bottles, a dozen plastic jars that hold mixed nuts, etc. Well, I buy the same wine by the case and I had a dozen of them stacked up in the basement (thinking they would be good for storing stuff fitting together perfectly in tight spaces).
Well, guess what exact size they were with a wide side and flap? The size of my tulip and hyacinth cages! And I have a weird curved linoleum cutter my Dad made. It sliced right down the corners of the boxes perfectly.
And guess what I also had? Fifty 10" tent stakes! Perfect for holding the cardboard down. I cut them to size, put the debris in the recycle bin, poked a hole through opposite corners with an awl, and carried them all outside.
It was hard to find the remnants of the tulip leaves, but I had pictures of the bed from 2 directions from the blooms last year. Between the few leaves and the pictures, I set down the cardboard covers and stuck the tent stakes in the holes to keep them in place.
Then I weed-whacked the whole area. Why? So that I can cover the entire area with black plastic to kill all the weeds. The bulbs won't care; they don't like rain while they are dormant. When the weeds are dead, I'll uncover them in Summer so the bulbs won't overheat (they are shaded all day now).
9. All this work has been awkward. I like to keep my kitchen knives sharp. Stele them once a week to straighten the edges (they curl with use), and sharpen them every few months. You know that test about tossing a ripe tomato at a sharp knife and it cuts the tomato in half? Mine do that.
It does that to fingertips too. I'm careful. I have brushes to keep my fingers away from the sharp edges while I clean them. But OOPS! I cut my fingertip badly a week ago. I hadn't seen that much blood in 30 years. It was 15 minutes before enough pressure even stopped the bleeding. Fortunately, I coagulate fast.
Anyway, I finally managed to get enough coagulation to put a bandage on it. I have some of that triple antibiotic ointment on it first, then a large bandaid, then some adhesive cloth bandage along my finger to hold the bandaid in place.
It HAD to be the index finger of my right hand of course. The MOST inconcenient finger for a right-handed person. Makes even putting on my velcro-strap watch difficult, never mind tying shoes.
But I may be a bit lucky there. I think I was a natural lefty, taught to be right-handed in the 1950s (a common practice in the US, then). I still do some things with my left hand naturally and deliberately do some things left-handed for practice.
It has certainly helped.
10. Making progress on the compost bin. Nothing to show, as I was just collecting boards and posts for cutting and assembly tomorrow. I looked at the boards and posts I already had and adjusted my design slightly to account for those. Might as well use up what I have rather than buy new boards! I'm always flexible about designs.
Sunday, May 21, 2017
Wednesday, May 17, 2017
Compost Bin, Part 2
I set the work aside for a couple of days to catch up on weeding while the weather was cool. But it hit 90F yesterday, so it was a good day to work in the cool basement.
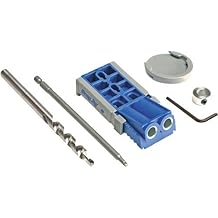
So, I mentioned using the tenon jig to make half-lap joints...
This is the jig.


I'll show that next time. Meanwhile, there are some old deteriorated beds where I want to install the new compost bin, so I need to demolish those first. And there is a shrub I want to save from there.
This isn't the best time of year to move a shrub, but I don't have much choice. I think I will take a dozen tip-cuttings and try and root them indoors before digging the shrub up. And I'll make the rootball extra large to give it a best chance to survive the transplant shock.
Tomorrow is predicted to hit 92F, so I don't think I want to do serious work outside then, but I'll break up the framed bed it is in and get that part done.
And I have work I can do inside or outside in shade. I really try to do as much work as possible in the shade. LOL!
Sunday, May 14, 2017

Friday, May 12, 2017
Compost Bin, Part 1
Well, I got started on the compost bin I mentioned a couple days ago. And it was about time! I originally made a quick-and-dirty one not long after I moved here. It was just 6 upright posts sitting at ground level with boards nailed around them and a divided to make it 2 bins. Needless to say, it didn't last long. Nails don't hold, pitchfork activity and leaning on the posts made it tilt over, boards came loose. It wasn't a total failure; it did function for 10 years. But I expect more than that.
I built a better one for a friend. Posts set in the ground with cement, screws, removable angled fronts. I always do better work for others. For myself, I take shortcuts. *sigh*
So I bought one of those big rotating barrels set on a stand with a handle to turn the barrel. That lasted 10 years, sort of. The gears to turn the barrel broke after 5 years, then a side can loose. I was leaving grass clippings on the lawn, mower-shredding fallen leaves into the lawn anyway, so I used the barrel just to let kitchen scraps decompose.
But I'm changing back to making real compost again. So I looked up a couple plans online, mixed some features together, and improved on them. It has 2 bins each 4' deep and 4' wide and 3' high. The 2 back, 2 sides, and 1 divider are made of five 4'x3' frames of 2"x4" pressure-treated lumber with 1/2" wire mesh attached to the inside edge. Well, the divider is a little smaller to fit between 2 posts.
The 5 wire mesh frames are made with half-lap joints. They aren't elegant joints, but they give plenty of surface space for gluing and screwing so they are very sturdy. This isn't living room furniture; strength is better than appearance, LOL!

You can dado-cut half lap joints, but I have a tenoning joint gadget I've never used and that makes smoother cuts, so that's how I'm doing it. I'll show actual construction pictures later. But it takes some effort to make the half laps fit together perfectly. You can't just find the center of the board; the saw blade removes material. And the tenoning gadget was new to me. Fortunately, I had scrap pieces of the 2x4s and got the cutting depth right after only 3 tries.
The half lapped frames will also have a diagonal brace inside the frame. I'll do that the easy way. When the frames are glued and a perfect 90 degrees (clamped to some squares I have for that purpose), I'll put in screws for long term holding. Even exterior glue doesn't hold forever. THEN, I'll simply put a 2x4 under the frame, pencil the cut, and use a taper jig to make the brace fit into the corners.
Then I'll attach the brace with pocket hole screws.
I bought a pocket hole Kreb jig a few years ago and I love it. Talk about SOLID! I have tightened squeeky floor joists in the basement and loose deck posts.
So my compost bin parts are modular. Pre-constructed 4'x3' frames to be attached to in-ground posts I will space as I go. Hey, I know my likely failures; if I dig the post holes first, they will be off a couple of inches by the end.
The posts will be set a foot deep. With my clay soil, cement is not needed. But I will use a tamped-down brick at the bottom of each hole to prevent settling and frost heave. With the posts set in a foot, on firmly-settled bricks, and diagonal braces in each of the back and side frames, this compost bin will not tilt over.
Which leaves the front... With most compost bin designs, you have to reach over the front to spear the material to shift it from one bin to the other (to keep it aerated and mix it well). That gets awkward and tiring. I build my friend's compost bin with angles slats set into cuts in the posts, but that weakened the posts (we had to fix that after 5 years).
This time I am constructing posts for straight up slats to drop into. I am sandwiching a 2"x2" post between wider boards to create a slot for the removable front slats instead of cutting one and weakening the posts.
The idea is that I can just lift the slats up through the space between the wider boards for easy access to the bin contents. And the slats will have 2" long spacers under each end for aeration.
The top will come last after the whole thing is installed. I know all too well from past experience that planned measurements can get off more than one would think on rough projects like this. The top will be custom-fitted to whatever the exact constructed size of the bin is. And quite frankly, I want to see the finished compost bin before I decide what kind of hinges to use.
Tomorrow, pictures of the half lap cutting, and possibly the first assembly of the back and side frames...
I built a better one for a friend. Posts set in the ground with cement, screws, removable angled fronts. I always do better work for others. For myself, I take shortcuts. *sigh*
So I bought one of those big rotating barrels set on a stand with a handle to turn the barrel. That lasted 10 years, sort of. The gears to turn the barrel broke after 5 years, then a side can loose. I was leaving grass clippings on the lawn, mower-shredding fallen leaves into the lawn anyway, so I used the barrel just to let kitchen scraps decompose.
But I'm changing back to making real compost again. So I looked up a couple plans online, mixed some features together, and improved on them. It has 2 bins each 4' deep and 4' wide and 3' high. The 2 back, 2 sides, and 1 divider are made of five 4'x3' frames of 2"x4" pressure-treated lumber with 1/2" wire mesh attached to the inside edge. Well, the divider is a little smaller to fit between 2 posts.
The 5 wire mesh frames are made with half-lap joints. They aren't elegant joints, but they give plenty of surface space for gluing and screwing so they are very sturdy. This isn't living room furniture; strength is better than appearance, LOL!
You can dado-cut half lap joints, but I have a tenoning joint gadget I've never used and that makes smoother cuts, so that's how I'm doing it. I'll show actual construction pictures later. But it takes some effort to make the half laps fit together perfectly. You can't just find the center of the board; the saw blade removes material. And the tenoning gadget was new to me. Fortunately, I had scrap pieces of the 2x4s and got the cutting depth right after only 3 tries.
The half lapped frames will also have a diagonal brace inside the frame. I'll do that the easy way. When the frames are glued and a perfect 90 degrees (clamped to some squares I have for that purpose), I'll put in screws for long term holding. Even exterior glue doesn't hold forever. THEN, I'll simply put a 2x4 under the frame, pencil the cut, and use a taper jig to make the brace fit into the corners.
Then I'll attach the brace with pocket hole screws.
I bought a pocket hole Kreb jig a few years ago and I love it. Talk about SOLID! I have tightened squeeky floor joists in the basement and loose deck posts.
So my compost bin parts are modular. Pre-constructed 4'x3' frames to be attached to in-ground posts I will space as I go. Hey, I know my likely failures; if I dig the post holes first, they will be off a couple of inches by the end.
The posts will be set a foot deep. With my clay soil, cement is not needed. But I will use a tamped-down brick at the bottom of each hole to prevent settling and frost heave. With the posts set in a foot, on firmly-settled bricks, and diagonal braces in each of the back and side frames, this compost bin will not tilt over.
Which leaves the front... With most compost bin designs, you have to reach over the front to spear the material to shift it from one bin to the other (to keep it aerated and mix it well). That gets awkward and tiring. I build my friend's compost bin with angles slats set into cuts in the posts, but that weakened the posts (we had to fix that after 5 years).
This time I am constructing posts for straight up slats to drop into. I am sandwiching a 2"x2" post between wider boards to create a slot for the removable front slats instead of cutting one and weakening the posts.
The idea is that I can just lift the slats up through the space between the wider boards for easy access to the bin contents. And the slats will have 2" long spacers under each end for aeration.
The top will come last after the whole thing is installed. I know all too well from past experience that planned measurements can get off more than one would think on rough projects like this. The top will be custom-fitted to whatever the exact constructed size of the bin is. And quite frankly, I want to see the finished compost bin before I decide what kind of hinges to use.
Tomorrow, pictures of the half lap cutting, and possibly the first assembly of the back and side frames...
Thursday, May 11, 2017
Yard Work 3
Mosquitos are a problem here. The Asian Tiger Mosquito showed up here in 1999. The Authorities said it wasn't here yet. It stunned one back then and kept it intact in a small jar in the refrigerator and tried to tell the Dept Of Natural Recources and the local University that I had one, but no one seemed interested.
So, naturally, a YEAR later the local newspaper headlined "Asian Tiger Mosquitoes Found In Maryland". Yeah, I knew that.
Anyway, I have been fighting them ever since. The little bastards are active in daytime and are hard to detect on your skin. I happen to be good at detecting them on me, so I have probably killed more of them than the average victim.
This year, I am fighting back. I'm trapping them. Well, not the adult females, the offspring. They lay their eggs in water. There is a bacteria (Bacillus thuringiensis) that kills the larvae. It comes in various forms, but I like the small Bt doughnuts of it that you just drop in standing water.
I set out 5 pots of water with the Bt around the yard last month. I set one pot without it. When I see larvae in the untreated pot, I know the the females are laying their eggs in the treated water too. I dump the untreated water pot every 2 days. The treated water pots never have live larvae!
I found old black plastic pots that fit a gallon food baggie perfectly. The dark pot makes the water look good to the female mosquito The orange landscaping flag is so that I don't lose track of where they are. The Bt has to be re-added once each month.

Getting the first few generations killed makes a BIG difference. Already, I can go outside and find only a couple flitting around me and I swat them against my shirt very fast. Fewer and fewer of them. They don't travel far, so most of them here are from here.
Two years ago, I could hardly go to the mailbox without a bite. This year, NONE!
Wednesday, May 10, 2017
Yard Work 2
Building a compost bin... My original 2 section compost bin died years ago (falling sideways and such). Well, it WAS over 25 years old. I still dump kitchen scraps in it, but I decided I was mostly just feeding possums. So it was time for a new one. And in a new location.
My new garden enclosure resulted in an unusable spot north of it. Perfect place for a new double-bin compost bin. So I looked up some plans for covered 2-bin compost bins. I didn't find one I liked. HURRAY, I get to design one myself. I'll build anything great I find, but I love building something better. I spent time this past Winter doing that. Came up with a nice one. It had 1/2" hardware mesh sides for aeration, was designed for 5 identical square frames of pressure-treated lumber, and a hinged top.
After looking at the design this week, I thought of changes. I sketched it out Saturday, improved it Sunday, changed it again, diagrammed it on graph paper, and bought most of the pieces yesterday.
It is built of five 4'x3' frames of 2"x4" pressure-treated lumber with diagonal braces to prevent leaning. The front has 1"x6" boards that slide down in slots in the front for easy removal and access to the compost material for turning. The corner posts are set down in the soil a foot deep for added sturdiness.
The front posts are interesting. To make slots for the boards to sit in (for easy removal for access for turning the bin contents, there are 2 ways to go. One is to cut slots in a 4"x4" post. I have the equipment to do that, but my past experience is that that weakens the post.
The other way is to construct a slot. A 2"x2" between two 2"x4" boards makes a nice slot too and is easier to build. And I already have the pieces to do that.
So here is my diagram...

I wish I could show it better. Scanning a drawing is always frustrating for me. I probably have incompatible equipment. It took 20 minutes to get THIS! 😂😣
I'll answer any questions about it...
Later today, I'll start cutting the boards I bought to the sizes I need. Some of the joints are "half-laps", so I'll finally get to use the tenon-cutting jig I bought years ago.
The good thing is that I am finally getting around to a project I have wanted to build for several years. Most years, this project stayed low on the priority list. Now it got to the top. I must be catching up on things!
YAY!
Mark
Monday, May 8, 2017
Yard Work 1
I finally learned the name of the invasive vine that has been creeping into my yard from the neighbor's yard. It's Periwinkle. I thought Periwinkle was a small plant like violets! But a couple of posters on a garden site clued me in, and when I looked it up, there it was. I can't believe a week of searching "invasive vines" didn't help me find that out myself.


It is apparently hard to kill. Deep resilient spreading roots, leaves that don't absorb water, tolerant of many soils and sunlight. I even have some I put a trash barrel over last summer; the entire vine is white but won't die. They are surviving by nutrient spread from uncovered vines.
I weed-whacked them last week. That should weaken them for a while. But it seems there are only a few ways to eliminate them. Digging the roots out 2' down, covering them in black plastic for a couple years, and using herbicides.
Digging down that far needs heavy equipment and the space is too tight. I can't cover them all with plastic as they are among plants I want to keep. So that means herbicide. And it means an oil-based herbicide.
I try to stay organic. Not certified, but in general practice. So in the open areas it has invaded, I will spray carefully. I have a large cardboard box I have cut the bottom out of and made a small hole in the top. I will spray Triclopyr into the hole, let the box sit sit 5 minutes and move it to the next spot (wearing latex gloves and a mask).
Then I will cover the area with black plastic (I have large rolls of the stuff). For the individual plants in the flower beds, I will apply it with a 1" brush on leaves. And since I'm going that far, I will use the box on the poison ivy and the english ivy ("in for a penny, in for a pound").
Friday, May 5, 2017
Flower Pictures
After the Spring Bulbs are gone, I'm offerring a cascade of pictures of them. Just to share and remember.


Sunday, April 30, 2017
Gardening And Yardwork
I had a successful day today - I planted 6 annual sunflower seedlings! There was a lot more to the day's work, of course, but by the time I planted the sunflower seedlings, I felt I was done.
For starters, the temperature reached 88.5F according to my 2 different brands of digital wireless outdoor thermometers*. In April. In the shade. And I didn't spend much of the day in the shade.
My PRIMARY desire for the day was to plant the sunflower seedlings. For some reason, I sow 6 sunflower seeds every Spring, and never get around to planting them before they are too leggy and weak to thrive. They are always "last on the list". Partly, I never have a really good spot to put them. Well, this year I did.
I have mentioned before that I set up 3 edged beds in the back yard. One is for wildflowers, one is for Spring bulbs and daylillies, the last is for bee/butterfly/hummingbird flowers.

In the center of that last (middle) one (only 10' in diameter), I wanted to plant sunflowers as a centerpoint.
But I had trimming to do first. I mowed the lawn 2 days ago and the more constructed beds I create, the more trimming there is. My new Ryobi 40 battery-powered string trimmer does a grand job! But you have to USE it, so I did that first to get it out of the way. It was a lot more work than I expected. The trimmer battery last about 40 minutes; I used that up and set it to recharge.

While I was waiting, I took my hedge-trimmer and dead-headed all the Spring bulbs, and I have more bulbs than I used to (when I could do that with my sheep-sheers).
Still with time before the string trimmer fully charged, I caught up on making more plant labels. I found a great deal on metal plant labels last Fall and got 120 for 50 cents each. Plastic labels just don't last. After that was done for all my existing crops and some specimen hostas, I went back at trimming the yard with the string trimmer. It takes longer to trim than to mow the whole yard! And I was using it to cut down an invasive vine, an invasive self-sowing spreading loosestrife (Lysimachia Firecracker) shipped to me in error as a Coreopsis, and some self-sowing Salvia(?) perennial I regret ever planting. I'll keep cutting them down until they all die!
I was pretty much used up for the day, but remembered the sunflowers. I HAD to plant them, sweaty and tired as I was. My idea was to set a 1' diameter 2' tall wire cage in the center of the bed and plant the sunflowers around it attached to the cage. I measured out the center and set the cage there with some stakes to hold it in place firmly and used an auger to drill 6 holes around it. It was awkward reaching around the cage to set the seedlings in while not stepping on newly-emerging hummer/bee/butterfly seedlings, but I managed it.
I have a couple hundred plant clips (another good deal I found, and endlessly useful), and supported the sunflower seedlings to the cage with the clips. The clips are about 1" around, so they wont restrict the stems.

Support 2' high should help the sunflowers stay upright, but if not, I can attach a 2nd cage on top of the 1st. Yes, I should have just planted the sunflower seeds directly and they would have been sturdier. But I always try to rush the season by starting them indoors. Next year, I will sow them direct.
But for once, they are planted and have a chance.
For starters, the temperature reached 88.5F according to my 2 different brands of digital wireless outdoor thermometers*. In April. In the shade. And I didn't spend much of the day in the shade.
My PRIMARY desire for the day was to plant the sunflower seedlings. For some reason, I sow 6 sunflower seeds every Spring, and never get around to planting them before they are too leggy and weak to thrive. They are always "last on the list". Partly, I never have a really good spot to put them. Well, this year I did.
I have mentioned before that I set up 3 edged beds in the back yard. One is for wildflowers, one is for Spring bulbs and daylillies, the last is for bee/butterfly/hummingbird flowers.

In the center of that last (middle) one (only 10' in diameter), I wanted to plant sunflowers as a centerpoint.
But I had trimming to do first. I mowed the lawn 2 days ago and the more constructed beds I create, the more trimming there is. My new Ryobi 40 battery-powered string trimmer does a grand job! But you have to USE it, so I did that first to get it out of the way. It was a lot more work than I expected. The trimmer battery last about 40 minutes; I used that up and set it to recharge.
While I was waiting, I took my hedge-trimmer and dead-headed all the Spring bulbs, and I have more bulbs than I used to (when I could do that with my sheep-sheers).
Still with time before the string trimmer fully charged, I caught up on making more plant labels. I found a great deal on metal plant labels last Fall and got 120 for 50 cents each. Plastic labels just don't last. After that was done for all my existing crops and some specimen hostas, I went back at trimming the yard with the string trimmer. It takes longer to trim than to mow the whole yard! And I was using it to cut down an invasive vine, an invasive self-sowing spreading loosestrife (Lysimachia Firecracker) shipped to me in error as a Coreopsis, and some self-sowing Salvia(?) perennial I regret ever planting. I'll keep cutting them down until they all die!
I was pretty much used up for the day, but remembered the sunflowers. I HAD to plant them, sweaty and tired as I was. My idea was to set a 1' diameter 2' tall wire cage in the center of the bed and plant the sunflowers around it attached to the cage. I measured out the center and set the cage there with some stakes to hold it in place firmly and used an auger to drill 6 holes around it. It was awkward reaching around the cage to set the seedlings in while not stepping on newly-emerging hummer/bee/butterfly seedlings, but I managed it.
I have a couple hundred plant clips (another good deal I found, and endlessly useful), and supported the sunflower seedlings to the cage with the clips. The clips are about 1" around, so they wont restrict the stems.
Support 2' high should help the sunflowers stay upright, but if not, I can attach a 2nd cage on top of the 1st. Yes, I should have just planted the sunflower seeds directly and they would have been sturdier. But I always try to rush the season by starting them indoors. Next year, I will sow them direct.
But for once, they are planted and have a chance.
Wednesday, April 26, 2017
Other Things
Not everything I do is yardwork. I watch TV too. Probably not what you watch though. I watch MSNBC for the political commentary. I watch Nationals baseball games a few times a week.
But I also watch animated TV shows. Rick&Morty, Family Guy, Simpsons, Robot Chicken...
But I want to mention a show that seems to have returned after an absence, and has astonished me in quality. I am speaking of 'Samurai Jack'. The original series ran from 2001 to 2004. I was a fan.
Samurai Jack is a warrior in an ancient time. An evil sorcerer (Aku) rose to take over his land and laid waste to it. Samurai Jack fought the sorcerer and was close to winning but Aku sent him into the future, assuming he would have complete control of the world by that time (and he does).
The future is dreary, dim, and forlorn. Jack (and I'm not sure if that is a name or a description of some sort) contends with the future Aku's robots, sycophants, and assassins sent after him by Aku.
Jack is of course highly skilled and always wins.
But there is more to it. Jack helps the downtrodden, enslaved, and twisted creatures in the future to which he has been sent. He kills lethally but only when attacked.
The art is interesting. It is minimal, yet very descriptive. Every part of nature is stylistic, trees are basic columns, lakes are flat. But the characters move quickly. This is in opposition to anime shows like Dragonball, where artistic effort is limited to repeated views of non-movement to save costs.
Jack decides that the only way to defeat Aku is to return to the past where Aku began and defeat him then. There is a special sword involved, but I don't know know enough about that. Jack does not know how to return to the past.
I assume, if there is an arc to the production, there will be some clues as to how that can occur.
The reason I am writing this is that the show suddenly returned with new episodes. And there has been a change. In the new series, Jack is attacked and kills a human for the first time. I missed that, but thinking back, I understand the idea. In the oldr episodes, he was attacked by "strange creatures" and robots. This time, apparently he actually killed a human and he is distraught.
Then 8 identical female assassins track him, wounded. He heals slowly with some mystical wolf. Don't laugh, it was really rather well done. Healed he ventures forth again. The 8 assassins find him.
Recalling an original episode of his youth where his Emperor father is confronted by assassins and saying you have a choice to leave and live or stay and meet your fate (the Emperor kills the assassins but is killed also), Jack tells the assassins the same. They attack with various weapons.
It is a high tree battle. 7 of the 8 are or disabled by Jack and fall into a deep fog below. He tries to spare the last but she is unrelenting. Eventually, he releases her into the depths below. Then the branch he is standing on breaks and he falls too.
He falls into a tree and the branches break his fall. Surviving, he explores the area. 7 of the assassins are utterly thoroughly dead. One survives (Ashi). Though injured, she tries to kill him again and again. Sickened by the deaths, Jack surrounds her in chains and carries her out of the area like on a backpack. She constantly screams, curses and threatens him, showing her allegiance to Aku.
We see her earlier life as a trainee to kill Jack in service to "wonderful Aku". Jack perseveres in trying to save her through some strange situations. Inside a huge monster and escaping, etc.
Tossed up on a small island in the middle of nowhere, Jack releases Ashi (the assassin) and sits apart in sadness. Ashi has found her favored weapon in the mud (a hook on a chain) and is about to attack again.
But there are ladybugs on the island. One lands on her hand. She recalls a moment in her training when that happened. The trainer squished the ladybug, to Ashi's dismay. She watches the ladybug fly from her hand to Jack's hand. He smiles at it and lets it go. That gives Ashi her first doubt about her assassination goal. She sleeps. When she awakes, Jack is gone. Ashi swims to a far shore (I think). She re-evaluates her training and goals.
Ashi decides she wants to learn more. She seeks Jack. On the way, she meets several strange kinds of creatures. Each type knows Jack as a friend and one who helped them in their darkest times. She is asked if Jack is a "friend". At first, she is not sure. But even the formerly meanest creatures tell her that Jack changed their lives. She says "maybe" she is a friend of Jack. After the last group, she says yes she is a friend of Jack.
At that point, she washes in a stream rubbing a stone (soapstone?) over her whole body (she was wearing a black bodysuit before). It comes off completely. It's a metaphor for changing. She fashions clothes of leaves. Life after death, I suppose.
She finally catches up to Jack in a graveyard of old spirits. They have convinced Jack he has killed the innocent and he seems ready to kill himself. She attacks the spirits but they beat her. She tells Jack the innocents are alive (I didn't catch who they were or how she knows).
At the last minute, Jack defends her, the spirits retreat, and Jack understands that she has changed. Well, she was trying to kill him, wearing a black bodysuit, and under the command and of Aku before. Now she is smiling, wearing green leaves, and helping.
Jack is always good at recognizing goodness and change. They smiled at each other.
The show airs new episodes Saturday night at 11 pm ET, repeats Wednesday 10 pm.
I wouldn't mention this except it seems to be an exceptional example of actually mature animated story-telling worth watching. There is a long-term story here, and it is worth following.
Please forgive any errors I made in describing the story so far. I am not a professional TV show describer.
Mark
Subscribe to:
Posts (Atom)
-
 I think I have it figured out now. I needed basic frame strength (cubes) plus top support (arches with a ridgepole) for shedding rain and s...
 -
I like to plant Pansies in the Fall. I replace the dead Tomatos and deck pot flowers with them most years. Best deal I found was 12-packs ...