I was dismayed to step out on the deck yesterday and see a brown shape near my garden. I initially thought I had left a log out there, but I gave a shrill whistle and it turned to look. A groundhog! And it was checking out my garden enclosure.
Well, I sort of trust the garden enclosure. Its chicken wire around all the sides and top, and there is even 2' of chicken wire off the sides and onto the lawn to discourage exactly that varmint digging under the enclosure.
But I'd rather not have a groundhog beat my defenses one day when my melons are ALMOST ripe. So I set my live have-a-hart cage baited with a melon slice and strawberry trimmings. Caught it that night!
I dispatched it humanely and swiftly as possible. It is now returned to the environment... I found the burrow and dumped a load of cat poop in there. There is probably another opening to the burrow, but it seems to have pulled the boards off around the bottom of my raised toolshed and I can't get at anything under the toolshed easily.
So this time I will place cinderblocks against the boards and hope that discourages any new groundhog visitors looking for new homes.
I guard my garden zealously!
Showing posts with label Garden. Show all posts
Showing posts with label Garden. Show all posts
Wednesday, June 15, 2016
Thursday, May 26, 2016
Thankful Thursday
1. The bathroom remodelers completed the work today. But there are some places where tape is holding trim tight for another whole day, so I will post the "after" pictures next time.
2. The cats don't have to be locked into the bedroom anymore (well until the next project).
3. I won't have to set my alarms for 6:30 am tomorrow. That will be a relief because I kept worrying during the nights that I would sleep through them. 6:30 may not seem early to you, but I had mine set for 5 am for 35 years, and after 10 years retired, I'm out of the alarm habit.
BTW, I don't actually use alarm clocks anymore. I use digital kitchen timers. Since I keep irregular hours these days, I can just push the hour button 9 times, press start, and not worry about what time of day that gets me up. SO much easier than a real alarm clock.
4. I have my car back in the garage again (the remodelers were using it for a work area).
5. With the 6 weeks of nearly constant daily drizzle done, I was able to mow the lawn today.
6. I felt free to work in the garden again. I planted my last 4 tomato seedlings, 14' of italian pole beans, 8' of cucumbers, 4 cantaloupe melons, 2 honeydew melons, 2 squash, 6 leeks, 18 corns (10 early and 8 late season). Harvested my first 6 radishes of the season (wow, even home grown radishes taste better than the grocery store stuff - spicier, firmer). My snow peas are starting to produce...
7. To celebrate the remodeling completion, I made a nice dinner. Delmonico steak, fried potatoes, asparagus with mushrooms, tossed salad, SEVERAL glasses of wine! And fresh fruit for dessert (plum, peach, apple, grapes, and cantaloupe).
8. I'm setting the timers tonight for 12 hours. If I wake up refreshed before that, fine. If not, well, I have some catching up to do.
9. After dinner, all the cats were on my chair with me. They shifted positions a few times, but there was always one on the back and one on each arm. They were happy to get time outside this afternoon, but they really wanted closeness. And they got plenty of attention this evening. And I bet they will almost be surprised not to be locked into the bedroom tomorrow morning!
And, yes, I shared my steak with them...
Monday, October 26, 2015
The Last Edging Circle
It nearly done. I did the last digging yesterday. Almost... There are 3 tree roots crossing the edging trench. I don't want to chop them out; the tree needs them. They ARE slightly below-ground though. I think I will cut the bottoms of the edging to fit over top of the roots. But I sure need to have the whole rest of the edging perfectly fitted around the trench before doing any cutting-to-fit.
Seriously, it has to be about as precise as wood-working.
So I went round and round the circle trench to get it as uniformly deep as possible (but not too deep either, so I can lay in this last area of edging. The edging is heavy (but cuttable) plastic, and I'll get it to all fit in tomorrow.
But I thought this would take 2 weeks and it has been 6 weeks. *sigh* Other demands get in the way. Laundry, grocery-shopping, cooking, etc...
At least I'm close to done! But that's not "quite" done. The center areas is edged, but that is for transplanted Lychimatria Firecracker to. Lovely plant; very invasive though. So I have the circle for it that I can mow around all year and keep it from spreading.
The last area is for semi-shady wildflowers, spring bulbs, and some dwarf azaleas. I have no idea how that will work out, but I don't have to worry about THAT until next Spring.
Meanwhile, the older flowerbed along the fence has been ignored for months. I needs work. Mostly, it needs areas that have been taken over by grass killed. Fortunately, it won't take more than a day (he said optimistically) to pull the grass tops off and cover the areas with black plastic for the Winter. I hope they will die. And least they will be weakened. And that whole area needs to be rebuilt next year.
There is too much space there with "just a few of this and a couple of that" left in spots after years of gradual die-backs. Even perennials don't live forever.
I need to collect the surviving ones from various spots together (9 same plants together look better than 3 spots of 3 plants). Some long-lived perennials (like purple coneflowers and black-eyed-susans) tend to self-seed to places the prefer, and some plants get exposed to more sunlight than they like when other plants die back and need better conditions.
The good news is that I have 15 daylilies saved in pots from the ridge that was removed, I have 30 azalea cuttings that have been rooting for 2 months, the dwarf butterfly bush and the dwarf knock-out rose seem healthy enough for cuttings (I have a well-lit plant light stand), and I have LOTS of viable seeds of marigolds, zinnias, salvias, forget-me-nots, butterfly weed, herbs etc.
I am slowly changing from multi-yearly troublesome perennials, that bloom briefly, to replaceable annuals that bloom all year long. The nice thing about annuals is that you can turn the soil early each Spring before planting and expose the germinating weed seeds to be killed with a shallow hoeing.
Some perennials solve all the problems by growing high and thick so that no weeds thrive. That's why I'm trying to give the Lychmastria their own space. There are 2 areas of plants where no weeds grow. The Lychimastria and the Stokesia (Stokes Asters). I'll divide the Stokesia (guidance says in Spring, which seems odd, but OK). To set up another 6x6' area.
Sunday, October 11, 2015
The Three New Planting Areas
You ever get yourself planned for more than you can do by the time you should? Of course you have. Think of that last party you threw... For me it is planting stuff. And the order of planting stuff can get awkward too.
I'm tired of digging ditches for edging. It's harder than I thought for the 3 new planting areas.
 Perspective is strange. That far one is as big around as the near one. They are 80', 40', and 80' respectively. So I had to dig narrow trenches 5" deep to set the edging down mostly in-ground. The far area ground has a lot of gravel and rocks. Half the digging required a leverage fork to dig dirt loose along the perimeter, a pick to loosen the rocks, a trenching shovel to scoop the loosened mixture out, and a grub hoe blade (the other side of the pick) to chip away the bottom to get in uniformly 5" deep.
Naturally, all those tools have short handles, so I was either bent over or on my knees the whole way around with each tool.
 OK, it's getting easier as I move toward the house. The soil is better. Maybe. Fewer rocks, but more heavy clay. The clay stick to the tools and I have to bang them on the ground to get the stuff off! I was going to say I can't decide which is worse, but actually they both are. :(
Then of course, the edging has to be set in the trench and the trench has to be refilled. More fun... Well, it's easier to backfill the soil than to dig it up, but it still takes some work.
So I have the far area finished (took 3 days of off-and-on work). More "off" than "on" because I'm way past 30 (my vague recollection of when I was at my physically best). At 65, I'm at the point where I don't mind working hard with rest in between but darn don't want to die of a heart attack just to plant some flowers. At 30, that possibility never even occurred to me. So I make sure to stop every 15 minutes and relax for 5.
I finished the middle edged area today. Just the nearest one left to do, and I am pretty sure that area as the easiest soil to dig in. I might get that last edging in in 2 days.
But today, it occurred to me that I have a timing problem with the plantings. The far area will have a natural wildflower area and some transplanted purple coneflowers, goldenrod, and black-eyed susans. The smaller middle area will have only the invasive Lychimastria Firecracker. The nearest area will have half-shade wildflowers. So far, so good...
But 2 weeks ago, I had the great idea of planting a lot of spring-flowering bulbs among the areas for early color (and most enclosed in below-ground 1/2" wire mesh cages for protection from the voles and squirrels). Well, the daffodils don't need protection, but the tulips and hyacinths do, and that causes a problem.
If a plant the wildflower seeds in the far are now (as I should), they will be JUST growing when it is time to plant the spring-flowering bulbs in mid November. Ack! I would be walking all over the new plants. I can't plant them now, as they won't arrive until early November.
The middle area isn't a problem. The Lychimastria can't be transplanted until they go dormant, and that will be early November. So they and the spring-flowering bulbs go in at the same time. The near area isn't a problem, because the half-sunny wildflowers will get sown in Spring and I can easily walk around the emerging bulbs then.
I'll have to think about how to manage the planting of that far area some more. I'm not worried; there is always a solution to any problem. I just have to find it.
And I have more on the landscaping To-Do-List. 200 crocus bulbs to plant in vole-proof cages. But that's for the next post...
I'm tired of digging ditches for edging. It's harder than I thought for the 3 new planting areas.

Naturally, all those tools have short handles, so I was either bent over or on my knees the whole way around with each tool.

Then of course, the edging has to be set in the trench and the trench has to be refilled. More fun... Well, it's easier to backfill the soil than to dig it up, but it still takes some work.
So I have the far area finished (took 3 days of off-and-on work). More "off" than "on" because I'm way past 30 (my vague recollection of when I was at my physically best). At 65, I'm at the point where I don't mind working hard with rest in between but darn don't want to die of a heart attack just to plant some flowers. At 30, that possibility never even occurred to me. So I make sure to stop every 15 minutes and relax for 5.
I finished the middle edged area today. Just the nearest one left to do, and I am pretty sure that area as the easiest soil to dig in. I might get that last edging in in 2 days.
But today, it occurred to me that I have a timing problem with the plantings. The far area will have a natural wildflower area and some transplanted purple coneflowers, goldenrod, and black-eyed susans. The smaller middle area will have only the invasive Lychimastria Firecracker. The nearest area will have half-shade wildflowers. So far, so good...
But 2 weeks ago, I had the great idea of planting a lot of spring-flowering bulbs among the areas for early color (and most enclosed in below-ground 1/2" wire mesh cages for protection from the voles and squirrels). Well, the daffodils don't need protection, but the tulips and hyacinths do, and that causes a problem.
If a plant the wildflower seeds in the far are now (as I should), they will be JUST growing when it is time to plant the spring-flowering bulbs in mid November. Ack! I would be walking all over the new plants. I can't plant them now, as they won't arrive until early November.
The middle area isn't a problem. The Lychimastria can't be transplanted until they go dormant, and that will be early November. So they and the spring-flowering bulbs go in at the same time. The near area isn't a problem, because the half-sunny wildflowers will get sown in Spring and I can easily walk around the emerging bulbs then.
I'll have to think about how to manage the planting of that far area some more. I'm not worried; there is always a solution to any problem. I just have to find it.
And I have more on the landscaping To-Do-List. 200 crocus bulbs to plant in vole-proof cages. But that's for the next post...
Tuesday, July 28, 2015
Ponderosa Pink Heirloom Tomato
I got my first ripe heirloom tomato today. It was a Ponderosa Pink. It wasn't great, well, the first ripe tomatoes of any kind usually aren't the best. But this one had a special meaning.
You see, my Dad (deceased 2014) loved them. I think that is what his Dad grew and to him, that was THE tomato. Dad used to save seeds from them and regrow them each year. Dad wasn't a very good gardener. He just planted stuff in bad soil and went full-out chemical on them. It was a very "modern" 1950s/1960s thing to do.
We kids hated his garden. He grew kale, for example, and we had to eat it. The kale was so "metalic" that a magnet might have stuck to it. The corn was always too startchy. The beans were OK.
But the tomatoes were pretty good, the few that grew. Ponderosa Pink. Dad saved the seeds in a paper bag in the garage. As the conditions were bad in the garage, I'm surprised that any sprouted at all. The year Dad and Mom left that house and moved north, the bag of seeds disappeared. Dad always said he gave me the seeds, but he didn't. The loss of the family Ponderosa seeds was a deep disappointment to him. I assume that the bag of seeds on the garage shelf just got left behind and the new occupants tossed them away.
I followed Grandad's gardening practices. He was organic, and his veggies always tasted good. I suppose he also had good Ponderosa Pink tomatoes, but I was too young to know about varieties then.
As years passed and I got my own space for gardening, I looked up some of the best heirloom varieties of tomatoes. I grew Brandywine, Cherokee Purple, Prudens Purple, Aunt Gerties Gold, and Cherry tomatoes. I didn't grow Ponderosa Pink.
But I got curious about Ponderosa Pink this year and found a place that sold it (It doesn't seem to be very popular). The shipping was more than the cost of the seeds, but, "well, what the heck".
So the first heirloom tomato I harvested this year was a Ponderosa Pink.
 Dad, this one is for you...
You see, my Dad (deceased 2014) loved them. I think that is what his Dad grew and to him, that was THE tomato. Dad used to save seeds from them and regrow them each year. Dad wasn't a very good gardener. He just planted stuff in bad soil and went full-out chemical on them. It was a very "modern" 1950s/1960s thing to do.
We kids hated his garden. He grew kale, for example, and we had to eat it. The kale was so "metalic" that a magnet might have stuck to it. The corn was always too startchy. The beans were OK.
But the tomatoes were pretty good, the few that grew. Ponderosa Pink. Dad saved the seeds in a paper bag in the garage. As the conditions were bad in the garage, I'm surprised that any sprouted at all. The year Dad and Mom left that house and moved north, the bag of seeds disappeared. Dad always said he gave me the seeds, but he didn't. The loss of the family Ponderosa seeds was a deep disappointment to him. I assume that the bag of seeds on the garage shelf just got left behind and the new occupants tossed them away.
I followed Grandad's gardening practices. He was organic, and his veggies always tasted good. I suppose he also had good Ponderosa Pink tomatoes, but I was too young to know about varieties then.
As years passed and I got my own space for gardening, I looked up some of the best heirloom varieties of tomatoes. I grew Brandywine, Cherokee Purple, Prudens Purple, Aunt Gerties Gold, and Cherry tomatoes. I didn't grow Ponderosa Pink.
But I got curious about Ponderosa Pink this year and found a place that sold it (It doesn't seem to be very popular). The shipping was more than the cost of the seeds, but, "well, what the heck".
So the first heirloom tomato I harvested this year was a Ponderosa Pink.

Wednesday, July 22, 2015
Busy Day
It was unusually nice weather today (partly cloudy, dry, 30% humidity and 80F). I won't see many of those again until September. So I was up early, for me; 10:30 AM. I know many of you cringe to think of that as "early", but an advantage of being single and retired is setting your own hours.
So I started the day with an English Muffin and a cheese/bacon/bell pepper omelet, a glass of green tea, and a glass of V8. I've been cooking for so long now that all my cast iron pans are utterly non-stick. They are wonderful!
Fed The Mews first, of course. AND after. When they haven't eaten for 10 hours (because I've been in bed), they need a 2nd breakfast. I'd just give them more at first, but Iza can't keep it down all at once. And normally, I would let them out afterwards, but it was lawn-mowing day.
So I went out and mowed the lawn. Takes about an hour for mowing and 30 minutes trimming with the new string-trimmer. There are a lot of places I just can't mow closely, so I finally bought one of those new 18 volt lithium battery trimmers and it works GREAT! When they say "it's like a gas one", they are darn close! I need to get a shoulder strap though; its not one of those little 2 lb jobs...
I let The Mews out after the mowing was done and the fence gates were shut...
After that, I decided to attack some of the brambles that have been invading the more civilized part of by back yard. My "poacher's shovel" is great for that (think of an industrial-strength 18" trowel on a shovel handle). I need the narrow blade because the brambles are among plantings. I got about a dozen dug up.
Then I needed to do some watering. All you sufferring from drought, forgive me, but we have had unusually frequent rain here and I almost didn't notice we had finally gone a week without any rain. I started the watering because the annuals I still have in pots looked a bit wilted. And once I get a hose in my hand, EVERYTHING gets watered, LOL!
Not that I water everything by hand. I have a tripod with a fan-nozzle attached that I build a few years ago.
 This original had a shower spray nozzle, I replaced it with one that spreads more sideways. I use the shower head nozzle for hand-watering now.
And then I had to water the enclosed veggie garden. I'm not used to the tight spaces yet, so it is a bit awkward. I'll get the tricks for worked out this year. Watering the 6 new raised beds takes a good 30 minutes.
And THEN I had to water all the deck containers. I tried just filling and re-filling a watering can to water them, but that got pretty tedious. I thought I would try either one of those super limp hoses that collapse back into a small container, or one of those coiled types that stretch out and fit back in a metal holder. You've seen them on ads.
But I was at a D-I-Y store and I noticed they were using the coiled type themselves. So I figured they probably have some experience with their products, and bought the Melnor green coiled one.

So far, it is working very nicely and sure doesn't take up much space. I screwed the wire frame to a piece of exterior plywood and attached the plywood to the side of the deck. A short hose reaches to the multi-outlet water outlet.

For the record, I use one outlet for the hose to the deck, one for the hose to the nearby lawn, one to an industrial strength hose that goes 150' to the back veggie garden, and one for a jet nozzle right at the spigot that is useful for many things (cleaning buckets, hands, boots, etc). Dragging hoses all around the yard is both difficult and damaging to plants (I have the entire area around the spigot planted).
So I came back in at 6 PM and decided about dinner. I decided I'd earned a steak. I buy them in bulk from the local meat store, cut them in half, and freeze them in sandwich bags (wrapped in a bigger bag, wrapped in a heavier bag - no freezer burn). So I stuck one bag in a pan of hot water (gentle thawing), made a nice home-grown tomato salad (with some minced onion, chopped cucumber, and shaved carrot), sauted some wedges of red and green bell pepper, M/Vd a potatoe, and poured a glass of wine while I sauteed the steak (its more stovetop-roasting in the covered cast iron pan).
Dessert was cut-up fresh fruits (cantalope, green grapes, a plum, a navel orange, and some prunes).
Life is good...
Now I need to consult with The Mews about what they want to post for tomorrow.
So I started the day with an English Muffin and a cheese/bacon/bell pepper omelet, a glass of green tea, and a glass of V8. I've been cooking for so long now that all my cast iron pans are utterly non-stick. They are wonderful!
Fed The Mews first, of course. AND after. When they haven't eaten for 10 hours (because I've been in bed), they need a 2nd breakfast. I'd just give them more at first, but Iza can't keep it down all at once. And normally, I would let them out afterwards, but it was lawn-mowing day.
So I went out and mowed the lawn. Takes about an hour for mowing and 30 minutes trimming with the new string-trimmer. There are a lot of places I just can't mow closely, so I finally bought one of those new 18 volt lithium battery trimmers and it works GREAT! When they say "it's like a gas one", they are darn close! I need to get a shoulder strap though; its not one of those little 2 lb jobs...
I let The Mews out after the mowing was done and the fence gates were shut...
After that, I decided to attack some of the brambles that have been invading the more civilized part of by back yard. My "poacher's shovel" is great for that (think of an industrial-strength 18" trowel on a shovel handle). I need the narrow blade because the brambles are among plantings. I got about a dozen dug up.
Then I needed to do some watering. All you sufferring from drought, forgive me, but we have had unusually frequent rain here and I almost didn't notice we had finally gone a week without any rain. I started the watering because the annuals I still have in pots looked a bit wilted. And once I get a hose in my hand, EVERYTHING gets watered, LOL!
Not that I water everything by hand. I have a tripod with a fan-nozzle attached that I build a few years ago.

And then I had to water the enclosed veggie garden. I'm not used to the tight spaces yet, so it is a bit awkward. I'll get the tricks for worked out this year. Watering the 6 new raised beds takes a good 30 minutes.
And THEN I had to water all the deck containers. I tried just filling and re-filling a watering can to water them, but that got pretty tedious. I thought I would try either one of those super limp hoses that collapse back into a small container, or one of those coiled types that stretch out and fit back in a metal holder. You've seen them on ads.
But I was at a D-I-Y store and I noticed they were using the coiled type themselves. So I figured they probably have some experience with their products, and bought the Melnor green coiled one.
So far, it is working very nicely and sure doesn't take up much space. I screwed the wire frame to a piece of exterior plywood and attached the plywood to the side of the deck. A short hose reaches to the multi-outlet water outlet.
For the record, I use one outlet for the hose to the deck, one for the hose to the nearby lawn, one to an industrial strength hose that goes 150' to the back veggie garden, and one for a jet nozzle right at the spigot that is useful for many things (cleaning buckets, hands, boots, etc). Dragging hoses all around the yard is both difficult and damaging to plants (I have the entire area around the spigot planted).
So I came back in at 6 PM and decided about dinner. I decided I'd earned a steak. I buy them in bulk from the local meat store, cut them in half, and freeze them in sandwich bags (wrapped in a bigger bag, wrapped in a heavier bag - no freezer burn). So I stuck one bag in a pan of hot water (gentle thawing), made a nice home-grown tomato salad (with some minced onion, chopped cucumber, and shaved carrot), sauted some wedges of red and green bell pepper, M/Vd a potatoe, and poured a glass of wine while I sauteed the steak (its more stovetop-roasting in the covered cast iron pan).
Dessert was cut-up fresh fruits (cantalope, green grapes, a plum, a navel orange, and some prunes).
Life is good...
Now I need to consult with The Mews about what they want to post for tomorrow.
Tuesday, July 21, 2015
The Garden Inside
I have been planting while I built. I risked losing plants to the Evil Squirrels or Groundhogs, but I've managed to avoid them this year. I may have reduced the local population down to where they don't like getting into my space.
Which is good, because there are still gaps between the rolls of chicken wire I need to patch.
They great news is that my garden, while incomplete, is growing well.
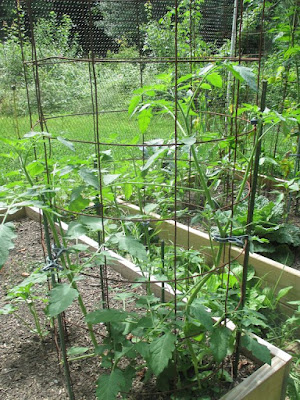
First, I have my first main season tomato. It is a Big Beef, which is a hybrid and not my favorite, but it is still better than the store-bought ones. The heirlooms are just now fruiting and will take a couple weeks to ripen.
 I'm trying somehing in one bed based of the Three Sisters of Native America plantings. Thats growing corn, letting pole beans climb the cornstalks, and growing melons below to shade out weeds.
 I may have planted the corn late; the beans are growing faster. But I'll see what happens for this year. I can stick 8' posts in the ground between the corn plants to let the pole beans climb (and the pole beans are the flat italian kind which taste better than standard ones to my mind). The melons are honeydew.
 The heirloom tomatoes are growing unusually tall. New soil with good compost, I guess. But most have blossoms now. Below them are 2 green squash and 1 yellow squash.
 This bed has cantalope melons. I'm planting Fall crops around it. I'm off-schedule with most plantings this year because of the enclosure construction work. I should be back on schedule next year. But it is a rare opportunity for Fall crops that I usually don't get around to.
 This cherry tomato was planted late. It sat in a tiny 6-pack cell for months and I had about given it up for dead and/or stunted. But after being in ground for only 2 weeks, it went from a 8" sprig to this. Talk about GROWTH! I may harvest cherry tomatoes yet...
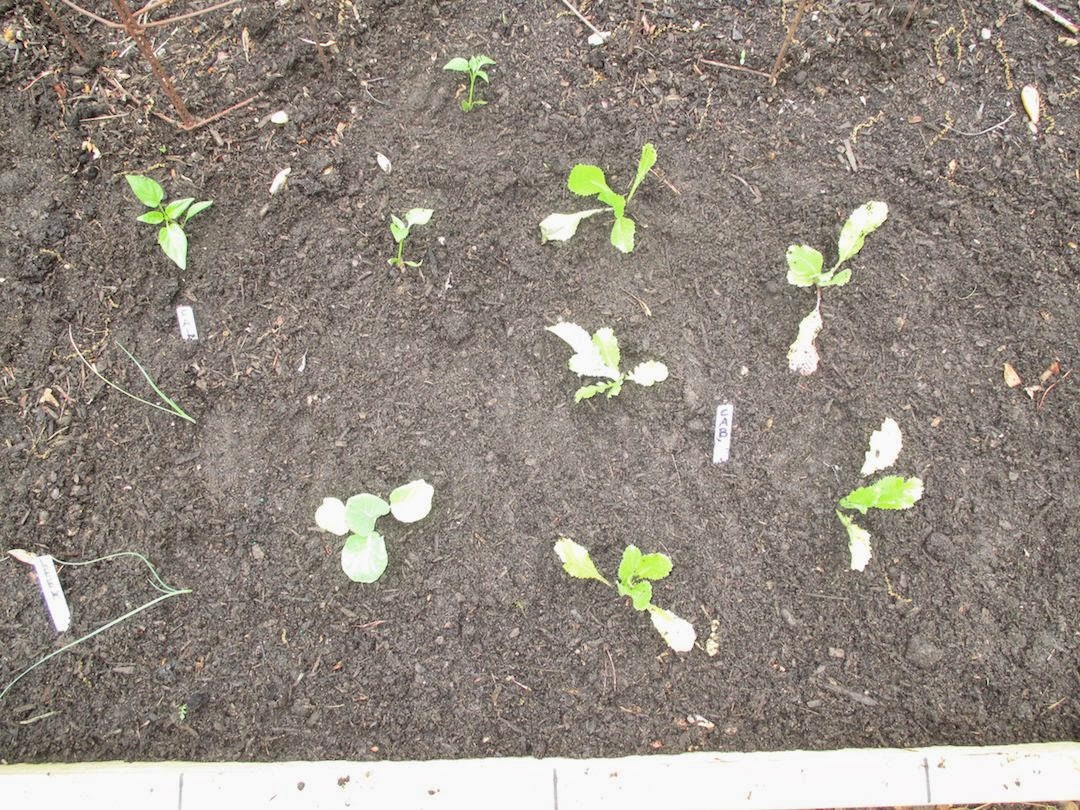
 This is more late plantings. Broccoli, Leeks, Cabbage, and Celery. All I can get from Celery around here is leaves, but they sure are strong-tasting! Which is exactly what I want in my salads.
And I have Brussels Sprouts, Radishes, Carrots,
Which is good, because there are still gaps between the rolls of chicken wire I need to patch.
They great news is that my garden, while incomplete, is growing well.
First, I have my first main season tomato. It is a Big Beef, which is a hybrid and not my favorite, but it is still better than the store-bought ones. The heirlooms are just now fruiting and will take a couple weeks to ripen.


And I have Brussels Sprouts, Radishes, Carrots,
Monday, July 13, 2015
The Garden Enclosure
Its not finished, but I did finally get the door set in properly today. It doesn't sound like That Big A Deal, but it drove me crazy to the point where I just stopped about it for several weeks (and did other useful stuff).
But I went back at it 2 days ago. It not elegant. The half-lap joints that fit so well on the basement floor didn't fit well out in the garden. I'm guessing that there were fitting options that options that "from basement floor to reality" were not right. Putting posts into holes in the ground is not quite like the frames sitting on a nice level basement floor.
But with enough support (uprights, cross, and sideways), I got the door to close smoothly and the lath to connect. I bet any professional would cringe at the work I've done. But as long as it latches closed, it doesn't really matter. All it has to do is stay solid.
And then its worth finishing the chicken wire. All I have left of that is wrapping some corners where the 4' rolls didn't quite reach. That involves some cutting and pacthing using leftovers, but I have enough of those.
It will be SO great to have this completed. Pictures when it is really completely done. But the "damn door" was 90% of the unfinished work, so I am about there.
Saturday, May 9, 2015
A Brief Planting Interlude
With the chicken wire overhung on the PVC frames, I realized I was able to do some planting in the beds below without worrying the draping of the chicken wire would rip them up. HURRAY, I can start the garden in the new beds! I had lots of home-grown seedlings waiting to go in the ground.
Here are broccoli, celery, leeks, and bell peppers... I can't get full celery stalks here, but I prefer the leaves anyway for the stronger flavor in salads.
 And some cabbages...
 I have 9 heirloom tomatoes planted in large sturdy remesh cages. 2 Brandywines, 2 Cherokee Purple (my favorites),

1 Aunt Gerties Gold, 1 Striped German ...
 1 Prudens Purple, 1 Ponderosa Pink, and 1 Big Beef (a decent-tasting hybrid for backup)
 Tomorrow, I'll be planting seeds in the other beds. Spinach, radishes, carrots, scallions, beets, etc.
And one bed is reserved for the "3 sisters". That's corn, pole beans, and melons. The corn is a bi-color type (love bi-color corn for the combination of flavor and sweetness), the pole beans should climb the corn stalks, and the melons should cover the soil and shade out the weeds. It's an American Native pre-Columbian practice. We'll see how it works...
Here are broccoli, celery, leeks, and bell peppers... I can't get full celery stalks here, but I prefer the leaves anyway for the stronger flavor in salads.


And one bed is reserved for the "3 sisters". That's corn, pole beans, and melons. The corn is a bi-color type (love bi-color corn for the combination of flavor and sweetness), the pole beans should climb the corn stalks, and the melons should cover the soil and shade out the weeds. It's an American Native pre-Columbian practice. We'll see how it works...
Thursday, May 7, 2015
The Chicken Wire
So I finally got 8' wide (two 4' widths) of the chicken wire over the top of the garden enclosure frame... It looked like this...
Up the side, across the top, and down the other side is about 45'. Some there is some left over from the 50' roll.
 The black vinyl-coated wire looks good. It's not tight yet. That part will come later. For now, it is just attached enough so as to not sag onto the garden.
 It is temporarily affixed to the side PVC pipes with some overlap. And the final steps will be to thread 100s of feet of galvanized wire sewing the edges of the rolls of chicken wire together tightly. Otherwise the Evil Squirrels would wiggle in between.
 The chicken wire rolls hang a foot or so long to spread out on the ground. That will prevent groundhogs and rabbits from going up the the chicken wire wall and digging in underneath. If they manage that, I will just put down heavier mesh wire at ground level.
 But I don't think that will be necessary. When critters decide on a place to dig at an edge, it seldom occurs to them to back off 2 feet and try again.
After I have all the tops of the enclosure covered and tightened (and I have the frame supported in all directions by unstretchable nylon ropes until the wire is all installed - at which point the wire attached to the pipes will strngthen the structure sufficiently).
The next part will be to construct the door. I think I have arranged that rather well. I've built a 2x4" frame around the door that fits the hinge side and the door lock side and the top. I will set 4x4" posts around where the door will attach. And because the 2x4" door frame allows several inches of attachment "wiggle room", it should fit perfectly.
Not to say attaching the screen door will be simple. Its heavy with the 2x4" boards surrounding it, and there will be some shimming required to make the door frame fit to the 4x4" posts so the door is level and swings easily not hitting the ground. But I have some ideas on that too.
So many of the ideas for this project have come to me as I was trying to fall asleep. I should try sleeping more often, LOL!
Next time: The door installation...
Up the side, across the top, and down the other side is about 45'. Some there is some left over from the 50' roll.
After I have all the tops of the enclosure covered and tightened (and I have the frame supported in all directions by unstretchable nylon ropes until the wire is all installed - at which point the wire attached to the pipes will strngthen the structure sufficiently).
The next part will be to construct the door. I think I have arranged that rather well. I've built a 2x4" frame around the door that fits the hinge side and the door lock side and the top. I will set 4x4" posts around where the door will attach. And because the 2x4" door frame allows several inches of attachment "wiggle room", it should fit perfectly.
Not to say attaching the screen door will be simple. Its heavy with the 2x4" boards surrounding it, and there will be some shimming required to make the door frame fit to the 4x4" posts so the door is level and swings easily not hitting the ground. But I have some ideas on that too.
So many of the ideas for this project have come to me as I was trying to fall asleep. I should try sleeping more often, LOL!
Next time: The door installation...
Sunday, April 19, 2015
The Garden Enclosure
It progresses. I discovered some real problems as I went recently. I want the top of the enclosure to be level. But the ground slopes front to back and right to left. That makes digging the holes for the frame real tricky.
I tried to measure the slope of the ground first. That got me a general idea that is dropped 1.5' in both directions, but it wasn't very exact. I suppose I could have lived with that, but my Dad was always one to point out minor flaws in anything I ever built (no matter how well built), so I have a reaction to that even though he is gone now. Old habits die hard. And there IS a point to seeking perfection in any project, Dad criticisms or not. A few extra days work means years of admiring work well done.
So I wanted to make sure that, even though the ground was sloped, the top of the frame should be level. If I had surveyor's equipment, that would have been easy. But I don't. So I thought about it a few days. With some complicated ways that seemed really awkward in reality.
As I was trying to get to sleep the previous night (and I did the construction yesterday, so that was 2 nights ago), I kept turning the problem over in my mind. It finally struck me... A water level! I would build the enclosure from the top down!!!
For those of you not familiar with the idea, water in a bucket with a long tube attached will stay at the same level as the bucket even when you move the tube around. It's not a new invention, but it was a new thought to me. I found a nice (free I hope) picture to describe it...

Well, saved me the effort of drawing and scanning it myself. And I wasn't cutting off the tops of the PVC pipes, I just dug my holes a bit deeper to make them match at the top. I marked each PVC pipe 8" down from the top and made the water level match it THERE. So the tops of all my PVC frame uprights are level.
The garden enclosure is 20' by 20' with the raised framed beds I built, that gives me 2' between each bed and 2' around the outside of them (inside the enclosure). I hope that makes sense. When I post this in a few weeks as an instructional post, I'll add diagrams.
But the point is that it finally solved my difficulties with the sloped ground. Some pictures of the general steps...
The holes dug. The digging was horrible. The basic soil in the back yard is gravel, clay, and more gravel. A post hole digger wasn't sufficient. I had to use a breaker bar. That's a 5' solid iron rod about 1.5" in diameter, with a chisel point at the bottom. It weighes 12-15 pounds. You lift it, you pound it down, you swivel it about. Its the "breaker bar 2-step dance". LOL! THEN you use the post hole digger to scoop the loosen debris out. It's great (but unwanted) exercise. Good for causing hand blisters too.
This is the lowest end of the yard. The higher end holes got to 2.5' deep
 Here are the PVC pipes sitting in the holes at one end. They may not look all in a row, but they are.
 As each one was individually set at the proper depth so that the top was level, I shoveled dirt back in and stomped it down hard. There is still some "wiggle" room to allow for attaching more pipes at the tops.
 Here is a corner, showing the connections. It's not easy, being just me to be at both ends of the pipes, but I set up ladders to hold one end of each pipe while I set the other end in tightly. I'm used to having to construct "helper" supports on projects. A 6" spring clamp atached to a ladder makes a nice "V" shape to hold the far end of a pipe temporarily...
 I initially thought it would be easiest to start at one corner and work my way around the perimeter, but it wasn't. Doing all the north/south first was easier for supporting the pipes! BTW, see the spring clamp attached to the ladder there? It was a very good "third hand".
 And a secret. The PVC pipe is too flexible for a good solid structure. Metal is better. But I couldn't find the kind of connectors I needed that fit the metal conduit pipe (unlike a site I found about building such a structure said I could). So to get the rigidity of metal conduit pipe AND the connections that fit PVC Pipe, I put metal conduit pipe into each PVC pipe!
 THAT solution took a few days thought last Winter... And metal conduit pipe is inexpensive, so that was not a concern.
I have most of the uprights and half the crossbeams in place. Took two days but it will be worth it.
Why am I doing this? Well, the squirrels and groundhogs developed a taste for my garden seedlings a few years ago and basically ruined my garden 3 years in a row. When I cover this frame with chicken wire, they won't be able to get in. And I will place bent chicken wire at the bottom to stick out 2' to prevent any tunneling. Bwa-Ha-Ha!
I will have a garden yet...
I tried to measure the slope of the ground first. That got me a general idea that is dropped 1.5' in both directions, but it wasn't very exact. I suppose I could have lived with that, but my Dad was always one to point out minor flaws in anything I ever built (no matter how well built), so I have a reaction to that even though he is gone now. Old habits die hard. And there IS a point to seeking perfection in any project, Dad criticisms or not. A few extra days work means years of admiring work well done.
So I wanted to make sure that, even though the ground was sloped, the top of the frame should be level. If I had surveyor's equipment, that would have been easy. But I don't. So I thought about it a few days. With some complicated ways that seemed really awkward in reality.
As I was trying to get to sleep the previous night (and I did the construction yesterday, so that was 2 nights ago), I kept turning the problem over in my mind. It finally struck me... A water level! I would build the enclosure from the top down!!!
For those of you not familiar with the idea, water in a bucket with a long tube attached will stay at the same level as the bucket even when you move the tube around. It's not a new invention, but it was a new thought to me. I found a nice (free I hope) picture to describe it...
Well, saved me the effort of drawing and scanning it myself. And I wasn't cutting off the tops of the PVC pipes, I just dug my holes a bit deeper to make them match at the top. I marked each PVC pipe 8" down from the top and made the water level match it THERE. So the tops of all my PVC frame uprights are level.
The garden enclosure is 20' by 20' with the raised framed beds I built, that gives me 2' between each bed and 2' around the outside of them (inside the enclosure). I hope that makes sense. When I post this in a few weeks as an instructional post, I'll add diagrams.
But the point is that it finally solved my difficulties with the sloped ground. Some pictures of the general steps...
The holes dug. The digging was horrible. The basic soil in the back yard is gravel, clay, and more gravel. A post hole digger wasn't sufficient. I had to use a breaker bar. That's a 5' solid iron rod about 1.5" in diameter, with a chisel point at the bottom. It weighes 12-15 pounds. You lift it, you pound it down, you swivel it about. Its the "breaker bar 2-step dance". LOL! THEN you use the post hole digger to scoop the loosen debris out. It's great (but unwanted) exercise. Good for causing hand blisters too.
This is the lowest end of the yard. The higher end holes got to 2.5' deep
I have most of the uprights and half the crossbeams in place. Took two days but it will be worth it.
Why am I doing this? Well, the squirrels and groundhogs developed a taste for my garden seedlings a few years ago and basically ruined my garden 3 years in a row. When I cover this frame with chicken wire, they won't be able to get in. And I will place bent chicken wire at the bottom to stick out 2' to prevent any tunneling. Bwa-Ha-Ha!
I will have a garden yet...
Thursday, April 16, 2015
Garden Enclosure
Is starting to get built, FINALLY! I have to dig 9 holes 2' deep. And there's a reason I don't just grow my garden on the soil. Its AWFUL!!!
I could have sold the soil to a gravel company. Its rocks and clay a foot deep and after that its sand. The sand is OK to dig through; the rocks and clay is the hard part. It takes a breaker bar.
I can't even find a picture of what I have to show. But imagine a 5' iron bar about 1.5" around with a chisel point. You lift it and pound it down into the hole and you loosen the rocks and soil. Then you use a post-hole-digger to grab the loosened soil and pull it out.
≈

The breaker bar weighes about 20 pounds. And you have to pound it down about 30 times per hole. Good exercise... But it DOES loosen rocks and hard soil.
I dug 6 of the required 9 holes today. I stopped when I sensed a blister coming... But tomorrow needs only 3 more holes.
The holes are to support PVC pipes that will form a grid to support 1" chicken wire to keep out the varmints. A lot of work, yeah. But when the squirrels and groundhogs are unstoppable otherwise and you want a garden, you do what you have to do.
And I'll certainly show the garden enclosure pictures as it is built!
But the main thing is that I did the really hard holes today. I think the best way to do any project is to do the hardest part first. It only gets easier after that. Besides, if the hard part is TOO hard and you have to give up, then you haven't wasted time on the easier parts that will be of no use.
The garden enclosure is surrounding 6 raised framed beds filled with 1/2 topsoil and 1/2 leaf compost. It's going to be a great new garden, replacing the poorer ones I built 25 years ago which finally rotted out.
The new ones are larger and deeper. And level!
 The enclosure will be 20' by 20' by 8' high. I still have to figure out how to attach a walk-in screen door..
I could have sold the soil to a gravel company. Its rocks and clay a foot deep and after that its sand. The sand is OK to dig through; the rocks and clay is the hard part. It takes a breaker bar.
I can't even find a picture of what I have to show. But imagine a 5' iron bar about 1.5" around with a chisel point. You lift it and pound it down into the hole and you loosen the rocks and soil. Then you use a post-hole-digger to grab the loosened soil and pull it out.
≈
The breaker bar weighes about 20 pounds. And you have to pound it down about 30 times per hole. Good exercise... But it DOES loosen rocks and hard soil.
I dug 6 of the required 9 holes today. I stopped when I sensed a blister coming... But tomorrow needs only 3 more holes.
The holes are to support PVC pipes that will form a grid to support 1" chicken wire to keep out the varmints. A lot of work, yeah. But when the squirrels and groundhogs are unstoppable otherwise and you want a garden, you do what you have to do.
And I'll certainly show the garden enclosure pictures as it is built!
But the main thing is that I did the really hard holes today. I think the best way to do any project is to do the hardest part first. It only gets easier after that. Besides, if the hard part is TOO hard and you have to give up, then you haven't wasted time on the easier parts that will be of no use.
The garden enclosure is surrounding 6 raised framed beds filled with 1/2 topsoil and 1/2 leaf compost. It's going to be a great new garden, replacing the poorer ones I built 25 years ago which finally rotted out.
The new ones are larger and deeper. And level!
Saturday, April 11, 2015
The New Garden Beds
Pictures at the end...
They are finally all built and filled! I started last Fall to tear out the old 25 year old ones (and which were not my best work (being unlevel and too shallow). I bought wood to construct more and larger and taller ones. I got 5 of 6 finished before the ground froze and it was too cold to work outside.
So the first thing was to build the 6th bed, then move all the remaining good soil from the old ones. That took some time. The ground stayed frozen well after the air warmed up in March. Then I had to wait for the yard to dry enough to bring in more topsoil and compost.
I waited because there were 2 ways to do that. First (because the lawn was soft from thawing) was I could get the soil and compost from a landscape supply place in the hauling trailer, park it in the front yard at the street, bring the lawn mower with the yard trailer (3x4 feet) to the hauling trailer, shovel it full from the hauling trailer, drive it around back to the garden, and unshovel it into the beds. I've done that before and its a lot of shoveling!
Second, I could wait for the lawn to dry enough to drive the hauling trailer straight back to the garden and unshovel the load once (and right next to it). That's an iffy trick of getting between Spring rains and not wanting to wait too long to get it done.
Now, the new beds had some decent soil from the old beds, and I wanted to mix compost (a lovely black and crumbly local leaf compost called "Leaf-Gro") into the existing soil. I did that 2 weeks ago. That got most of the beds half-filled. But the last bed had little good soil and the rest had settled about 4" down.
I went back to the landscaping supply yard expecting to have to get more topsoil on one trip and then more compost on a second. But Wonder of Wonders, they had something NEW. A thoroughly mixed 50-50 blend on the Leaf-Gro and topsoil.
I examined each of the 3 carefully, crumbling handfuls, smelling it, and looking at the color. Their pure topsoil is very good stuff, the Leaf-Gro is very good stuff, and the 50-50 mix seemed to really be 50-50. To explain how I knew, I found clods in the 50-50 mix and crushed them. Half were topsoil and half were Leaf-Gro. And the color of the really sifted parts (99% of the mix) was right between them in color.
Sure beats mixing the individual parts together with a spading fork one forkful at a time over 160 square feet of beds!
I got two front-loader buckets of the mix (about 2 cubic yards or a bit over 1.5 cubic meters) according to the landscape place. I think they underestimate the front-loader; I think I got 2 cubic meters (from measuring the volume in the trailer.
But having the trailer right at the garden SURE made things easier. Sure, shoveling is tedious. But straight off the back of the trailer into a wheelbarrow once and dumping it only 10' away into the beds was shoveling it once rather than twice. And I had EXACTLY enough to fill ALL the beds to the top (the soil will settle a bit).
Pictures...
Half-done last Fall. There is JUST enough space between the beds for my wheelbarrow.
 More done last Fall. BTW, you can see how I attached the lower and upper frames. The dark wood on the inside is a 1"x6" pressure-treated board that attaches the 2 together. There is one on each long side of each bed.
 All built by this Spring.
 The tarp-covered trailer of 50-50 topsoil and compost mix. Oops, didn't get a picture with the tarp off... But you can see it was nearly filled. 5'x8' trailer filled 1.5 feet high = 60 cubic feet = 2+ cubic yards).
 Filled all the beds to top (it will settle a bit). The beds are 4' wide, 3' and 4'. With 2' between them and allowing 2' on the outsides, it is a perfect 20' square for the framed chicken wire and pipe enclosure!
 Did all the emptying/shoveling in 2 hours! And had to slather muscle-rub on my hands when I went to make dinner later when the muscle cramps started. OUCH! Its been a long un-excerising Winter... But I recover fast. Oh, and just how did I scrape the trailer so clean, you ask? Two words. Snow Shovel!
 And I have 2 trash barrels full of leftover pure Leaf-Gro compost to use on the flowerbeds!
 Now I just have to build the PVC pipe and chicken wire enclosure to protect the magnificent new garden from the Evil Squirrels, Evil Rabbits, and Evil Goundhogs.
Well, what is life without the next project? LOL! And I have plenty of them on my list...
They are finally all built and filled! I started last Fall to tear out the old 25 year old ones (and which were not my best work (being unlevel and too shallow). I bought wood to construct more and larger and taller ones. I got 5 of 6 finished before the ground froze and it was too cold to work outside.
So the first thing was to build the 6th bed, then move all the remaining good soil from the old ones. That took some time. The ground stayed frozen well after the air warmed up in March. Then I had to wait for the yard to dry enough to bring in more topsoil and compost.
I waited because there were 2 ways to do that. First (because the lawn was soft from thawing) was I could get the soil and compost from a landscape supply place in the hauling trailer, park it in the front yard at the street, bring the lawn mower with the yard trailer (3x4 feet) to the hauling trailer, shovel it full from the hauling trailer, drive it around back to the garden, and unshovel it into the beds. I've done that before and its a lot of shoveling!
Second, I could wait for the lawn to dry enough to drive the hauling trailer straight back to the garden and unshovel the load once (and right next to it). That's an iffy trick of getting between Spring rains and not wanting to wait too long to get it done.
Now, the new beds had some decent soil from the old beds, and I wanted to mix compost (a lovely black and crumbly local leaf compost called "Leaf-Gro") into the existing soil. I did that 2 weeks ago. That got most of the beds half-filled. But the last bed had little good soil and the rest had settled about 4" down.
I went back to the landscaping supply yard expecting to have to get more topsoil on one trip and then more compost on a second. But Wonder of Wonders, they had something NEW. A thoroughly mixed 50-50 blend on the Leaf-Gro and topsoil.
I examined each of the 3 carefully, crumbling handfuls, smelling it, and looking at the color. Their pure topsoil is very good stuff, the Leaf-Gro is very good stuff, and the 50-50 mix seemed to really be 50-50. To explain how I knew, I found clods in the 50-50 mix and crushed them. Half were topsoil and half were Leaf-Gro. And the color of the really sifted parts (99% of the mix) was right between them in color.
Sure beats mixing the individual parts together with a spading fork one forkful at a time over 160 square feet of beds!
I got two front-loader buckets of the mix (about 2 cubic yards or a bit over 1.5 cubic meters) according to the landscape place. I think they underestimate the front-loader; I think I got 2 cubic meters (from measuring the volume in the trailer.
But having the trailer right at the garden SURE made things easier. Sure, shoveling is tedious. But straight off the back of the trailer into a wheelbarrow once and dumping it only 10' away into the beds was shoveling it once rather than twice. And I had EXACTLY enough to fill ALL the beds to the top (the soil will settle a bit).
Pictures...
Half-done last Fall. There is JUST enough space between the beds for my wheelbarrow.
Well, what is life without the next project? LOL! And I have plenty of them on my list...
Monday, November 24, 2014
A Little Computer And Some Garden Problems
COMPUTER: Well, first, I KNEW everything wouldn't be perfect on the new old laptop. The thrill of connectivity deceived me. Oh, it's not terrible news, but the "M" key came loose right away, and my feedly.com reader list keeps disappearing from the sidebar. It sticks on the desktop but not the laptop. I'm sure I'll find out how to stick it permanently, but haven't so far.
And there are other annoying problems. I'm sure most can be fixed, but some may just be part of using a laptop. I was expecting that since I was only using the laptop for reading blogs (at the moment), what did I care about security? There's nothing ON the laptop. But then I started getting unending, nearly constant ads. It was like "Whack-A-Mole"! Close one, another pops up. I went 15 minutes doing nothing but closing ads at one point, and even closing some of them seems to have generated some email responses to the ads even though I don't have any email set up tat I know about. Probably some basic gmail embedded in the computer.
I went into the system preferences and made some adjustments which reduced the ads but haven't eliminated them. I was hoping not to have to buy MacKeeper for the laptop (it can prevent pop-up ads among other things. I may find free software that does that. Apparently, I'm going to have to compare files on my desktop to the laptop, see what I can copy over, and maybe buy some simple versions of other software.
If anyone has Mac desktop and laptop equipment and some of those things sound familiar, please drop me an email with any useful advise, please! Reattaching the "M" key is actually a priority, but the other long term stuff is more vital.
GARDEN: We had an unusual 70+ day today, so I set about constructing the 5th of 6 framed beds. I thought it would go fast, but NOOOOO....
I mostly have to laugh at all the surprises a project can offer. Well, it doesn't help to complain. Not that I don't both laugh AND swear sometimes.
I got out in the garden at 1:30. First, I had to carry the precut boards (by me, not the Home Depot guy after the first bad experience). I carried one out to the garden, then decided to try using the dolly to carry 2 at a time. Didn't work, they were too tall and awkward. So I carried them all out one at a time. 2"x8"x7' preservative-treated boards are heavy, but on my shoulder one-at-a-time worked. That part was fairly expected.
So the 5th frame was to go 2' from the last and since there had been old beds there before (full of good soil), I only shoveled soil enough to lay down the new boards (different sizes from the old and 90 degrees in rotation).
Dragged out all the usual tools from the shed, connected the 150' of electrical cord, set up the radio on Classical, and started to dig some trenches where the new frame would set level. There are invading vines from a neighbor, and I have been digging them out as I go. Dig, pull, toss, dig, pull, toss... Only one looked odd out of the corner of my eye, so I looked at it. A poison ivy plant! Sure, why not? I haven't seen a poison ivy plant in the garden for several years and I was holding it in my bare hands. Might as well find one now.
So I dropped it in a remote corner where it could die peacefully and went into the house at once to wash my hand. Holding the hand up so that I wouldn't touch anything in the house with it, I got safely to the bathroom and washed with soap for 5 minutes (hurray for pump soap). Then I washed again with rubbing alcohol. If I'm not complaining of poison ivy in 5 days, you'll know it worked.
So I was back out at the garden and set out the corners for the 5th bed. Which meant clamping a long straight board to the end on the previous bed so that they all stay even with each other. Naturally, I had brought the small clamps back to the house for a different project, so back to the house I went. That 150' of walking back and forth adds up! So I clamped the "straight-edge board" and set some corner bricks to support the lower lever of the frame. Yes, I've developed a routine after the first 4 beds. Experience accumulates.
The distance to the far end of the 5th bed was farther than I eyeballed it, so I had to rip out more of the old frame boards and dig off more old garden soil into the existing beds than I had expected. More time gone. And then I hit a 3" tree root from my neighbor's junk trees. And I mean "junk". He just let whatever grew, grow. None of them are good trees, just invasive ones that grow thickly and unhealthfully. Someday, I may ask him if we can just cut them down and plant nicer smaller ones like dogwoods and crabapples or whatever he likes.
But it meant I had to find my ax to cut the invasive root, which was back in the house, of course (for a perfectly good reason). Then I remembered that the ax was a bit dull, so I had to sharpen it. And the bench grinder on a stand was behind a bunch of stuff moved when the insulation guys worked in the basement, and by the time I got access to it and sharpened the ax to "OK" that was another quarter hour gone. And of course, the root was loose in the ground so chopping it with the ax took some time.
An hour and a half and I still hadn't gotten the first board in place for the 5th bed... I used some bad words.
But I was finally able to start with the frame. Previous frames, I leveled first and constructed later. I tried constructing first this time. If you place bricks angled at all the corners, you can get all the board corners to match. That worked pretty well. I got the lower layer of the frame attached in only 30 minutes. That sounds long, but I am obsessed with getting all the corners matching as perfectly as possible. These beds should last 20 years and I'll be looking at them a lot, so why not go for the best appearance?
To construct each layer of the framed bed, I set the long boards on a brick at the corners. The brick also holds the short end boards at the same level. After that, I can use long clamps to loosely hold the 4 boards together. After that, I tap the boards until the square ends match up. Sometimes the boards are not exactly the same width, so I wedge one up to match the next. I used little twigs on the first few beds but realized the axe blade was very good for that.
I have 2 drills for the project. One is a standard electric drill for drilling pilot holes for the long screws that go though both boards at the corner. The second drill is a cordless drill with a screw setting (has a slower speed and a torque control to not overdrive the screws in). But most importantly, it means I don't have to keep changing the drill bit for the screwdriver bit. And I'm using lubricated star-drive screws designed for preservative-treated boards. Those resist the P-T board chemicals AND go in easier. They are worth the very slight extra cost.
I got the lowever level of the framed bed finished and saw bad news. The sun was on the horizon! It was only 4:15! But my horizon is not flat horizon. The land slopes up radically on my west side. But I had all the tools out, the 2nd level of boards ready, and I wanted to finish the 2nd level today. It supposed to rain tomorrow and get colder.
And wouldn't you know it, my box of screws was empty. Back to the house... I thought, and correctly, that I had another box of them "somewhere". Took only 15 minutes to find them. Yes, they were in an obvious place, but not obvious to ME today... LOL!
So back outside in the fading light. Fortunately, the 2nd level of boards is WAY easier than the first. And I found a few quick tips to make that easier. I had used a square piece of 4"x4" to establish square corners on the first couple of 4' wide framed beds. I found that using 4" bar clamps on the 3' wide 3rd and 4th beds was easier. I tightened them loosely, tapped all the corners flush, then tightened the claps more and drilled the holes. Worked great.
Except the 5th and 6th beds (like the 1st and 2nd beds) are actually 4'3" wide and the 4" clamps are JUST too short. Well, guess what, you can hook 2 clamps together! So I attached a 4' clamp and a 12" clamp across the beds at both ends and locked all the corners tight after making them flush in all directions*.
After that, and with the sun over the local elevated horizon, I got the last of the screws in! The framed bed isn't complete. The 2 levels are not attached to each other. I uses a 1"x6"x6' P-T board for THAT. I attach it on the inside of the long boards. Half the width above the seam between the frame boards and screw it on. Then attaching screws in that 1" board below, draws the 2 levels together beautifully!
Tomorrow isn't going to be as nice as today. 50 degrees vs 75. But 50 is OK I might get the last LAST, LAST LAST framed built finished tomorrow. If it doesn't rain...
So close to the end, and chasing the decent weather to the finish, LOL!
But you know, if there weren't surprises all the time in a project, it probably wouldn't be worth writing about it. Seriously, how exciting would it be to just write "I built 6 framed beds this year"?
* I still had to tap boards around in all the corners until the matched up evenly horizontally AND vertically. THEN I tightened the clamps hard and drilled pilot holes for the screws.
Pictures in a few days when I finish...
Friday, October 31, 2014
Garden Enclosure Again
Got back to work on the framed beds. Bought twelve 2"x8"x8' pressure-treated boards yesterday morning and cut up half of them in the afternoon. Half because I bought boards for 2 beds and decided to do them one at a time.
First, I discovered why the first set of boards I bought a few weeks ago for the first 2 beds were hard to get squared in construction. I had the store staff cut them on their huge fancy saw. Silly me! I assumed the boards were the lengths the labels said (like 8' long). The length didnt matter for the long sides of the beds, but it did for the widths because I simply said "ct them in half".
"Half" isn't a measurement...
Only after constructing the first 2 beds did I realize that all the boards were not equal. Not exactly a functional disaster for a garden bed, but it vaguely offended me. I should have been forewarned by the very surly male store person who was talking to the female cashiers when I made him do some work.
So this time I simply took all the boards home to cut myself. It was a revelation! The boards varied in length from barely 8' to 8' 1"!!! End the ends were NOT square by as much as 1/4" over the widt. No WONDER I had had so much trouble getting the first set to match up square!
I have a radial saw to cut long boards to length easily. I have a good table saw too, but you can't slide an 8' board on it. Radial saws work best for that. So first, I measured a board and found it was long and not square at the end.

I have it next to an 8' workbench at the same level height, so I can handle 10' long boards. The radial saw is great for long boards because the saw moves, not the long boards. I bought it when I built the fence because I had to cut about 1500 long boards (yes 1500) for that project. It paid for itself just for that and I've probably cut almost as many more since then.
But back to the odd lengths and unsquareness of the boards... I first shaved 1/4" off one end of each, then stacked them to the side. When all were done, I clamped down a board at 8' from the saw blade (as a positive "stop"" and cut them to exact length. Perfect length and all square ends!
Two of the 8' boards were WAY heavier than the others (I could barely lift them), so I kept them aside to cut into the smaller widths for the bed ends of 3'. Like the longer boards, I shaved off the ends to get them squared.
Nothing ever works out as planned. I set up another positive stop (meaning a clamped board away from the saw blade an exact repeatable distance). And clamped the board against the saw fence so that there could be NO errors.
There was an error on the very first one. I screamed in frustration!!! How could it have been wrong? Oops, the edges of preservative treated lumber are not "perfectly" straight along the long edges. I had chosen the straightest ones I could find, but flat straight ones vary along their length. So, as I kept adjusting the clamping to get them as straight as possible, the board slipped away 1/4 inch from the positive stop...
You can't win sometimes! So this bed isn't 8' long; it is 7' 11 and 3/4" long. *sigh* It why I don't try to build furniture. I'm cursed with minor errors. OK, in the garden framed beds, it doesn't really matter much. But it still ticks me off!
So, this early afternoon, I went out to construct the 3rd bed. I have the digging routine down pat. The yard is sloped, so I have to dig a trench for each bed to make it level. I set the lower end of the long boards on a brick and raise it until it is level. Then I dig down the upper end by that much. It works. Then I level the end board and clamp the long boards to it.
Making the end board fit even with the long boards, I drive in three 3" screws on each side, then raise the other narrow end up onto a board to keep them even. Drive three 3" screws into each side there. Then remove the support boards and settle the completed frame into the shallow trench.
If it isn't level, I lift the frame and push dirt under it until it is level. Not usually required, but I did have to once. Then I make sure the frame is really square. You do that by measuring both opposite corners. When I tap them a bit so the opposite dimensions are the same, I know it is really square.
It started to rain slightly after I got the first layer of frame for the 3rd frame in place this afternoon, so I had to stop and put all the tools away. But at least that was done. Putting the 2nd layer of boards on the top of the 1st level is always easy. You just match the tops to the bottoms.

I cut a scrap board into two 2' pieces to space the beds apart for walkable/wheelbarrowable paths. The upper left is the bottom of newer box...
But the rain stopped. I didn't want to haul all the tools out of the shed in case the rain started again, but I did have time to haul all the boards for the 4th bed out of the trailer and into the garage. At least I know how to do the cutting better than the first time, LOL!
That will be tomorrow's start.
First, I discovered why the first set of boards I bought a few weeks ago for the first 2 beds were hard to get squared in construction. I had the store staff cut them on their huge fancy saw. Silly me! I assumed the boards were the lengths the labels said (like 8' long). The length didnt matter for the long sides of the beds, but it did for the widths because I simply said "ct them in half".
"Half" isn't a measurement...
Only after constructing the first 2 beds did I realize that all the boards were not equal. Not exactly a functional disaster for a garden bed, but it vaguely offended me. I should have been forewarned by the very surly male store person who was talking to the female cashiers when I made him do some work.
So this time I simply took all the boards home to cut myself. It was a revelation! The boards varied in length from barely 8' to 8' 1"!!! End the ends were NOT square by as much as 1/4" over the widt. No WONDER I had had so much trouble getting the first set to match up square!
I have a radial saw to cut long boards to length easily. I have a good table saw too, but you can't slide an 8' board on it. Radial saws work best for that. So first, I measured a board and found it was long and not square at the end.
I have it next to an 8' workbench at the same level height, so I can handle 10' long boards. The radial saw is great for long boards because the saw moves, not the long boards. I bought it when I built the fence because I had to cut about 1500 long boards (yes 1500) for that project. It paid for itself just for that and I've probably cut almost as many more since then.
But back to the odd lengths and unsquareness of the boards... I first shaved 1/4" off one end of each, then stacked them to the side. When all were done, I clamped down a board at 8' from the saw blade (as a positive "stop"" and cut them to exact length. Perfect length and all square ends!
Two of the 8' boards were WAY heavier than the others (I could barely lift them), so I kept them aside to cut into the smaller widths for the bed ends of 3'. Like the longer boards, I shaved off the ends to get them squared.
Nothing ever works out as planned. I set up another positive stop (meaning a clamped board away from the saw blade an exact repeatable distance). And clamped the board against the saw fence so that there could be NO errors.
There was an error on the very first one. I screamed in frustration!!! How could it have been wrong? Oops, the edges of preservative treated lumber are not "perfectly" straight along the long edges. I had chosen the straightest ones I could find, but flat straight ones vary along their length. So, as I kept adjusting the clamping to get them as straight as possible, the board slipped away 1/4 inch from the positive stop...
You can't win sometimes! So this bed isn't 8' long; it is 7' 11 and 3/4" long. *sigh* It why I don't try to build furniture. I'm cursed with minor errors. OK, in the garden framed beds, it doesn't really matter much. But it still ticks me off!
So, this early afternoon, I went out to construct the 3rd bed. I have the digging routine down pat. The yard is sloped, so I have to dig a trench for each bed to make it level. I set the lower end of the long boards on a brick and raise it until it is level. Then I dig down the upper end by that much. It works. Then I level the end board and clamp the long boards to it.
Making the end board fit even with the long boards, I drive in three 3" screws on each side, then raise the other narrow end up onto a board to keep them even. Drive three 3" screws into each side there. Then remove the support boards and settle the completed frame into the shallow trench.
If it isn't level, I lift the frame and push dirt under it until it is level. Not usually required, but I did have to once. Then I make sure the frame is really square. You do that by measuring both opposite corners. When I tap them a bit so the opposite dimensions are the same, I know it is really square.
It started to rain slightly after I got the first layer of frame for the 3rd frame in place this afternoon, so I had to stop and put all the tools away. But at least that was done. Putting the 2nd layer of boards on the top of the 1st level is always easy. You just match the tops to the bottoms.
I cut a scrap board into two 2' pieces to space the beds apart for walkable/wheelbarrowable paths. The upper left is the bottom of newer box...
But the rain stopped. I didn't want to haul all the tools out of the shed in case the rain started again, but I did have time to haul all the boards for the 4th bed out of the trailer and into the garage. At least I know how to do the cutting better than the first time, LOL!
That will be tomorrow's start.
Tuesday, October 28, 2014
Garden Enclosure
Back On Track! Sometimes, when I get most frustrated about a project, I back off and think. There is almost always a solution to any simple problem. I found a solution to the problem I most recently posted about on the subject.
The problems were having to build framed beds on unlevel ground, keeping 2 layers of boards even and connected, and making the paths wide enough to get around all the beds in an enclosed area.
Sometimes the solutions are pathetically obvious in hindsight, sometimes the solutions are less obvious.
The biggest problem with my original design is that I did not take the thickness of the boards. 2x8 boards are 1.5" thick. Not much, but after 3 beds with boards on both sides, that adds up. Each framed bed takes 3" and 3 beds is almost a foot.
So instead of all the framed beds being 4' wide, the center one is 3'. That gives me 2' paths and 3" to mess up in.
Then I realized that having 7' long beds meant that the center pole support would be in the middle of a path. ARGH! So, the center beds will be 8' and 6' instead of 7' and 7'. The ceter support pole will be exactly on the side of the 8' framed bed.
The last problem is that the yard is unlevel. I don't want to make the beds be unlevel, s I need to adjust the board frames so they ARE level. But at one end, that puts the frame above ground. I decided to slip a 1" board at the lower end on the first beds. That's a bad fix. The RIGHT way to do it is to bury a 2"x4" board at the lower level til it "just reaches ground level and set the new frames on top of that. If that isn't clear, don't worry it works. I had done that on another project 20 years ago and forgotten. I "reinvented the wheel" so to speak. Anyway, it will work.
So I am back on the project.
Tomorrow, I go to Home Depot and buy twelve 2"x8"x8' pressure-treated boards. I had planned to do that today, but I ended up raking fallen trees debris off my roof. and them sweeping the debris off the deck.
But I know how to complete my garden enclosure project now, and that's the main thing.
Wednesday, October 22, 2014
Garden Enclosure, Again
Some projects just go WRONG. And you don't realize until you are about half done. I thought the major work would be to build the enclosure and tearing apart the old rotting frame beds would be easy.
I'm an idiot! PPPPPPPTTTTT..............
I wish it was April again and I was just starting this. I would do it SO differently! But I wanted to save all the good soil by moving it from the old beds to the new beds as I built them. Seemed logical at the time, but Bad Decision. Happens a lot.
I had a friend who decided to almost double the size of his house by having half of it demolished and then added to. It went horribly! He could have had the whole house demolished and rebuilt so much easier and at about the same cost faster. Ruined a year of his life and cost me our friendship (I mentioned the renovator who built my toolshed and did some additions elsewhere).
Don't EVER make major recommendations to friends... He blamed me for the disaster and I wasn't sympathetic enough but that's another story (which I will tell someday soon).
But back to the garden. I SHOULD have just busted out all the old framed beds from end to end last April, disposed of all the old wood, and spread the soil and used my rototiller to level the whole *#%@ area. I didn't and I regret it now.
Part of the problem is that my lot slopes from back to front and from the center to the sides. Nothing is level here. It isn't obvious by just looking, but even an 8' long bed is 4" higher at one end than the other.
I have 2 of the 6 beds built. It was hard work. I had the original beds because the soil in the last sunny areas is all rock and clay. I should have remembered that when I planned to replace them.
If I was starting the project again today, I would just take out all the existing rotting boards at the same time and roto-till the entire area to level it all at once. Why not do that now?...
Because of a silly piece of twine. It outlines the whole new enclosure area. Silly, but I didn't want to undo the careful twine outline of the new bed. I can be very talented and very stupid at the same time. No laws prevent it..
But clearly, the way to go is to disassemble the 2 beds I built already (which in spite of my digging are unlevel and unsquare. Save the wood. Rototill the entire area and rake it flat as a pancake, THEN easily build the new framed beds on the leveled ground and add new soil.
And THEN build the squirrel and groundhog proof chicken wire enclosure.
My tomatoes MAY only cost me $10 each for several years...
I'm doing this because it is basically my "Last Hurrah" of gardening. In a few years (I'm 64) I won't be able to take on this kind of project. The new garden beds will basically last me my future years until I can't garden any more. So it is to rebuild them now or never.
And I will do it myself, or there is no point to it.
Tuesday, September 23, 2014
Garden Enclosure Restart
Well, I decided I had to make some greater allowance for moving around the beds. I kind of forgot there would be a wall of chicken wire all around the edge... So the paths around the outside edges will be 2' wide and the inner ones more like 20". That's enough to get around.
So... I took the first big step and went to the Home Depot to buy twelve 2"x8"x8' boards. A few years ago, they wouldn't cut pressure-treated boards, but now they do. So I selected 12 decent boards (had to look at 20 boards to find 12 straight ones) and had them cut 8 of them 7' long and 4 of them in half.
That gives me enough boards to make two 7'x4' beds two 8' boards high.
Here's the plan... I have enough space cleared of the old rotting beds to build the 2 new beds. I can then move the soil from the existing old beds to fill the new 2. Then I can knock apart 2 more old ones and build 2 new ones, etc.
Why not just rebuild all the old beds you ask? Well, the paths between them were too wide (wasting space) and they faced the wrong direction. When you have limited sunlight, that matters. And odd as it may seem, six 7'x4' beds with narrower paths give me more gardening space than the four 8'x3' beds in the same area.
Trust me on this...
So over the next couple days I'll dig a shallow trench to set the new frames in level (a flaw to correct about the old beds which were more unlevel than you would think sitting on what looks like flat ground) and construct them more sturdier (sturdily?) And I will be adding compost to the new beds, which should get them off to a good start next Spring. And the new beds will be higher, so there will be more decent soil for roots to grow.
It's a lot of work, but it will be worth it. especially since I will be able to cover 1 bed each year with black plastic to kill the weeds and nematodes and such. Sometimes half the battle to grow good crops is to manage the soil. Healthy soil means healthy crops.
I'll take pictures as I go.
Saturday, September 20, 2014
Garden Enclosure
I'm back at the 20'x20' garden enclosure project. And while my initial goal was to maximize the framed bed area and minimize lumber purchases, I've concluded that I need to make some changes.
First, the framed beds were planned to be three 16'x4' beds. And two 8" wide boards high per bed. Second, my plan was to use only 2 of the 3 planned beds each year and let 1 go fallow (and solarized with a clear plastic cover) each year. But even a 2" thick board will bend out over 16', so that meant annoying stakes for reinforcement.
And, well, a 2"x8"x16' board is really hard to handle. And keeping 1/3 the growing space fallow/solarized each year seems wasteful. So instead of those 3 framed beds, I'm building six beds 4'x7', two 8" boards high . That means I can build all the framed beds using 2"x8"x8' boards, which I can haul home in my 8' trailer and I can actually carry those boards. With 6 beds instead of 3, I can keep 1 bed fallow and solarized each year with less growing-space loss, walk around them easier, and build them easier. I lose 24 square feet growing area (the 2' between the beds), but I gain 28 sq ft not being fallow each year, so its a wash.
I drew some pictures, but I just can't get the scanner function on the printer to work today (again)... The first plan had three 16'x4' beds side by side. The new plan has six 4'x7' beds in a 2x3 grid. I had to draw rectangles in Word On Mac, print it out, take a picture of the printout, and upload the picture. I'm just having a bad month with programs.
But here it is and you BETTER appreciate the effort to show it!!! LOL!
 I spent about 5 hours fighting over several days with the usual programs to draw/scan/display, with no luck. But it only took 2 minutes to draw it in Word, 1 to print it, 1 to take a camera picture of the printed page, and 3 minutes to get it to a small jpeg file. Sometimes indirect ways are easier.
I need to reteach myself a lot of the programs; I don't use them enough. And I suspect I better clean up my Mac. It's running slower and even a Mac can get clutterred.
Anyway, I went out to dig the first of 9 holes to set pipes into to construct the enclosed garden (safe from squirrels, groundhogs, rabbits, etc). After I dug down 4" in the 1st spot, I hit rock. And I don't mean little baseball-sized ones. I dug a 2' hole around that rock and couldn't find the edge. So I tried the next spot where I wanted to set in a pipe. Same problem. I even tried breaking the rock up with repeated blows to it with a 5' beveled "breaker bar". And nothing broke. I caused no damage to the rock at all.
You never know what is under your ground until you start digging into it! In my case, I knew from some experience that my property is a silt plain draining to a swamp. There are pockets of pure sand, some of pure clay, and lots of hand-sized round rocks. I didn't know about the 2'+ rocks...
I think a geologist would conclude my property used to be a river path, with large rocks just under the surface that silted over with sand and clay millenia ago.
I can't dig those up, I can't use an auger to drill through them, I can't ignore them.
Well, wait, I CAN ignore them! The purpose of digging the holes around the garden-to-be is merely to set the upright PVC pipes in place. So what if I build a base of PVC pipes ON the ground instead of INTO the ground?
Instead of burying pipes in the ground, I'll make a frame of pipes on the ground with attachment connections sticking up. And I can attach the ground level PVC pipes to the ground firmly with 2' rebar rods.
Newest problen solved... I assume I will discover other problems before the structure is completed, but nothing that can't be overcome. Well, solving the problems is half the fun.
The initial plan was to assemble the upright pipes and then assemble the beds after. The plan NOW is to assemble the first 2 raised beds to establish one edge of the new layout, fill them with soil, then disassemble the other old framed beds, and clear THAT area for new construction and move the remaining soil from the older beds to the new ones as I move along.
I know this is hard to imagine without pictures. I'll be taking many as the project continues. Promise.
But at least I am getting started on it again and solving the problems I didn't expect.
First, the framed beds were planned to be three 16'x4' beds. And two 8" wide boards high per bed. Second, my plan was to use only 2 of the 3 planned beds each year and let 1 go fallow (and solarized with a clear plastic cover) each year. But even a 2" thick board will bend out over 16', so that meant annoying stakes for reinforcement.
And, well, a 2"x8"x16' board is really hard to handle. And keeping 1/3 the growing space fallow/solarized each year seems wasteful. So instead of those 3 framed beds, I'm building six beds 4'x7', two 8" boards high . That means I can build all the framed beds using 2"x8"x8' boards, which I can haul home in my 8' trailer and I can actually carry those boards. With 6 beds instead of 3, I can keep 1 bed fallow and solarized each year with less growing-space loss, walk around them easier, and build them easier. I lose 24 square feet growing area (the 2' between the beds), but I gain 28 sq ft not being fallow each year, so its a wash.
I drew some pictures, but I just can't get the scanner function on the printer to work today (again)... The first plan had three 16'x4' beds side by side. The new plan has six 4'x7' beds in a 2x3 grid. I had to draw rectangles in Word On Mac, print it out, take a picture of the printout, and upload the picture. I'm just having a bad month with programs.
But here it is and you BETTER appreciate the effort to show it!!! LOL!
I need to reteach myself a lot of the programs; I don't use them enough. And I suspect I better clean up my Mac. It's running slower and even a Mac can get clutterred.
Anyway, I went out to dig the first of 9 holes to set pipes into to construct the enclosed garden (safe from squirrels, groundhogs, rabbits, etc). After I dug down 4" in the 1st spot, I hit rock. And I don't mean little baseball-sized ones. I dug a 2' hole around that rock and couldn't find the edge. So I tried the next spot where I wanted to set in a pipe. Same problem. I even tried breaking the rock up with repeated blows to it with a 5' beveled "breaker bar". And nothing broke. I caused no damage to the rock at all.
You never know what is under your ground until you start digging into it! In my case, I knew from some experience that my property is a silt plain draining to a swamp. There are pockets of pure sand, some of pure clay, and lots of hand-sized round rocks. I didn't know about the 2'+ rocks...
I think a geologist would conclude my property used to be a river path, with large rocks just under the surface that silted over with sand and clay millenia ago.
I can't dig those up, I can't use an auger to drill through them, I can't ignore them.
Well, wait, I CAN ignore them! The purpose of digging the holes around the garden-to-be is merely to set the upright PVC pipes in place. So what if I build a base of PVC pipes ON the ground instead of INTO the ground?
Instead of burying pipes in the ground, I'll make a frame of pipes on the ground with attachment connections sticking up. And I can attach the ground level PVC pipes to the ground firmly with 2' rebar rods.
Newest problen solved... I assume I will discover other problems before the structure is completed, but nothing that can't be overcome. Well, solving the problems is half the fun.
The initial plan was to assemble the upright pipes and then assemble the beds after. The plan NOW is to assemble the first 2 raised beds to establish one edge of the new layout, fill them with soil, then disassemble the other old framed beds, and clear THAT area for new construction and move the remaining soil from the older beds to the new ones as I move along.
I know this is hard to imagine without pictures. I'll be taking many as the project continues. Promise.
But at least I am getting started on it again and solving the problems I didn't expect.
Wednesday, September 10, 2014
A Food Interlude
I've been talking about losses, finances, and projects too much lately. There is also food...
The medical charts I see say I should weigh 153 pounds. I weighed 162 this morning, but its hard to get rid of those last pounds. I don't worry about that TOO much. The insurance charts say people about my weight over the medical charts live longer. Living longer seems good.
But let's talk food here. And not lots of it, but GOOD food! And I don't mean really fancy food either. I mean just good basic food. I like fresh food I prepare myself. I don't mean that I grow and grind the wheat for the bread for my sandwiches or anything like that. But I do grow some food myself and shop mostly through the produce department of the local Safeway and bake some great bread (with my bread machine and lots of herbs and spices). I buy my meat at a local butcher and liquor shop (it's an interesting place).
My garden wasn't much this year, as I am tearing it up to rebuild it. But I did manage to grow bicolor corn, russian fingerling potatoes, and leeks in containers, and cukes and italian flat beans around cages in the old asparagus bed.
So here's what happened yesterday...
I cooked 3 chicken thighs (bone in for additional flavor) in the oven, and the thighs were coated in my home-mixed "shake and bake" . I like thighs because they have more flavor and you can't really overcook them (anything from 175 to 190 is "just fine"). I had a small ear of corn-on-the-cob from my garden. I won't get many, but they sure are sweet straight from the cornstalk. I picked a dozen flat italian beans and simmered them 4 minutes dropping in the ear of corn after 1 minute. I made a salad of a home-grown heirloom Aunt Gertie's Gold tomato, a home-grown 4" (and therefore seedless) cucumber, and a slice of a vidalia onion (purchased) and minced, with home-made italian dressing. And I had a dessert of cut-up fresh peach, strawberry, green grapes, cantelope, a navel orange, and a plum. With 2 glasses of old vine zinfandel...
And with a dark chocolate and a white chocolate Lindor truffle and a Dove caramel...
While watching my local Washington Nationals baseball team beat our closest rivals again, (sorry to all you Atlanta Braves fans) on TV and Marley AND Iza on my lap and feet... Wearing fleece-lined leather slippers...

As far as I'm concerned, it doesn't get better than that.
The medical charts I see say I should weigh 153 pounds. I weighed 162 this morning, but its hard to get rid of those last pounds. I don't worry about that TOO much. The insurance charts say people about my weight over the medical charts live longer. Living longer seems good.
But let's talk food here. And not lots of it, but GOOD food! And I don't mean really fancy food either. I mean just good basic food. I like fresh food I prepare myself. I don't mean that I grow and grind the wheat for the bread for my sandwiches or anything like that. But I do grow some food myself and shop mostly through the produce department of the local Safeway and bake some great bread (with my bread machine and lots of herbs and spices). I buy my meat at a local butcher and liquor shop (it's an interesting place).
My garden wasn't much this year, as I am tearing it up to rebuild it. But I did manage to grow bicolor corn, russian fingerling potatoes, and leeks in containers, and cukes and italian flat beans around cages in the old asparagus bed.
So here's what happened yesterday...
I cooked 3 chicken thighs (bone in for additional flavor) in the oven, and the thighs were coated in my home-mixed "shake and bake" . I like thighs because they have more flavor and you can't really overcook them (anything from 175 to 190 is "just fine"). I had a small ear of corn-on-the-cob from my garden. I won't get many, but they sure are sweet straight from the cornstalk. I picked a dozen flat italian beans and simmered them 4 minutes dropping in the ear of corn after 1 minute. I made a salad of a home-grown heirloom Aunt Gertie's Gold tomato, a home-grown 4" (and therefore seedless) cucumber, and a slice of a vidalia onion (purchased) and minced, with home-made italian dressing. And I had a dessert of cut-up fresh peach, strawberry, green grapes, cantelope, a navel orange, and a plum. With 2 glasses of old vine zinfandel...
And with a dark chocolate and a white chocolate Lindor truffle and a Dove caramel...
While watching my local Washington Nationals baseball team beat our closest rivals again, (sorry to all you Atlanta Braves fans) on TV and Marley AND Iza on my lap and feet... Wearing fleece-lined leather slippers...
As far as I'm concerned, it doesn't get better than that.
Subscribe to:
Posts (Atom)
-
 I think I have it figured out now. I needed basic frame strength (cubes) plus top support (arches with a ridgepole) for shedding rain and s...
 -
I like to plant Pansies in the Fall. I replace the dead Tomatos and deck pot flowers with them most years. Best deal I found was 12-packs ...