Today, I set about making holes in the base (F) and slots in the upper shelf (E) for the rods to rest in. After 2 hours of careful work, the only thing I can say is *#>&@*
Translated, that means "OOPS". It happens to me in every project. I do something that seems right but that has a flaw and/or I mismeasure something. On this project, I managed to do both at the same time...
The base has holes halfway through for the butt end on the rods. Some are fat, some medium, and some thin. So I decided to drill them to fit. I put paper tape on the base (so I could mark on it) and measured out the centerpoints. Then to be absolutely sure the shelf slots would match the base holes, I put the boards edge to edge and used a square to mark the shelf slots.
I drilled the holes in the base. The forstner bits are great for large flat holes. It looked great! Then I drilled half-holes in the upper shelf.
I was very careful about that. I used a sacrificial board underneath (because they were through-holes) to prevent tearout. I drilled a test hole in a piece of scrap board. I got some tearout anyway. Well that's the bottom side, so I decided to live with it.
That's part of the *#>&@*< feeling. Because of the way I transferred the base centerpoints to the shelf, the bottom of the shelf as I drilled it would actually be the top side when assembled!
So, when I put the cleancut side of the shelf "up", this is what I saw.
When I switched it so the holes matched up, the tearout side was "up".
And then I noticed that one of the shelf holes was 1/4" offset!
ARGGGGH! I am NOT a happy camper right now. Luckily, I have another 4" board. I'll remake the shelf tomorrow. This time, I'll know to put the shelf board ON TOP OF the base, not NEXT TO it when I transfer the centerpoints...
Monday, August 31, 2009
Sunday, August 30, 2009
Fishing Rod Rack Project, Part 2
OK! The base glued together well and only needed a little scraping on the edges for minor glue squeezeout. I used a finishing sander for good measure.
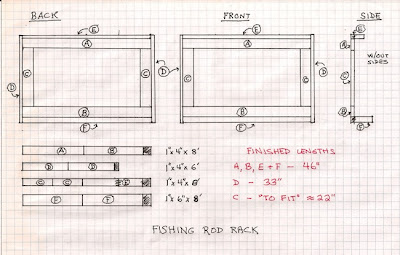
The first thing to do today was to make the cross boards EXACTLY the same lengths. I trimmed one end of the base board (F) on the table saw, then cut it 46". I used that to mark the lengths of boards A, B, and E. I tried to figure out a way to set up a "stop" on the miter gauge, but the fence can only get 30" from the table saw blade and the miter gauge isn't long enough on the other side of the blade to set up one there.
I could have set up a stop on the radial arm saw bench, but it seems to be about 1/4 degree out of square and I can't seem to adjust it any better than that. Oh well, it is good for rough deck and fence work, if not for cabinetry.
So I trimmed the pieces to size as best I could. When I stacked them all together even at one end, they were within 1/64" at the other. I clamped the stack together and power sanded the difference smooth. They ended up perfect.
I trimmed the sides (D) to 33" and am ready to start putting the frame together (Boards A, B, D and D).
I also need to rout slots into board E and drill 1 1/4" holes with forstner bits 1" deep into board F. But it is time for dinner, and I like to have wine with dinner, so there won't be any more woodworking tonight!
Saturday, August 29, 2009
Fishing Rod Rack Project
FISHING ROD RACK
After having my fishing rods leaning against the garage wall for years, and having them all fall over whenever one got bumped, I decided I needed a rod rack. I looked at some for purchase but I didn't like any of them (all were either too cute, way too fancy, or held too few rods). Besides, why buy when you can build?
So I sat down to design one. My 1st design had all the rods standing straight up through holes, but I realized they would all lean slightly in different angles. Functional, but aesthetically unpleasing...
So I tried again. This time, I decided to have them set in holes in the base and lean into slots in a higher shelf. That would have them all at a consistent angle. It took a while to find a height for the upper shelf where no ferrules would be in the way. And I reworked the design a couple of times to make sure the construction was solid.
So here is what I came up with (double-click the picture for enlargement):
I was surprised to notice that the front and back views are identical. I was also trying to use boards I already had, so the 2" base is actually two 1" boards glued together.
So I laid out my boards:
Most of the boards needed to be cut approximately in half. That was too long for my table saw (because of the Incra Fence), but my old radial saw has plenty of room. Since there is at least 2" of waste on each board, I could cut them all oversize (the radial arm saw does not seem to cut as squarely as the table saw).
Boards A, B, E, and F have to all be exactly the same length, so I glued up the 2 boards for F (the base) and left it until tomorrow.
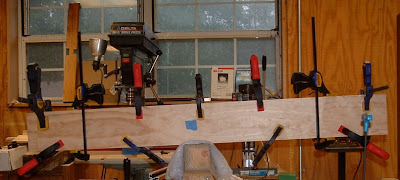
You can never have too many clamps. LOL!
Monday, August 17, 2009
Poison Ivy Update
Most of the poison ivy I sprayed last week is dying nicely. But that damn big shrubby one over the fence is reluctant to die. I'll have to give it another spraying (or two). But it is supposed to rain later today, so I'll have to wait.
That tall weed with the purple berries I couldn't remember the name of is "Pokeweed". It isn't the worst weed around here, but it is very large so it stands out. And it is hard to dig up because it has a large swollen root about a foot deep.
The worst one I have is mock strawberry. It grows EVERYWHERE. It isn't hard to kill individually because it depends on a surface stem-knot, but when there are 1,000s it is a real pain. And the birds love the fruits so there is always a new supply of them scatterred everywhere. They get into the thick groundcovers so well that they are nearly impossible to pick out.
I had to finally dig out a large area of ground-cover sedums and dianthus becuase I simply could not get all the mock strawberries out and they just kept growing back (I was able to carefully pick a dozen sedum clean of the "mocks" and replant them. They are spreading again well.
Among the poison ivy, the mock strawberry, the honeysuckle, and the pokeweed, I could go crazy. At least I don't have kudzu!
Friday, August 14, 2009
Lack of Rain
The Weather Channel predicted 30-50% chance of thunderstorms EVERY day this past week. I got 1/4" once! So I spent the day watering the garden, flowerbeds, and even some small trees. I realize a 30-50% chance isn't a promise (they do their best), but I should have gotten more than 1/4" once...
On the other hand, it was a nice day (82F) so it was nice to be outside with the cats. It could have been 97F and humid like a few days ago...
We are almost through the "dog days" so things will cool down and rain a bit more often soon. I shouldn't complain. We had no day over 100F and not only did the lawn soil not dry up and crack open, the grass even stayed (mostly) green! It's not often I have to mow the lawn in August.
By the way, "dog days" has nothing to do with our canine friends panting in the heat. The term comes from the fact that the constellation Canis Major (Big Dog) rises just ahead of the sun at this time of year. So our ancestors in the Northern Hemisphere knew that the hottest days were arriving in mid July. It was once thought that Sirius, the brightest star in the sky, was so bright that it added heat to the day. Well, good thought, but it is just the tilt of the Earth in the Northern half...
The corn failed though. 3' high and it tasselled. 4" ears that may or may not kernel out. I guess I still don't have enough sunlight for corn. At least the tomatoes, cukes and beans are doing well. From 8 tomato plants, I am getting several ripe fruits per day. I am losing many to Blossom End Rot (something I usually only have on the 1st few fruits of the year). I don't know why that is a problem this year. I added plenty of compost to the soil, and I gave them foliar spray several times. I even added saved eggshells for the calcium.
Thursday, August 13, 2009
Another Front Landscape Box Update
The Caladiums are really taking off! I was worried about them at first, because they seemed to be coming up so thinly. I thought most of them weren't going to grow. The 1st few emerged July 10th like nervous mice.
But look at it NOW!
And there are still more just emerging!
It's nice when some project you are unsure about works out well...
But look at it NOW!
And there are still more just emerging!
It's nice when some project you are unsure about works out well...
Tuesday, August 11, 2009
Fishing Boat Renovation
I have a 16' jon boat. It's 16 years old, but in good shape. But I got tired of replacing the rotting plywood floors every few years. So this Spring, I bought plate aluminum, attached good outdoor carpet to the aluminum, added some additional support under it, and mounted swivel seats.
But the current project was the trailer, which is the same age. I hadn't used it in 3 years, the tires were sitting a muddy spot all that time, the spare wheel bolts were rusted onto the frame, and the coupler was so rusted I had to stomp on it to get the latch to shut. I tried to repack the axles with fresh grease, but the grease fitting was so corroded I couldn't even attach it.
So THIS project was to take the trailer to a trailer store and say "FIX IT"! Sometimes you have to turn a project over to experienced people with specialized tools. For example, they admitted they had to use some serious equipment to break the old bearing buddies loose...
They put on a new coupler, new tires (the rims were OK), a new spare rim&tire (the tire was dry-rotted, cleaned out all the old grease, replaced the seals, repacked the grease, and put on new "bearing buddie". I even bought a keyed trailer coupler lock. I was tired of having to get my reading glasses and a flashlight out to open the lock in the dark when I got home.
I'm ready to go fishing! Now, if the weather would just cool down a bit...
Sunday, August 9, 2009
Poison Ivy
I have a perpetual problem with poison ivy, so yesterday was "Seek & Destroy Day". Most of it comes in from the neighbors' yards (4 of 5 sides of me - I have a home plate shaped yard with 2 back neighbors). I have mentioned this problem to all 4 neighbors, but they say they just avoid those patches. So it gradually creeps through my fence and spreads when I'm not looking. Two of the neighbors had poison ivy vines that matured and produce berries, so I get some individual plants growing in the middle of the yard (half of my back yard is semi-wild). I even get some under the deck. How a berry gets under the deck is beyond me...
So I mixed up some Brush-B-Gon and went on patrol. I had to carry the 2 gallon sprayer by hand because there is a slow drip I need to fix. I have a shoulder strap, but it dripped on me that way. My left arm is still sore!
Well, I must have sprayed 100 individual (small) plants, counting neighbor's plants for as far as I could spray through the fence. I was surprised to realize that what I thought was a neighbor's shrub was actually poison ivy! I covered it thoroughly!
I am always careful to choose a calm day and stand upwind from the spot I am spraying. And BTW, if you smoke, this is a good time to do it. The smoke alerts me to any slight shift in wind direction (and therefore spray drift). More than once I have suddenly had to back away from a spot quickly because of a mild wind shift.
I also make it a point to hose down my garden area afterwards, just in case of drift. And I keep the cats inside the whole day after. I wear disposable latex gloves, too.
As long as I had extra spray. I took the opportunity to knock off some plant I had too many of and I can never remember the name of. It has large leaves, purple berries, grows to about 6' high, has a weak stalk, and has a large swollen root (corm, rhizome, whatever). It is easy to break it, but the root seems immortal. Fortunately, it dies quickly when sprayed.
Having some still left over, I sprayed my driveway because I'm tired of mowing it. I should explain... The driveway is asphault, is 23 years old and I have never resurfaced it. There were a few spots where grass established itself in cracks a few years ago, but this year it seems to have really exploded.
I think I will replace it with concrete soon. But for now, just killing the grass would be nice.
Monday, July 20, 2009
Watering and Weeding
The weather has been very weird here this year. It rained almost every day in May and most of June. Then it stopped utterly. I was so used to the soil being well watered that I didn't think about it when it didn't rain for 3 weeks.
The Cucumbers wilted, so I watered them. Then I tried to push a finger into the soil next to the tomatoes and couldn't! So I spent the past 2 days watering everything. I don't water the lawn, often. If it goes dormant, that's fine; it always comes back.
But I gave the vegetable garden and the flowerbeds a good soaking. The veggies are in separate framed beds, so I don't want to water the spaces between. The flowerbeds are about 8' wide, and I don't have any sprinkler system the waters so narrowly. I have some drip hoses, but they are unimagimably slow and don't work evenly.
So, I did it by hand. By spading fork actually...
A few years ago, I discovered that the fan hose-end nozzle fit in the handle of my D-shaped spading fork. It occurred to me I could just set it in there and drive the spade fork into the ground to shower an area many minutes at a time.
It works great. I keep a kithchen timer in my pocket, set it for 4 minutes, and weed a dry area of the garden while the water showers down on the other parts. The fan sprayer nozzle is perfect for 6-8' deep beds and almost all the water goes to the plants. The timer gives me consistent watering.
To all you gardeners out there, don't worry, I watered the tomatoes and such by hand only at ground level. I know about the diseases that wet plants can get.
I also watered the flowers at mid-day when they were sure to dry off the leaves before evening...
It took most of 2 days to do it.
But everything seems recuperated now, and it is supposed to rain a couple times next week. Yay! The lawn needs it and the garden/flowers will appreciate it!
Wednesday, July 15, 2009
Harvest Time, Finally
Well, I spent a few days weeding the garden and flowerbed. Nothing worth taking a picture of or posting about. But I was amply rewarded!
I picked my 1st 2 tomatoes and a cucumber.
Some years ago, I started growing heirloom Brandywine tomatoes. They were so superior to even the best home-grown hybrid tomatoes that I finally stopped bothering to grow even Celebrity and Big Beef (the best tasting hybrids). I've expanded to include Cherokee Purple, Prudens Purple, Caspian Pink, Tennessee Britches, and Aunt Gerties Gold.
While Brandywine routinely wins taste tests, I consider Cherokee Purple the best heirloom tomato. Brandywine is both sweet and acidic, but it is not very productive and it succumbs to disease too easily. Cherokee Purple has a more complex taste, and it is meaty, productive, and stays healthier.
Here is the Cherokee Purple, cut open (as well as the cucumber - note the small seeds):
Subscribe to:
Posts (Atom)
Election
Well, I guess I'm ready to vote. Most of my choices were settled months ago, but there were some local elections and ballot questions ...