Wednesday, April 21, 2010

Update

Well, with the weather turning unseasonably cool and wet, I haven't put the tomato seedlings in the new framed bed.    I'll wait a few days.

At the same time, I suddenly got it in my mind to renovate the 2 ponds...  The small preformed one had 3 goldfish, but they died.  I decided to pull all the potted lilies and sweet flag out.  Ack, the roots filled the entire pond!  No wonder the fish died.    It took a day to chop the roots apart into pieces I could pull out!

The larger pond (10' diameter and 2' deep) has a liner that developed holes 2 years ago.  I had avoided replacing the liner because it was covered with heavy rocks.  When I put them in place 15 years ago, I could lift them.  Now I can't.  But I put everything onto the effort yesterday and rolled every one out of the way at least off the liner top.  I'll detail each project as I can and take pictures, but it looks like crummy cold wet weather through the weekend.  May be a few days.

Just wanted to let you all know I am still here and working on projects, just having weather delays...

Just to help, here are my tomato seedlings and a few flats of annual flowers I'm growing from seed.
They are  a bit tall because they don't fit under the grow lights anymore. but that's OK because I plant them deep (for those who don't know, tomatoes develop roots from all buried stem).  And next weekend is the normal time to put them out around here.  I just got excited because the weather was unusually warm last week and I thought it was going to stay that way.

There are flats of annuals too.
Simple stuff like marigolds, forget-me-nots, impatiens,  carnations, etc to fill in holes in the perennial beds while I think about them this season.

I've realized I had too many spots of just a few perennials, and I want to have more of the ones that do well here.  I mean, instead of having a few square feet of a dozen different plants, I want 100 square feet each of a few good ones.

And while I have ordered some additional perennials of the ones that are doing well, I've left spots for annuals this year while I make a final evaluation.

Monday, April 19, 2010

"New" Raised Planting Bed, Part 2

I got a good start on finishing the "new" framed bed today.  Here is where I left off yesterday...


So I added another layer of the old garden soil...


Added more composted mulch...

Leveled it all out, and added a last layer of garden soil...


It was finally time to finish the project by adding the red reflective plastic (the tomatoes love it)...
The bed will hold 4 heirloom tomatoes in 24" diameter remesh cages.  I will tuck a few basil plants around them on the sunnier side.  It was way too windy to plant them today.  I've been hardening them to outside conditions gradually for a week, but the wind was vicious.  Stuff was blowing off the deck...

I've been debating whether to use the "wall o' waters" this year.  Next week is the average last frost date, but we haven't had a frost since February.  On the other hand, the warmer the better for early tomatoes.  The wall o' waters means a little less sunlight, but the warmth and the wind protection is worthwhile.  I guess I will use them this year.

I'll dig the holes for the tomatoes first, set up and fill the wall o' waters tomorrow, then let them warm up a full day.  Then plant the tomatoes the next morning.  The soil temperature is up over 60 F, so they won't mind being planted.  But wind can just dehydrate them so badly when they are getting established!

Saturday, April 17, 2010

"New" Raised Planting Bed

It's time to plant my tomatoes!  So I looked around the garden for a place I hadn't planted them in for a few years.  No luck!  Part of the problem is the tool shed I had a contractor build 5 years ago (concrete pad, cinder block foundation, standard pitched roof - I wasn't going to try that on my own) is that it shades 2 of the framed beds.  I haven't been able to use them for 5 years.  But that means they haven't had any crops in them either!

Here's the general picture of the garden.  It doesn't show the whole garden well.  There are six of the 8x3 frames, two 3x3 frames, and a 30x2 trellised bed.  The mailbox is a very convenient place to store small hand tools (try it, you'll love it).


Two of my framed raised beds were put in shadows because of that shed, so It was time to take action!  Rather than build new beds, I decided to simply move the two.  It didn't seem like a big deal.  Just lift off the frame, move it, and transfer the soil...

Yeah, right...  I tried just lifting the old frame off the bed, but it wouldn't move.  I pried under it with a crowbar, and that didn't help.

So, I decided to remove the braces holding the frame together and move each level of the framed bed one by one to a sunny spot.  The frames are 8' by 3' of 2x4s, so the whole bed is about 10" deep.  I had 1" by 4" vertical boards holding the 3 levels together.  The boards are all pressure-treated pine.  I wouldn't have used that had I known about the dangers 20 years ago but I figure that after that many years, there isn't much chemical to leach out.

The next generation of raised beds will be made of plastic or composite material, but that's a project for a few years from now when I rebuild ALL the framed beds.

So here is the progress so far:

I removed the frame layer by layer...

I covered the bottom with several overlapping layers of newspaper...
Started adding soil from the old location (see the unframed soil above the new location?)


Then I went to my "free compost" pile.  The county provides free shredded mulch (you come, they load, you haul), and I make it a point to get an extra load each year to cover and let break down for a year or 2.  This season's pile was barely recognizable are "mulch".  It is more like rough compost.  The outside is still "mulchy", but the inside is composted.

I added 2 inches of that...


Then more of the old bed soil, and leveled it...  You can see the old bed soil disappearing.  I added the vertical braces back to the the frame (before the soil got too high).

And that's where I stopped for the day.   I only spent a couple hours at it, but it was a good start.  Sometimes, the hardest part of any project is just beginning it.  After, that, momentum takes over (you do feel compelled to finish it).  LOL!

Monday, April 12, 2010

The "Project" We All Hate

Income Tax Preparation Day - Who loves it?  I could have done it earlier, but at least I didn't put it off to the very last day, like some people do.

I've used software for it the past 3 years.  It isn't really any faster, but it sure is EASIER!  And it saves money.  And writing!  The last is because I have to make an effort these days to write legibly.  The "easier" part is that the software imports all the basic data from the previous year's file (you do get to review and change it) AND you just answer "interview" type questions and the software puts the answers in the correct places on the tax form.  It also provides a lot of examples of the items to be included on each tax form line.

I especially like that the software does both Federal AND State forms (the Maryland tax form is worse than the Federal one).

Printing out the forms is wonderful.  I was able to print out all the backup forms and worksheets for my files, so everything is well-documented.

The "saving money" part is most appreciated.  The first year, I did the taxes by hand and then compared that to my software-provided return.  I saved about $600 with the software!  Not any sleazy tricks, just things I didn't understand or hadn't known about before.  I was very careful to research the savings the first year, but they were indeed legitimate.  Mostly, those were details of reportable stock and dividend exclusions.  I can discuss a lot of subjects knowledgeably, but financial terminology drives me crazy!

I have even learned (too late) about credits I could have applied in the past that I knew nothing about.

The "it isn't really any faster...  Actual preparation is faster, but it does take time to buy and download the software, save and print the forms and backup worksheets, and answer some of the questions you automatically know don't apply.  From start to finish, it took exactly 3 hours, 2 beers, and 1 pack of cigarettes.  About the same as "before software".  But so much easier.  And I am more confident the submission is valid and accurate.

The software cost $60 (Federal and State), but it was well worth it.  Next year, I'll try to remember to do it in March!  LOL!

Saturday, April 10, 2010

Storm Drain and Drainage Easement

The Drainage Easement has been the mild bane of my existence.  A constant itch I can never solve.  If you ever read the phrase "drainage easement" in a house you want to buy, go elsewhere! 

When I moved here, 25 years ago, there was a drainage easement on one side of the property.  It divided the 2 properties.  That makes it joint responsibility.  You DON'T WANT THAT.  Your neighbor will NEVER want to do what you want to.

In my case, my yard is lower than the neighbor's.  So when it floods, it is only MY problem.

Well, I woke up this morning and heard heavy equipment running outside.  It was county people cleaning the storm drain at the bottom of the drainage easement!  I got dressed fast and ran outside to see what they were doing. 

Some background...  A storm last Winter washed down tree branches that got so interwoven over the storm drain that I could not pull them apart.  Then leaves and dirt piled on top and made a dam.  Half my front lawn is sodden.  I mean squishy to walk on like a bog.

Coincidence:  I wrote up a list of things to do this week and the 1st item was to contact an excavator to dredge the easement.  The storm drain itself is untouchable county property.  But I was going to contact them about that.

My neighbor beat me to that.  He is selling his house and called the county to clear the storm drain.  Yay!


I noticed that they had shoveled the drainage path 5' upstream, so I asked if they could use their bucket dredge to deepen it.  No go.  They only own that 5' upstream.  The rest is mine and the neighbor.  I've looked at the drainage easment.  It is silted up almost 2' because the (idiot) neighbor planted willow trees along it.  Willow tree roots LOVE water and grow thick and trap dirt.


When I saw him planting the willows 15 years ago, I begged him not to for that reason.  He ignored me.  Why not?  The problem would all be mine. 

Now, they are trying to sell their house.  I'm a good neighbor.  If the county cleared the storm drain, I can clean up my corner of the yard.  I spent 2 hours clearing the brush from the boggy corner. 

Before:


After:


Here's the view from the street. best in at least 10 years!


Since I had the pruning saw and loppers out, I took out several saplings that had chosen to grow up through some shrubs.  But no pictures of that.  Just happy to have gotten THOSE spots off my list.

Next, the "ugly corner of the yard where I used to stack firewood and has grown all brushy"...

Friday, April 9, 2010

Garden Started Outside

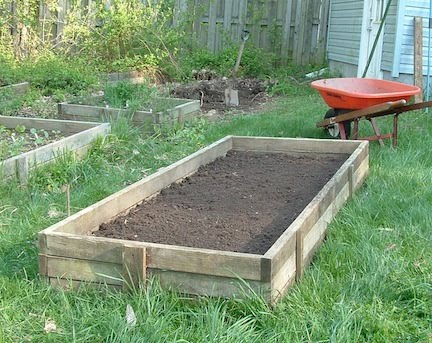
Finally, stuff planted outside!

Well, I did get the snow peas planted outside 3 weeks ago and they are emerging well.

But the other stuff had to wait.  I should mention that I love "square foot gardening".  Well, it's just me here, so I don't need much of anything at one time.  Can you just imagine me using a 20' row of cabbage all at once?  LOL!

So I plant in square feet individually in succession, as long as the season permits and then for Fall too.  So right now, I have individual intensive plantings of carrots, 2 kinds of radish, spinach, beets, shallots, scallions, chinese cabbage, and kohlrabi.  I have leeks ready to transplant in 2 weeks.

Nothing but labels right now, though there are seedlings emerging everywhere but the spinach.  I had no luck with that last year; it may be the seeds.

My garlic planted last Fall is doing well...  They are on the opposite side of the trellis from all the small crops.

My cole crops are looking good as transplants.  I gave the seeds better light this year and it shows.  This year I have broccoli, cabbage and radicchio.  I'll be trying brussels sprouts as a Fall crop this year; it just doesn't work here planted in Spring.

I know it looks like so little, but 3 of each will keep me for a month and I have succession plantings scheduled for 2 weeks.  I will start more of them for a Fall harvest too.

My small herb garden, planted last year, is doing great!  I have parsley, tarragon, thyme, chives,  sage.  And I am growing the few annual basil plants.

 I am even trying celery and parsnips, but it is too early for transplants or direct seeding.

The more regular veggies have to wait for a few weeks.  My heirloom tomatoes are great this year.  They are short and compact with good stems.  I have transplanted them once indoors  and they will go out in 2 weeks.  I have red, yellow, orange, and lilac sweet bell peppers ready to go in early May.

There will be flat Italian pole beans, cukes, 3 kinds of melons, squashes later. but that's for May days, not April around here.

And I have 6 flats of annual flowers going now.  THAT should brighten up the garden.  I love my perennials, but only annuals give a backbone of lasting color and I am using more this year.  And I can plant them in different places next year for a change of appearance.  Salvias, marigolds, forget-me-nots,  impatiens, and coleus.  Nothing special, just some plants to lock in season-long color in varying light conditions.

There are a few perennials I am ordering more of this year.  Some that grew well where I put them and I plan to make larger areas of those successful plants.  The stokesias and troillus did well, so more of them .  My flowerbed was too full of too many small groups of flowers.  I want larger areas of those that do well here.  Instead of 6 square feet of something; 60!  That's still only 6' x 10' per plant!

My total long flowerbed is about 100' by 10', so there is plenty of room.

Thursday, April 8, 2010

Flowerbed Problem

Sometimes, perennial flowerbeds just DIE.  Oh sure, there are often 2 of 12 plants that don't return and need to be replaced.  But I mean a place where, for no known reason, an entire area just DIES...

Last year, this spot was filled with columbines and coreopsis.  They seemed healthy at the end of the year!  They are are up and 6" tall in other spots in the garden.  But they are just completely gone here.


What you see there are winter weeds.  Purple deadnettle or something like that.  I've pulled them up relentlessly before they flower in years past, but they seem unstoppable.  Yet, they shouldn't make any difference.  I mean, they shouldn't be stopping any perennials from growing back in Spring.

I'll give them several weeks to show up, then I'm scraping the surface a few inch deep with the spade and then planting annuals (hmmm, maybe tomatoes) this year.  This coming winter, I'll cover the hole area with black plastic and kill all the winter weeds.

Sometimes bad things happen and you just have to start again...

Wednesday, April 7, 2010

Spring Has Sprung, Part 3

This time, I'm showing off the daffodils.  Daffodils love it here and thrive.  Tulips are only good for a couple years between the climate and shade.  Hyacinths last a few more years, but after 5 they are barely noticible.  Thankfully, there are many more color combinations of daffodils than 20 years ago.

The collection is a bit of a mess.  I started with the idea of many different daffodils plants in individual clumps and expected them to spread.  In follwing years, I planted more where I didn't think any were planted previously.  As you will see, my memory of spots isn't that good.  But I do have a lot of color.

And this year was unique.  Most years, the various daffodils bloom at different times from mid March to early May.  This year, they mostly all bloomed at the same time.  Nice for quantity, but confusing for appearance.

Here are some pictures from different directions.  Usually, there would be fewer flowers at a time, but more similar-looking then.  This year is a riot of blooms of all kinds...

But because there are so many colors all together, here are some individual pictures...

 So it was one of the more spectacular booming years...

The tulips linger in places that suit them best, but they only last 2-3 years here.


This spot had 24 in Spring 2008, but there are only these few left.  It is getting too warm for them in southern MD...  I had some nice Rembrandt tulips bloom, they came and went in only 3 days.  They probably won't return next year.  Sigh...

Still, I sure am enjoying this years bounty of blooms!

Tuesday, April 6, 2010

Spring Has Sprung, Part 2

Though I have started some yard projects, I wanted to catch up on pictures of Spring before they get too old to mention...

Today, I have pictures of my 2 saucer magnolia trees.  There's a back story.  When I got a new job in central Washington DC in 1984, I saw some trees that just entranced me.  No, not the famous cherry trees (though they are magnificent.  But there was a small park across the street from my office.  Every Spring, these twisted gnarly trees would fill with large 6" pink blooms that just amazed me.  It took 4 years to learn what kind of tree they were.  When I found out, I bought two.  One for the front yard and one for the back yard.

I have tried to shape them, something I am inexperienced at, but I do it judiciously with the much older professionally-maintained DC trees in mind.  It isn't easy.  I suspect the DC trees were treated like large Bonzai trees with wires bending the branches into contorted gnarls.  I'm still working on that.  Each Spring, I work on opening the center of the tree and creating angles in the branches.

The Backyard Tree:  This one gets more sun, so has grown to about 15' high in 20 years.  I have gotten some shape by bending down some branches with cinder blocks.  And I see that, slowly, I need to limb up the tree so that I can walk under it safely.  It will spread wide and strongly as it ages.  But here is the current tree...


As you can see, I've left many lower branches on for photosynthesis.  I think this Fall I can remove the lowest limbs after dormancy.  Plus, I think part if the design technique is to remove most of the interior twigs along the branches, leaving all the outermost.

The Frontyard Tree:  This one is partially shaded, so it is smaller; only 10' tall.  It suffered some loss last year when I had a contractor drive a vehicle into the back yard.  When I planted it, I thought it was far enough away from the huge old oak for a vehicle to pass, but I had to remove some branches on one side.


I plan to encourage some of the tallest branches to grow to the right, but above the height of a vehicle.  I do have reasons for standard vehicles to get past it to the backyard every couple of years, yet I to want it to appear more balanced than it currently is.

Of course, from other views, it is quite shapely.  This is the view visitors get, so it's not bad.

Even then, the lower limbs need to be slowly trimmed upwards.  This is a tree you should walk under, not around.

And by the way, you see that large rock near the tree?  I had that delivered 4 years ago, planning to create an flowerbed island around it and the tree.  I'll be doing that this year.  I'm planning to take some old carpet and cut it to shape.  If I do it soon, that should kill all the grass by Fall.  I'll remove the carpet, plant daffodils there in the Fall, mulch in heavily, then plant perennials next Spring.  Or maybe annuals so that I can change the colors each year.

Thursday, April 1, 2010

Spring Has Sprung

It is time to start projects again.  I'm just not good at doing stuff during Winter.  Even indoors.  It's weird.

But every Spring starts off with "Spring Cleaning".  This time, the major kickoff event was TRASH DAY.  I should explain.  I don't pay for regular trash pickup, because I only generate 1 bag per month of households trash and 1 small bag of kitty litter.  At $35/month for scheduled trash pickup, that's hard to accept.

So, since I regularly have stuff to bring to the recycling center (which is also the landfill), I just pay for trash weight at the same time.  They have a flat fee of only $5 for all the residential trash you bring.  I DO have curbside recycling, but they don't pick up boxes, bulky metal, etc.  So I end up going to the landfill every few months.

Well, with the snow in Feb/March, and since I was saving winebottles since Oct thinking I might try making my own, I had a real load.

Part of it was my trash.  I compost everything organic and recycle everything possible, so there isn't much per month.  1 bag.  And it doesn't smell. 

The stuff that DOES accumulate is kitty litter.  I buy the new kitty litter in tubs and keep them for the used litter.  Gaze on this and be amazed...


That's 6 months worth of used kitty litter.  I bet ya haven't seen that much ever.   Don't worry, the sealed bags I use prevent any smells...  But still, that's a LOT of used kitty litter, LOL!  300 pounds of it!

The car itself was filled up with boxes, trash, old fluorescent tubes, unrecyclable styrofoam, etc.

I expected an easy delivery process.  Thursday afternoon right after lunch.  Who would be there?  Well, the whole world, it seems.  I forgot this was Spring Break Week and apparently a lot of adults take the week off too.  The line to get IN to the dump was 15 minutes long and the line to get OUT (and pay) was 30 minutes.  I ALWAYS forget that school is out this week...

And then I discovered that the $5 flat fee doesn't apply to trailers!  It cost me $13 instead.  Still, I can't complain much.  6 months of $35 trash pickup would have been $210!  So I'm $197 ahead (minus 1 gallon of gasoline).  That's a lot of steak and wine...

At least the weather was perfect.  70F, sunny, and a light breeze.

Next, Spring is really here and the gardening is underway...

Dr Visit

I put off the annual exams because of Covid, but went today (been 6 years, actually).  More questions from the Dr than I remember from past ...